background image

FR

255

VAS 581 001

Elimination

10

Elimination

10.1

Elimination des liquides récupérés

I

10.2

Recyclage des emballages

Jetez les emballages dans le container pour vieux papiers.

Jetez le matériel d’emballage plastique dans le container adéquat.

10.3

Recyclage de l’appareil usagé

Lorsque vous mettrez votre A/CServiceCenter définitivement hors 
service, vidangez d’abord l’appareil pour éliminer tous les liquides et 
recyclez les liquides en tenant compte des directives relatives à la 
protection de l’environnement.

M

Remettez l’appareil usagé au centre de recyclage le plus proche ou 
adressez-vous au service après-vente.

REMARQUE 

L’huile ancienne doit être recyclée comme un déchet spécial.
Ne mélangez pas l’huile usagée avec d’autres liquides.
Conservez l’huile usagée dans des conteneurs adaptés jusqu’à ce 
qu’elle soit recyclée.

Содержание WAECO VAS 581 001

Страница 1: ...nleitung EN 67 Air conditioning service unit Operating manual ES 131 Estación de mantenimiento de aire acondicionado Instrucciones de uso FR 196 Poste de service climatisation Notice d utilisation RU 262 Станция по обслуживанию кондиционеров Инструкция по эксплуатации ...

Страница 2: ......
Страница 3: ...eCenter im Überblick 13 6 1 Vorderseite 13 6 2 Rückseite und Seitenansicht 14 7 Erste Inbetriebnahme 15 7 1 Ablauf der internen Dichtheitsprüfung 15 7 2 Aufstellen und Einschalten 15 7 3 Stand by Menü 17 7 4 Sprachauswahl 17 7 5 Firmendaten eingeben 18 7 6 Datum und Uhrzeit eingeben 19 7 7 Vorgabewerte ändern 20 7 8 Behälter für Öle und UV Additiv einsetzen 21 7 9 Behältergröße eingeben 22 7 10 Kä...

Страница 4: ...n 50 9 7 Zählerstände 53 9 8 Füllmengenkorrektur bei längeren Serviceschläuchen 54 9 9 Druckerpapier erneuern 55 9 10 Flash Memory Card wechseln 55 9 11 Altölbehälter wechseln 57 9 12 Netzkabel wechseln 59 9 13 Reinigung und Pflege 59 10 Entsorgung 60 10 1 Entsorgung der rückgewonnenen Flüssigkeiten 60 10 2 Verpackungsmaterial entsorgen 60 10 3 Entsorgung des Altgerätes 60 11 Was tun wenn 61 12 Te...

Страница 5: ...h Beachten Sie darüber hinaus auch Das Schulungshandbuch Fahrzeugklimatisierung Technische Grundlagen von Dometic WAECO Die Informationsbroschüre Fahrzeugklimatisierung Gesetzliche Grundlagen von Dometic WAECO Hinweise der Kältemittelhersteller Hinweise auf den Umgang mit brennbaren Gasen z B vom Kältemittelhersteller Eventuell in Ihrem Betrieb vorhandene spezielle Hinweise zur Wartung von Fahrzeu...

Страница 6: ... Beispiel Fett Bezeichnungen die sich auf dem Gerät befinden ENTER drücken Fett Displaymeldungen Schnellstart Text Text Aufzählung in beliebiger Reihen folge Sicherheitsdruckwächter Überdruckventile 1 Text 2 Text 3 Text Handlungsschritte die in der dargestellten Reihenfolge durchgeführt werden müssen 1 Gerät anschließen 2 Gerät einschalten 3 Auswahltaste drücken Text Ergebnis eines Handlungs schri...

Страница 7: ...Personal verwendet werden das eine geeignete technische Ausbildung nachweisen kann und die Wirkungsweise und Grundprinzipien des A CServiceCenters von Kühl oder Klimaanlagen sowie von Kältemittel kennt Bevor Sie das A CServiceCenter zum ersten Mal in Betrieb nehmen lesen Sie diese Bedienungsanleitung aufmerksam durch Benutzen Sie dieses Gerät nur für den angegebenen Verwendungs zweck Führen Sie ke...

Страница 8: ...erheitsventil Entleeren Sie die Serviceschläuche bevor Sie die Anschlüsse lösen Verwenden Sie ausschließlich das Kältemittel R 1234yf Wird das Kälte mittel mit anderen Kältemitteln gemischt kann dies zu Schäden am A CServiceCenter beziehungsweise an der Fahrzeug Klimaanlage führen Verwenden Sie ausschließlich WAECO UV Additive Werden andere UV Additive eingesetzt kann dies zu Schäden am A CService...

Страница 9: ...ltschutzgesetze eingehalten Es wird auch vermieden dass durch das Vorhandensein von Kältemittel in der Umgebung des Geräts das Auffinden von Lecks am Fahrzeug oder am Gerät erschwert wird oder unmöglich ist Atmen Sie die Kältemitteldämpfe nicht ein Die Kältemitteldämpfe sind zwar ungiftig sie verdrängen aber den für die Atmung erforderlichen Sauerstoff Kältemittel darf nicht im Bereich von tiefer ...

Страница 10: ...rung von Servicearbeiten am Gerät Der Betreiber des Geräts muss dafür sorgen dass Personal das mit Service und Reparaturarbeiten sowie der Dichtheitsprüfung beauftragt wird zertifiziert ist im Umgang mit Kältemitteln und Füllanlagen Die Zertifizierung sowie Kenntnisse der geltenen Vorschriften und Normen können in einer Schulung z B bei einer Handwerkskammer einer Industrie und Handelskammer oder ...

Страница 11: ...rden vor dem Versand sorgfältig kontrolliert Kontrollieren Sie nach der Anlieferung ob alle unten genannten Teile vor handen und unbeschädigt sind Informieren Sie bei fehlenden oder beschädigten Teilen umgehend das für den Transport verantwortliche Unternehmen A Bezeichnung Flaschenventiladapter für Kältemittelflaschen Adapter für 500 ml Frischöl und UV Kontrastmittelflasche Geschlossener patentie...

Страница 12: ...sonen erfolgen welche die entsprechenden Fachkenntnisse zur Wartung von Klimaanlagen besitzen Mit dem A CServiceCenter dürfen nur Fahrzeug Klimaanlagen gewartet werden in denen das Kältemittel R 1234yf verwendet wird Das A CServiceCenter ist nur für zugelassene Betriebsstoffe geeignet Bezeichnung Artikel Nr Ersatzfilter mit Filtercode für Wartung 4445900221 Geräteschutzhaube 4445900081 Ersatz Papi...

Страница 13: ...ick 6 1 Vorderseite 1 Niederdruckmanometer 2 Statusleuchte Rot Füllen 3 Statusleuchte Blau Evakuieren 4 Statusleuchte Grün Absaugen 5 Hochdruckmanometer 6 Display 7 Bedientastatur 8 Gasanalyse Einheit 9 Frontabdeckung 10 Feststellbare Vorderräder 14 13 3 4 5 10 8 9 7 6 2 16 12 11 15 1 ...

Страница 14: ...vicekupplung für Hochdruckanschluss rot 14 Servicekupplung für Niederdruckanschluss blau 15 Drucker 16 Anzeigeeinheit 6 2 Rückseite und Seitenansicht 17 Frischöldose nicht im Lieferumfang enthalten 18 Behälter für UV Additiv nicht im Lieferumfang enthalten 19 Patentierter Altölbehälter 20 Abdeckklappe 21 Hauptschalter 22 Lüfter 19 18 17 20 22 21 ...

Страница 15: ...el beauf schlagt jetzt erfolgt ein 6 minütiger Drucktest bei dem sämtliche zugehörige Magnetventile geöffnet bleiben um sofort einen Druck abfall feststellen zu können Nach erfolgreichem Ablauf wird das Kältemittel abgesaugt und das Gerät steht für Servicearbeiten zur Verfügung 7 2 Aufstellen und Einschalten 1 A CServiceCenter zum Arbeitsplatz fahren und Vorderräder 10 feststellen I 2 A CServiceCe...

Страница 16: ...d läuft ein Software Test des A CServiceCenters Danach läuft eine Dichtheitsprüfung Nach erfolgreicher Dichtheitsprüfung zeigt das Gerät das Stand by Menü an I Warten Interner Tankdruck xxxx mbar Für ausreichende Belüftung sorgen Software Test Warten Dichtheitsprüfung Warten Kältemittel g XXXX Frischöl ml XXX UV Additive ml XXX 11 56 35 10 03 15 HINWEIS Errorcodes die bei der Erstinbetriebnahme au...

Страница 17: ...chauswahl 1 Pfeiltasten oder drücken um ins Grundmenü zu gelangen 2 Im Grundmenü mit den Pfeiltasten oder Weitere Menues wählen 3 Zur Bestätigung ENTER drücken 4 Mit der Pfeiltaste Service wählen 5 Zur Bestätigung ENTER drücken 6 Passwort 5264 eingeben 7 Mit den Pfeiltasten oder die gewünschte Sprache wählen 8 Zur Bestätigung ENTER drücken 9 STOP drücken Die gewählte Sprache ist aktiv und das Stan...

Страница 18: ... Im Display erscheint die Zahl der angezeigten Firmendaten Zeile hinter der Meldung Firmendaten eingeben 01 bis 05 Mit den Pfeiltasten oder wird die gewünschte Firmendaten Zeile ausgewählt 7 Mit der Bedientastatur 7 und den Pfeiltasten die gewünschten Daten eingeben Zum Umschalten zwischen Groß oder Kleinbuchstaben die Info Taste drücken Zum Löschen einzelner Zeichen Taste C kurz drücken Zum Lösch...

Страница 19: ... den Pfeiltasten oder Weitere Menues wählen 2 Zur Bestätigung ENTER drücken 3 Mit der Pfeiltaste Service wählen 4 Zur Bestätigung ENTER drücken 5 Passwort 8463 eingeben 6 Mit der Bedientastatur und den Pfeiltasten die gewünschten Daten eingeben 7 Zur Bestätigung ENTER drücken 8 STOP drücken um in das Stand by Menü zu gelangen Schnellstart Einzelne Prozesse Weitere Menues ENTER OK ...

Страница 20: ... wählen 2 Zur Bestätigung ENTER drücken 3 Mit der Pfeiltaste Service wählen 4 Zur Bestätigung ENTER drücken 5 Passwort 3724 eingeben 6 Mit der Bedientastatur und den Pfeiltasten die gewünschten Daten eingeben 7 Zur Bestätigung ENTER drücken 8 STOP drücken um in das Stand by Menü zu gelangen Parameter Vorgabe ab Werk Wartezeit für den Druckanstieg Min 1 Vakuumzeit Min 20 Vakuumkontrollzeit Min 10 F...

Страница 21: ...hälter an den Schnellverschlüssen aufstecken Behälter für frisches Öl 17 Behälter für UV Additiv 18 und Altölbehälter 19 2 Abdeckklappe 20 schließen 3 Behältergröße für Frischöl und UV Kontrastmittel eingeben siehe Kapitel Behältergröße eingeben auf Seite 22 HINWEIS Verwenden Sie ausschließlich für R 1234yf freigegebene Öle und UV Additive Beachten Sie die Hinweise des Fahrzeugherstellers 19 18 17...

Страница 22: ...eingegeben werden 1 Im Grundmenü mit den Pfeiltasten oder Weitere Menues wählen 2 Zur Bestätigung ENTER drücken 3 Mit der Pfeiltaste Service wählen 4 Zur Bestätigung ENTER drücken 5 Passwort 2688 eingeben 6 Mit den Pfeiltasten die gewünschten Felder aktivieren die dunklen Felder sind aktiv 7 Zur Bestätigung ENTER drücken 8 STOP drücken um in das Stand by Menü zu gelangen Schnellstart Einzelne Proz...

Страница 23: ...t 7 10 1 Kältemittelanalyse bestanden Wenn das Kältemittel nicht verunreinigt ist zeigt das A CServiceCenter nach dem Ende der Analyse folgendes an Mit dem A CServiceCenter kann gearbeitet werden HINWEIS Das A CServiceCenter analysiert den Reinheitsgrad des Kältemittels vor dem Absaugen Sollte dieser unter 95 liegen nimmt das Gerät das Kältemittel nicht an Kältemittelanalyse Warm up Bitte warten K...

Страница 24: ...R bestätigen Das A CServiceCenter prüft insgesamt bis zu dreimal Wenn auch der dritte Analysevorgang nicht in Ordnung ist zeigt das A CServiceCenter folgendes an 2 STOP drücken 3 Externes Entsorgungsgerät an den Entsorgungsanschluss anschließen und mit ENTER bestätigen Kältemittelanalyse nicht ok Erneut versuchen ENTER OK Nein Achtung Kein R 1234yf Bedienungsanleitung lesen Entsorgung bereit ENTER...

Страница 25: ...ie Hotline siehe Kapitel Hotline auf Seite 5 ja nein nein nein ja ja A C ServiceCenter i O A C ServiceCenter i O A C ServiceCenter i O 1 Kältemittelanalyse durchführen A C ServiceCenter zur Verifizierung an einer neuen Kältemittelflasche mit R 1234yf anschließen Ergebnis Kältemittel i O Ergebnis Kältemittel i O Ergebnis Kältemittel i O 1 Wiederholung der Kältemittelanalyse 2 Wiederholung der Kälte...

Страница 26: ... Kältemittelflaschen besitzen einen Anschluss Beim Befüllen des A CServiceCenters muss sich der Anschluss oben befinden Flasche aufrecht stellen Kältemittelflaschen mit Steigrohr Diese Kältemittelflaschen besitzen zwei Anschlüsse Zum Befüllen des A CServiceCenters wird der mit L liquid flüssig gekenn zeichnete Anschluss benutzt Beim Befüllen des A CServiceCenters muss sich der Anschluss oben befin...

Страница 27: ...elbehälter wird befüllt Das Ende des Füllvorgangs wird nach der Analyse durch ein akustisches Signal bestätigt Ventile schließen und mit ENTER bestätigen 6 Nach dem Befüllen wird die Menge des Kältemittels im internen Behälter angezeigt STOP drücken um das Menü zu verlassen Um in das Stand by Menü zu gelangen noch einmal STOP drücken Das Gerät ist nun betriebsbereit Int Flasche füllen A C spülen N...

Страница 28: ... SAE J 2099 Prüfung des Druckanstiegs Ablassen des Altöls Evakuieren der Anlage Vor jeder Arbeit an einer Fahrzeugklimaanlage muss eine Dichtheitsprüfung durchgeführt werden Hierzu wird die Klimaanlage mit einer Probefüllung Kältemittel befüllt Über einen Zeitraum von 5 Minuten muss der Druck in der Klimaanlage konstant bleiben Eine vollständige Befüllung der Klimaanlage ist nur möglich wenn diese...

Страница 29: ...chdruck oder Niederdruck Mit ENTER bestätigen Der vollautomatische Klimaservice wird gestartet Während des Klimaservices wird das Kältemittel analysiert siehe Kapitel Kältemittel analysieren auf Seite 23 Nachdem der Klimaservice beendet ist erscheint die Aufforderung die Serviceschläuche 11 und 12 des A CServiceCenters von der Fahrzeug Klimaanlage abzukuppeln 9 Serviceschläuche 11 und 12 abkuppeln...

Страница 30: ...ätigung ENTER drücken 3 Mit der Pfeiltaste Service wählen und mit ENTER bestätigen 4 Passwort 9786 eingeben und mit ENTER bestätigen um ins Administratormenü ADM zu gelangen 5 Administratorcode 0000 Werkseinstellung eingeben und mit ENTER bestätigen I 6 Neuen Administratorcode eingeben Schnellstart Einzelne Prozesse Weitere Menues ENTER OK A C spülen Nullpunkt Waagen Service ENTER OK STOP EXIT Ser...

Страница 31: ... Benutzernamen eingeben und die Eingabe mit ENTER bestätigen I ADM AREA Confirm new code ADM AREA User number 1 ADM AREA User number 1 Insert new code ADM AREA User number 1 Confirm new code HINWEIS Mit der gelben Infotaste lässt sich zwischen Groß und Kleinschreibung umschalten ADM AREA User number 1 User name Max Mustermann ADM AREA User number 1 Max Mustermann HINWEIS Der User ist angelegt und ...

Страница 32: ...zercodes angelegt so muss nun ein Code eingegeben werden um die Station freizugeben 1 Den jeweiligen Benutzercode eingeben Bei Eingabe eines falschen Benutzercodes wird folgender Fehler meldung angezeigt Nach erfolgreicher Eingabe wird die Station freigeschaltet und fährt hoch Der Name des Benutzers wird angezeigt ENTER USER CODE WRONG CODE Max Mustermann ...

Страница 33: ...eiltasten oder Datenbank wählen und mit ENTER bestätigen 5 Personal DB wählen und mit ENTER bestätigen 6 In diese hier leere Datenbank mit den Pfeiltasten oder den jeweiligen Eintrag wählen und mit ENTER bestätigen 7 Zum Ändern der Einträge gelbe Taste Info drücken 8 In die freien Felder die Fahrzeugdaten Modell Typ eingeben und mit ENTER bestätigen Schnellstart Einzelne Prozesse Weitere Menues EN...

Страница 34: ...Einträge werden chronologisch abgelegt nicht alphanumerisch 8 4 Kältemittelverbrauch anzeigen Die Station speichert die Daten der eingefüllten und abgesaugten Kälte mittelmengen Diese können als Jahresübersicht oder Monatsübersicht direkt ausgedruckt werden 1 Im Grundmenü mit den Pfeiltasten oder Weitere Menues wählen 2 Zur Bestätigung ENTER drücken 3 Mit der Pfeiltaste Service wählen und mit ENTE...

Страница 35: ...entsprechenden Jahres angezeigt Durch Drücken der Pfeiltaste wird die Monatsübersicht im Display dar gestellt Hier wurden im Januar 2015 insgesamt 2 400 g Kältemittel abgesaugt In der Monatsübersicht wird die eingefüllte und abgesaugte Menge immer im Wechsel angezeigt Die Übersicht lässt sich jederzeit durch Betätigen der Taste ENTER ausdrucken Mit der Taste STOP wird die Übersicht beendet 2015 Vo...

Страница 36: ...esaugt und die Klimaanlage evakuiert Die endgültige Füllmenge wird vollständig gefüllt um eine hohe Füllmengengenauigkeit zu gewährleisten Auffüllen von Frischöl Einfüllen von UV Additiv Einfüllen von Kälte mittel Im Anschluss an jeden durchgeführten Prozess wird ein Serviceprotokoll gedruckt 1 Die entsprechenden Anschlüsse des A CServiceCenters zunächst mit der Fahrzeug Klimaanlage verbinden und ...

Страница 37: ...ollzeit eingeben 4 Beide Einstellungen mit ENTER bestätigen I Klimaanlage Ja entleeren Nein ENTER OK STOP EXIT Wartezeit für den Druckanstieg min 1 ENTER OK STOP EXIT HINWEIS Durch die Wartezeit wird sichergestellt dass eventuell vorhandenes Restkältemittel verdampfen und danach abgesaugt werden kann Das verdampfende Restkältemittel löst einen Druckanstieg aus Vakuum erzeugen Ja Nein ENTER OK STOP...

Страница 38: ...geben 8 Alle Einstellungen mit ENTER bestätigen I Klimaanlage Ja befüllen Nein ENTER OK STOP EXIT Frischöl ml 0 UV Additive ml 0 Kältemittel g 500 ENTER OK STOP EXIT HINWEIS Wenn im gleichen Prozessablauf ein Absaugvorgang stattfindet zählt die Menge des Frischöls als Extra Füllmenge die zu der zuvor abgesaugten Altölmenge addiert wird Stellt man diesen Wert auf 0 wird exakt die Menge Öl die abges...

Страница 39: ...änge mit ENTER starten 8 5 5 Nach Beendigung des Klimaservices Nachdem der Klimaservice beendet ist erscheint die Aufforderung die Serviceschläuche des A CServiceCenters von der Fahrzeug Klimaanlage abzukuppeln 1 Serviceschläuche 11 und 12 abkuppeln und zur Bestätigung ENTER drücken Die Serviceschläuche werden nun geleert Anschließend ist das Gerät für weitere Einsätze betriebsbereit 2 Ventilkappe...

Страница 40: ...und zur Bestätigung ENTER drücken 8 Klimaanlage befüllen mit Nein abwählen gewählte Einstellung blinkt und zur Bestätigung ENTER drücken 9 Prozesse starten mit ENTER wählen 10 Nach Beendigung des Absaugvorgangs die Station vom Fahrzeug trennen HINWEIS Mit dem Menü A C Spülen wird die Fahrzeug Klimaanlage mit frischem Kältemittel gespült Das Spülen ist vor allem geeignet um altes Kompressoröl zu er...

Страница 41: ...ung ENTER drücken 15 Mit den Pfeiltasten oder A C Spülen wählen 16 Gegebenenfalls mit der Bedientastatur 7 die gewünschten Daten eingeben und zur Bestätigung ENTER drücken Sollen keine Daten eingegeben werden ENTER drücken um zum nächsten Programmschritt zu wechseln 17 Mit den Pfeiltasten oder wählen ob die gesamte Klimaanlage oder eine einzelne Komponente gespült werden soll 18 Zur Bestätigung EN...

Страница 42: ...stätigung ENTER drücken Sollen keine Daten eingegeben werden ENTER drücken um zum nächsten Programmschritt zu wechseln 25 Klimaanlage entleeren mit Nein abwählen gewählte Einstellung blinkt und zur Bestätigung ENTER drücken 26 Vakuum erzeugen wählen gewählte Einstellung blinkt und zur Bestätigung ENTER drücken 27 Gegebenenfalls mit der Bedientastatur 7 die gewünschten Daten eingeben und zur Bestät...

Страница 43: ...ullpunktüberprüfung der Ölwaagen I 1 Im Grundmenü mit den Pfeiltasten oder Weitere Menues wählen 2 Zur Bestätigung ENTER drücken 3 Mit den Pfeiltasten oder Nullpunkt Waagen wählen HINWEIS Für eine korrekte Bemessung der Ölmengen und des UV Additivs ist es erforderlich dass die Nullpunkte der Waagen regelmäßig überprüft und gegebenenfalls neu festgesetzt werden Ein erneutes Festsetzen ist erforderl...

Страница 44: ...enn die Waagen entlastet sind zur Bestätigung ENTER drücken Die Aufforderung die Behälter von der Waage zu nehmen blinkt Wenn das Festsetzen des Nullpunktes erfolgreich durchgeführt wurde erscheint wieder das Auswahlmenü für die Waagen 5 Behälter wieder in die Arbeitsposition bringen Behälter für die Öle 17 und 19 und das UV Additiv 18 wieder an den Schnellverschlüssen anschließen und Abdeckklappe...

Страница 45: ...aanlage befüllen mit Nein abwählen Zur Bestätigung ENTER drücken 8 Prozesse starten wählen Zur Bestätigung ENTER drücken Die Serviceschläuche werden nun geleert und das Grundmenü des A CServiceCenters wird aktiviert Der Kompressor hat intern einen leichten Unterdruck erzeugt sodass der Filter mit geringstem Kälte mittelverlust gewechselt werden kann 9 Gerät ausschalten 10 Netzstecker ziehen 11 Abd...

Страница 46: ...brille 12 Schraube D aus der Halterung herausdrehen und Trocknerfilter gerade herausziehen 13 O Ringe E ersetzen Neue O Ringe vor dem Einbau mit Kälte mittelöl benetzen 14 Neuen Trockner einsetzen und Schraube mit 15 Nm anziehen 15 Netzstecker einstecken 16 Gerät einschalten Das Gerät führt einen Selbsttest durch 17 Abdeckung wieder befestigen D E ...

Страница 47: ... eingefügt wurde Vakuumzeit gibt an wie lange die Vakuumpumpe seit der letzten Rückstellung siehe Datum in Betrieb war HINWEIS Nach dem Erledigen der Servicearbeiten müssen Sie die jeweiligen Servicemeldungen löschen Zähler zurücksetzen Wechseln Sie hierzu in das Menü Weitere Menues Service und geben Sie hier den Code 7782 ein Mit den Pfeiltasten oder den gewünschten Eintrag wählen und mit ENTER b...

Страница 48: ...chtheitskontrolle Führen Sie nach dem Wechseln des Filters eine Dichtheitskontrolle mit einem freigegebenen Prüfgerät durch 9 5 Drucksensor kalibrieren I 1 Im Grundmenü mit den Pfeiltasten oder Weitere Menues wählen 2 Die Anlage drucklos machen wie in Kapitel Trockner Filter wech seln auf Seite 45 beschrieben 3 Zur Bestätigung ENTER drücken Service erledigt 08 03 15 Anzahl 4 STOP EXIT HINWEIS Für ...

Страница 49: ...zur Bestätigung ENTER drücken I 9 Wenn das Kalibrieren erfolgreich durchgeführt wurde ENTER drücken um das Menü zu verlassen 10 Zwei Mal STOP drücken um in das Stand by Menü zu gelangen 11 Servicekupplungen 13 und 14 wieder auf die Serviceschläuche 11 und 12 handfest aufschrauben dabei die blauen und roten Kennzeichnungen von Servicekupplungen und Serviceschläuchen beachten Int Flasche füllen A C ...

Страница 50: ...den Schritte dürfen nur von fachkundigem Personal durchge führt werden 2 Frontabdeckung demontieren Schrauben D des Bedienfeldes herausdrehen und Bedienfeld nach oben klappen Dann Schrauben E unten an der Frontabdeckung herausdrehen und Frontabdeckung abnehmen WARNUNG Schalten Sie vor dem Öffnen des Gehäuses das A CServiceCenter aus und ziehen Sie den Netzstecker D E D E ...

Страница 51: ...H auffüllen und Öleinfüllschraube G wieder hineindrehen 8 Frontabdeckung und Bedienfeld montieren und Netzstecker einstecken I HINWEIS Nach dem Erledigen der Servicearbeiten müssen Sie die jeweiligen Servicemeldungen löschen Zähler zurücksetzen Wechseln Sie hierzu in das Menü Weitere Menues Service und geben Sie hier den Code 7782 ein Mit den Pfeiltasten oder den gewünschten Eintrag wählen und mit...

Страница 52: ...urde Eingefüllt in A C gibt an wie viel Gramm Kältemittel über den Menü punkt Schnellstart oder auch Einzelne Prozesse in Klimaanlagen eingefüllt wurde Vakuumzeit gibt an wie lange die Vakuumpumpe insgesamt in Betrieb war Service erledigt zeigt die Menge der Servicearbeiten an die mit dem Klimaservicegerät durchgeführt wurden Von Klimaanlagen 07 03 15 g 4155 STOP EXIT von ext Flaschen 07 03 15 g 3...

Страница 53: ...rde Vakuumzeit gibt an wie lange die Vakuumpumpe seit der letzten Rückstellung siehe Datum in Betrieb war HINWEIS Das Gerät speichert verschiedene Zählerstände ab Um die Totalwerte abzurufen fortlaufend seitdem das Gerät produziert wurde gehen Sie in das Menü Weitere Menues Service und geben Sie hier den Code 7783 ein Mit den Pfeiltasten oder den gewünschten Eintrag wählen Diese Zählerstände sind ...

Страница 54: ...ENTER drücken 5 Passwort 7732 eingeben 6 Schlauchlänge in Zentimeter eingeben 7 Zur Bestätigung ENTER drücken Service erledigt 07 03 15 Anzahl 4 STOP EXIT HINWEIS Sollen längere oder kürzere Serviceschläuche für das Gerät einge setzt werden ist es erforderlich die Füllmengen den neuen Schlauchlängen anzupassen Der Serviceschlauch für die Hochdruckseite und der Service schlauch für die Niederdrucks...

Страница 55: ...maanlagen Füllmengen Um stets über einen aktuellen Datenstand zu verfügen muss die jeweils neueste Flash Memory Card installiert sein Informationen über den neuesten Flash Memory Card Datenstand erhalten Sie bei der Hotline Tel 49 0 25 72 8 79 191 I Eine veraltete Flash Memory Card wird nicht mehr benötigt und kann umweltgerecht entsorgt werden HINWEIS Beim Tausch einer alten Flash Memory Card geg...

Страница 56: ...tigen 4 Bedienfeld herunterklappen und festschrauben 5 Bedienfeld schließen und Netzstecker einstecken 6 Gerät einschalten und den Anweisungen auf dem Display folgen I HINWEIS Nach dem erneutem Einschalten müssen die Werte von der Flash Memory Card ans Gerät übergeben werden Wechseln Sie hierzu in das Menü Weitere Menues Service und geben Sie hier das Passwort 1518 ein Bestätigen Sie die folgende ...

Страница 57: ...en sicheren Betrieb Der Altölbehälter muss alle 6 Monate gewechselt werden 1 Abdeckklappe 20 an der linken Seite öffnen und Altölbehälter 19 am Schnellverschluss abziehen 2 Bügel M lösen und Deckel N abnehmen HINWEIS Tauschen Sie den Altölbehälter und den O Ring im Deckel alle 6 Monate Wenn der Altölbehälter beschädigt ist tauschen Sie ihn sofort aus 19 20 M N ...

Страница 58: ...vicearbeiten VAS 581 001 58 3 Altölbehälter O und O Ring P austauschen 4 Beim Aufsetzen des Deckels N auf die korrekte Positionierung der Nase Q achten 5 Altölbehälter am Schnellverschluss aufstecken O P Q N ...

Страница 59: ...Uhrzeigersinn drehen bis er einrastet 9 13 Reinigung und Pflege Reinigen Sie das Gehäuse bei Bedarf mit einem feuchten Tuch Nehmen Sie gegebenenfalls zusätzlich etwas Geschirrspülmittel Verwenden Sie keine Lösungsmittel oder scheuernde Reinigungs mittel Überprüfen Sie regelmässig die Serviceschläuche 11 und 12 und Servicekupplungen 13 und 14 auf Beschädigungen Nehmen Sie das A CServiceCenter nicht...

Страница 60: ...ng des Altgerätes Wenn Sie das A CServiceCenter endgültig außer Betrieb nehmen entleeren Sie das Gerät zunächst von allen Flüssigkeiten und ent sorgen Sie die Flüssigkeiten umweltgerecht M Bringen Sie das Altgerät dann zum nächsten Recyclingcenter oder wenden Sie sich an den Kundendienst HINWEIS Verbrauchtes Öl ist Sondermüll Mischen Sie verbrauchtes Öl nicht mit anderen Flüssigkeiten Bewahren Sie...

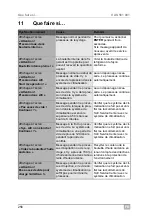
Страница 61: ...eldung während des Vakuumprozesses wenn der Druck in der Klimaanlage nach 8 Minuten noch mehr als 50 mbar beträgt Klimaanlage auf Leck prüfen bzw Anschlüsse des A CServiceCenters an die Klimaanlage überprüfen Im Display erscheint A C undicht Fortfahren Meldung am Ende des Vakuumprozesses Die Klimaanlage hat einen Vakuumverlust von mehr als 120 mbar innerhalb der Kontrollzeit Klimaanlage auf Leck p...

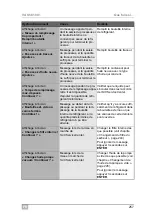
Страница 62: ...den konnte Prüfen ob im externen Kältemittelbehälter noch ausreichend Kältemittel vor handen ist bzw prüfen ob Ventile am externen Kältemittelbehälter geöffnet sind Im Display erscheint Internen Filter wechseln Fortfahren Meldung beim Einschalten des A CServiceCenters Möglichst bald internen Filter wechseln siehe Kapitel Trockner Filter wechseln auf Seite 45 Zum Übergehen 3 Sekunden ENTER drücken ...

Страница 63: ... werden Restdruck auf den Mano metern Drucksensorkalibrierung überprüfen Internen Flaschendruck überprüfen Funktion des Kompressors und der entsprechenden Magnetventile prüfen Im Display erscheint Error 11 Während des Software Tests konnte kein Altöl abge lassen werden Altölbehälter richtig ein setzen Magnetventil auf Gängigkeit überprüfen Waage auf Funktion prüfen Im Display erscheint Error 12 Wä...

Страница 64: ...Error 35 Restdruck in der Klima anlage Bitte absaugen und evakuieren Im Display erscheint Error 40 Druckabfall während der Druckprüfung Klimaanlage und Verbindungen auf Undichtigkeiten prüfen Im Display erscheint Error 41 Druckabfall während der Druckprüfung Klimaanlage und Verbindungen auf Undichtigkeiten prüfen Im Display erscheint Error 42 Druckabfall während der Druckprüfung Klimaanlage und Ve...

Страница 65: ...r hältnismäßig hoch Mögliche elektrische Stör quellen wie z B Mobil telefone oder Schweißgeräte vom Gerät fernhalten Im Display erscheint 00003 Die Kalibrierung mit der Umgebungsluft ist fehlge schlagen Für ausreichende Belüftung des Gerätes sorgen Eventuell ausgeströmtes Kältemittel erst abziehen lassen Im Display erscheint 00004 Das Gerät arbeitet außerhalb des empfohlenen Temperaturbereichs Ger...

Страница 66: ...z Absaugmenge des Kältemittels 30 kg Std Vakuumpumpenleistung 5 Kfz Std Leistung des hermetischen Verdichters 0 32 kW Trockenfilterleistung 150 kg Füllzylinder Speicher Nutzinhalt 16 kg Geräuschemission 55 5 dB A Genauigkeit der elektronischen Waage für Kältemittel 10 g Genauigkeit der elektronischen Waage für Alt Frischöl 1 g Genauigkeit der elektronischen Waage für UV Additiv 1 g Betriebstempera...

Страница 67: ...nd side view 78 7 Initial start up 79 7 1 Procedure for the internal leak inspection 79 7 2 Setting up and switching on 79 7 3 Standby menu 80 7 4 Language selection 81 7 5 Entering company data 82 7 6 Entering the date and time 83 7 7 Editing default values 84 7 8 Inserting the containers for oil and UV additive 85 7 9 Entering the container size 86 7 10 Analysing refrigerant 87 7 11 Verifying th...

Страница 68: ...Meter readings 117 9 8 Correcting the filling quantity for long service hoses 118 9 9 Replacing the printer paper 119 9 10 Changing the flash memory card 119 9 11 Changing the drained oil receptacle 121 9 12 Changing the power cable 123 9 13 Cleaning and maintenance 123 10 Disposal 124 10 1 Disposing of used fluids 124 10 2 Disposing of packaging material 124 10 3 Scrapping the old unit 124 11 Tro...

Страница 69: ...l carefully Also observe the following The Dometic WAECO training manual Technical Specifications Vehicle Air Conditioning The Dometic WAECO information brochure Legal Specifications Vehicle Air Conditioning Information from the refrigerant manufacturer Information on handling flammable gases such as from the refriger ant manufacturer Any specific instructions on servicing vehicle air conditioning...

Страница 70: ...formation for operating the product Format Meaning Example Bold Designations used on the unit Press ENTER to confirm Bold Display messages Short selection Text Text List in any order Pressure monitor Pressure relief valves 1 Text 2 Text 3 Text Actions to be carried out in the order shown 1 Connect the unit 2 Switch on the unit 3 Press the selection button Text Result of an action Unit is ready for...

Страница 71: ...ll as refrigerant Read this operating manual carefully before starting up the A CServiceCenter for the first time Only use the unit for its intended purpose Do not make modifications to the A CServiceCenter Maintenance must not be carried out on the vehicle air conditioner when the engine is at operating temperature When performing maintenance on the vehicle air conditioner the surface temperature...

Страница 72: ...d approved personnel from suitable and certified specialist companies Do not pump compressed air into the refrigerant lines of the A CServiceCenter or the vehicle air conditioning system A mixture of compressed air and refrigerant can be flammable or explosive 2 3 Handling refrigerant safely Maintenance must not be carried out on the vehicle air conditioner when the engine is at operating temperat...

Страница 73: ...g instructions according to TRG 402 for each filling system A CServiceCenter These operating instructions must be used to train personnel in handling the unit The operator must ensure that personnel are instructed in the following points at least once a year Special dangers when dealing with compressed gases Safety guidelines when dealing with compressed gases Health precautions when dealing with ...

Страница 74: ...ants Trained personnel 2 6 Safety devices Pressure monitor switches the compressor off if normal operating pressure is exceeded Pressure relief valves additional safety mechanism to protect lines or vessels from bursting if the pressure continues to rise despite the safety pressure monitor Fan and electronic box delay circuit checks the fans work properly at start up Door opener contact prevents t...

Страница 75: ... for 500 ml fresh oil and UV contrast agent bottle Closed patented drained oil receptacle Oil bottle 250 ml 2 items Protective unit cover Goggles gloves Operating manual NOTICE For safe operation and calibration you require R 1234yf refrigerant not in scope of delivery Refrigerant vessels are currently supplied with various connecting threads and adapters these are not in the scope of delivery Des...

Страница 76: ...ystems The unit is designed for commercial use The A CServiceCenter may only be operated by personnel who have the expertise required for servicing air conditioning systems This A CServiceCenter may only be used to service vehicle air condition ing systems in which R 1234yf refrigerant is used The A CServiceCenter is only suitable for approved operating fluids ...

Страница 77: ...w of the A CServiceCenter 6 1 Front 1 Low pressure gauge 2 Red Fill lamp 3 Blue Evacuate lamp 4 Green Suction lamp 5 High pressure gauge 6 Display 7 Keypad 8 Gas analysis unit 9 Front cover 10 Front wheels with wheel stops 14 13 3 4 5 10 8 9 7 6 2 16 12 11 15 1 ...

Страница 78: ...ce coupling for high pressure connection red 14 Service coupling for low pressure connection blue 15 Printer 16 Display unit 6 2 Rear and side view 17 Fresh oil can not included in the scope of delivery 18 Container for UV additive not included in the scope of delivery 19 Patented drained oil receptacle 20 Cover flap 21 Main switch 22 Fan 19 18 17 20 22 21 ...

Страница 79: ...efrigerant now a 6 minute pressure test is done with all the solenoid valves open to immediately determine a drop in pressure After successful completion the refrigerant is suctioned off and the unit is available for service work 7 2 Setting up and switching on 1 Wheel the A CServiceCenter to the workplace and lock the front wheels 10 I 2 Connect the A CServiceCenter to the mains 3 To switch it on...

Страница 80: ...ys the following in the standby menu I 7 3 Standby menu The standby menu shows you the current supply quantities and the time settings of the A CServiceCenter The following information is shown Refrigerant quantity Fresh oil quantity UV additive quantity Time Date Ensure sufficient ventilation Software test Please wait Tightness test Please wait Refrigerant g XXXX PAG oil ml XXX UV tracer ml XXX 1...

Страница 81: ... select Other selections 3 Press ENTER to confirm 4 Use the cursor key to select Service 5 Press ENTER to confirm 6 Enter the password 5264 7 Use the cursor keys or to select the preferred language 8 Press ENTER to confirm 9 Press STOP The language chosen is active and the standby menu is displayed Short selection Free selection Other selections ENTER OK ...

Страница 82: ...nes each with up to 20 characters The display shows the number of lines of company data after the message Enter company data 01 to 05 Use the cursor keys or to select the line of company data you want 7 Use the keypad 7 and the cursor keys to enter the data To switch between upper and lower case press the Info key To delete a character briefly press the C key To delete the current line press and h...

Страница 83: ...basic menu use the cursor keys or to select Other selections 2 Press ENTER to confirm 3 Use the cursor key to select Service 4 Press ENTER to confirm 5 Enter the password 8463 6 Use the keypad and the cursor keys to enter the information 7 Press ENTER to confirm 8 Press STOP to access the standby menu Short selection Free selection Other selections ENTER OK ...

Страница 84: ...t Other selections 2 Press ENTER to confirm 3 Use the cursor key to select Service 4 Press ENTER to confirm 5 Enter the password 3724 6 Use the keypad and the cursor keys to enter the information 7 Press ENTER to confirm 8 Press STOP to access the standby menu Parameter Default value Pressure increase test time min 1 Vacuum time min 20 Leak test min 10 PAG oil ml additional quantity 0 UV tracer ml...

Страница 85: ...left side and push the containers into the snap locks Container for fresh oil 17 Container for UV additive 18 and Drained oil receptacle 19 2 Close the cover flap 20 3 Enter the container size for fresh oil and UV contrast agent see chapter Entering the container size on page 86 NOTE Only use approved oils and UV additive for R 1234yf Observe the manufacturer s instructions 19 18 17 20 ...

Страница 86: ...viceCenter 1 In the basic menu use the cursor keys or to select Other selections 2 Press ENTER to confirm 3 Use the cursor key to select Service 4 Press ENTER to confirm 5 Enter the password 2688 6 Use the cursor keys to activate any fields you need dark fields are activated 7 Press ENTER to confirm 8 Press STOP to access the standby menu Short selection Free selection Other selections ENTER OK C ...

Страница 87: ...s being analysed 7 10 1 Refrigerant analysis passed If the refrigerant is not contaminated the A CServiceCenter displays the following at the end of the analysis The A CServiceCenter can be used NOTE The A CServiceCenter analyses the purity level of the refrigerant before draining If it is below 95 the unit does not accept the refrigerant Refrigerant Test Warm up Please wait Refrigerant Test Pleas...

Страница 88: ...Try again with ENTER The A CServiceCenter checks up to three times If the third analysis is still not successful the A CServiceCenter displays the following 2 Press STOP 3 Connect the external disposal unit to the waste terminal and press ENTER to confirm Refrigerant Test Fail Try again ENTER OK No WARNING Bad refrigerant Read user manual Recovery ready ENTER OK ...

Страница 89: ...pter Hotline on page 69 yes no no no yes yes A C ServiceCenter OK A C ServiceCenter OK A C ServiceCenter OK 1 Perform the refrigerant analysis Connect the A C ServiceCenter for verifying to a new refrigerant tank with R 1234yf Result Refrigerant OK Result Refrigerant OK Result Refrigerant OK 1 Repeat the refrigerant analysis 2 Repeat the refrigerant analysis Fault in A C ServiceCenter Call the hot...

Страница 90: ... vessels with rising pipe These refrigerant vessels have one connection When filling the A CServiceCenter the connection must be at the top place the vessel Refrigerant vessels with rising pipe These refrigerant vessels have two connections To top up the A CServiceCenter use the connection marked with L liquid When filling the A CServiceCenter the connection must be at the top place the vessel 1 I...

Страница 91: ...igerant vessel is filled When the filling process is finished this will be confirmed by an acoustic signal after the analysis Close the valves and press ENTER to confirm 6 After filling the quantity of refrigerant in the internal container is dis played Press STOP to exit the menu Press STOP again to access the standby menu The unit is now ready for operation Int vessel filling Flushing Reset scal...

Страница 92: ...age 87 Extraction of the refrigerant Recycling the refrigerant purity SAE J 2099 Pressure rise test Draining the used oil Evacuating the system Before working on the vehicle air conditioner a leak inspection must be carried out The air conditioner is filled with a sample refrigerant The pressure in the air conditioner must remain constant over a period of 5 minutes The air conditioning unit can on...

Страница 93: ...onnection high pressure or low pressure Press ENTER to confirm The fully automatic air conditioning service is started The refrigerant is analysed during the air conditioning service see chapter Analysing refrigerant on page 87 After the air conditioning service has finished you will be prompted to disconnect the hoses 11 and 12 of the A CServiceCenter from the vehicle air conditioning system 9 Di...

Страница 94: ...ections 2 Press ENTER to confirm 3 Use the cursor key to select Service and press ENTER to confirm 4 To access the ADM administrator menu enter the password 9786 and press ENTER to confirm 5 Enter the administrator code 0000 default setting and press ENTER to confirm I 6 Enter the new administrator code Short selection Free selection Other selections ENTER OK Flushing Reset scales Service ENTER OK...

Страница 95: ...orrect user name and then press ENTER to confirm I ADM AREA Confirm new code ADM AREA User number 1 ADM AREA User number 1 Insert new code ADM AREA User number 1 Confirm new code NOTE Use the yellow information button to switch between upper and lower case ADM AREA User number 1 User name John Citizen ADM AREA User number 1 John Citizen NOTE The user is created and the menu changes again to the us...

Страница 96: ...the display If a user code has been created the same code must be used to enable the station 1 Enter the correct user code If you enter an incorrect user code the following error message appears Once the correct code is entered the station is enabled and it starts up The user s name is displayed ENTER USER CODE WRONG CODE John Citizen ...

Страница 97: ...he cursor keys or to select Database and press ENTER to confirm 5 Select Personal DB and press ENTER to confirm 6 In this empty database use the cursor keys or to select the respective entry and press ENTER to confirm 7 To change the item press the yellow Info key 8 Enter the vehicle data model type in the blank field and press ENTER to confirm Short selection Free selection Other selections ENTER...

Страница 98: ... stored chronologically not alphanumerically 8 4 Displaying refrigerant consumption The station saves the data on the amount of refrigerant filled and extracted You can print out this data as an annual or monthly overview 1 In the basic menu use the cursor keys or to select Other selections 2 Press ENTER to confirm 3 Use the cursor key to select Service and press ENTER to confirm 4 Enter the passw...

Страница 99: ...of filling refrigerant for that year Press the cursor key to view the display for the monthly overview Here a total of 2 400 g of refrigerant was extracted in January 2015 In the monthly overview the filled and extracted amount is always displayed alternately Press Enter to print out the overview at any time Press STOP to exit the overview 2015 R1234 from system Total 2015 g 18650 PRINT STOP EXIT ...

Страница 100: ...ined and the air conditioner evacuated The final filling quantity is completely filled up to ensure high filling accuracy Filling with fresh oil filling of UV additive filling of refrigerant After each process has been performed a service report is printed 1 Start by fitting the connections of the A CServiceCenter to the vehicle air conditioning system and opening them 2 In the basic menu use the ...

Страница 101: ... cursor key to enter the vacuum phase time 4 Press ENTER to confirm both settings I Rec Recycling Yes phase No ENTER OK STOP EXIT Pressure increase Test time min 1 ENTER OK STOP EXIT NOTE The waiting time ensures that any residual refrigerant vaporises and can then be extracted The vaporising residual refrigerant triggers an increase in pressure Vacuum phase Yes No ENTER OK STOP EXIT Vacuum time m...

Страница 102: ...tity 8 Press ENTER to confirm all settings I Filling phase Yes No ENTER OK STOP EXIT PAG oil ml 0 UV tracer ml 0 Refrigerant g 500 ENTER OK STOP EXIT NOTE If extraction is taking place in the same process sequence the quan tity of fresh oil is counted as an additional filling quantity and is added to the drained oil quantity extracted beforehand If this value is set to 0 exactly the quantity of oi...

Страница 103: ... confirm 3 Once all settings have been entered press ENTER to start the process 8 5 5 After ending the air conditioning service After the air conditioning service has finished you are prompted to disconnect the hoses of the A CServiceCenter from the vehicle air conditioning system 1 Disconnect the service hoses 11 and 12 and press ENTER to confirm The service hoses will now be drained The unit is ...

Страница 104: ...m 8 Deselect Filling phase using No the setting flashes and press ENTER to confirm 9 Select Process start by pressing ENTER 10 After the extraction process is complete disconnect the station from the vehicle NOTE The Flushing menu is used to flush the vehicle air conditioning system with fresh refrigerant Flushing is especially suitable for replacing old compressor oil or removing most metallic re...

Страница 105: ...to confirm If no data is to be entered press ENTER to switch to the next pro gram step 17 Use the cursor keys or to select whether to flush the entire air conditioning system or just individual components 18 Press ENTER to confirm 19 Follow the instructions in the display 20 Before working on the vehicle air conditioner a leak inspection must be carried out For the flushing process the flushing ci...

Страница 106: ...ng phase using No the setting flashes and press ENTER to confirm 26 Select Vacuum phase the setting flashes and press ENTER to confirm 27 If necessary use the keypad 7 to enter the data and press ENTER to confirm If no data is to be entered press ENTER to switch to the next pro gram step 28 Select Filling phase the setting flashes and press ENTER to confirm 29 Enter the refrigerant filling quantit...

Страница 107: ...g the oil scales I 1 In the basic menu use the cursor keys or to select Other selections 2 Press ENTER to confirm 3 Use the cursor keys or to select Reset scales NOTE In order for the oil quantities and the UV additive to be measured correctly the zero point of the scales must be checked regularly and reset if necessary Resetting is necessary If the quantity in a container deviates by more than 10...

Страница 108: ...rained oil receptacle 19 When the scales are relieved press ENTER to confirm The prompt to remove the containers from the scale will flash Once you have set the zero point the selection menu for the scales appears again 5 Return the containers to the operating positions Reattach the containers for oil 17 and 19 and for the UV additive 18 to the snap locks and close the cover 20 6 Press STOP twice ...

Страница 109: ...nfirm 8 Select Process start Press ENTER to confirm The service hoses will now be drained and the A CServiceCenter basic menu will be activated The compressor has produced a slight internal vacuum so that the filter can be replaced with minimal refrig erant loss 9 Switch off the unit 10 Pull out the mains plug 11 Remove the rear cover The following steps may only be performed by qualified personne...

Страница 110: ...e dryer filter straight out 13 Replace the O rings E Moisten new O rings with refrigerant oil before installing 14 Insert the new dryer and tighten the screw to max 15 Nm 15 Reconnect the power plug 16 Switch on the unit The inverter performs a self test 17 Fasten the cover again D E ...

Страница 111: ...ction since the last reset see date Vacuum time indicates how long the vacuum pump has operated since the last reset see date NOTE After finishing the service tasks you must delete the respective service messages counter reset To do this switch to the Other selections Service menu and enter the code 7782 Use the cursor keys or to select the required entry and press ENTER to confirm Follow the disp...

Страница 112: ... filter code To reset the filter counter you need to enter a 12 digit code This special code is located on the new filter A Code entry prompt appears in the menu If a code is not entered the unit is taken out of operation Each code only works once 9 4 2 Leak test After changing the filter perform a leak test with an approved testing device Service completed 08 03 15 Total 4 STOP EXIT ...

Страница 113: ...bration has been completed press ENTER to exit the menu 10 Press STOP twice to access the standby menu 11 Screw the service couplings 13 and 14 hand tight onto the service hoses 11 and 12 taking care not to mix up the red and blue mark ings on the couplings and hoses NOTE The pressure transducer has to be correctly calibrated in order to make accurate pressure measurements Calibration is required ...

Страница 114: ...ke off the front panel Undo the screws D on the control panel and lift it up Then undo the screws E on the bottom of the front panel and take it off 3 Place a receptacle with a capacity of at least litre under the A CServiceCenter The oil from the vacuum pump flows through the opening I in the base of the unit WARNING Switch off the A CServiceCenter and unplug it from the power supply before openi...

Страница 115: ...he front panel and control panel back on and reconnect the power plug I NOTE After finishing the service tasks you must delete the respective service messages counter reset To do this switch to the Other selections Service menu and enter the code 7782 Use the cursor keys or to select the required entry and press ENTER to confirm Follow the display instructions and press and hold the ENTER button f...

Страница 116: ...lling R1234 to system indicates how many grams of refrigerant have been filled into air conditioning systems using the menu item Short selection or Free selection Vacuum time indicates how long the vacuum pump was operating in total Service completed indicates the amount of service work performed on the air conditioning service unit R1234 from system 07 03 15 g 4155 STOP EXIT R1234 from tank 07 03...

Страница 117: ...ection since the last reset see date Vacuum time indicates how long the vacuum pump has operated since the last reset see date NOTE The unit saves various meter readings To access the total values consecutively since the unit was produced enter the menu Other selections Service and enter the code 7783 Use the cursor keys or to select a particular entry These meter readings cannot be reset To acces...

Страница 118: ...Service 4 Press ENTER to confirm 5 Enter the password 7732 6 Enter the hose length in centimetres 7 Press ENTER to confirm Service completed 07 03 15 Total 4 STOP EXIT NOTE If longer or shorter service hoses are required for the unit you need to adjust the filling quantities to the new hose lengths The service hoses for the high and low pressure sides must always be of the same length as otherwise...

Страница 119: ...types and corresponding filling quantities For the information to be up to date at all times the latest flash memory card must be installed For information on the latest version of the flash memory card call the hotline Tel 49 0 25 72 8 79 191 I The old flash memory card is no longer required and can be disposed of in an appropriate manner NOTE When you replace an old flash memory card with a new ...

Страница 120: ...ten it 4 Lower the control panel and screw it down 5 Close the control panel and reconnect power plug 6 Switch on the unit and follow the instructions on the display I NOTE When you switch it on again the values should be copied from the flash memory card to the unit To do this switch to Other selections Service and enter the password 1518 Press ENTER to confirm the following display messages D D ...

Страница 121: ...tees safe operation The drained oil receptacle must be changed every 6 months 1 Open the cover flap 20 on the left side and remove the drained oil receptacle 19 from the snap lock 2 Release the bracket M and remove the cover N NOTE Replace the drained oil receptacle and the O ring in the lid every 6 months If the drained oil receptacle has been damaged replace it immediately 19 20 M N ...

Страница 122: ...tasks VAS 581 001 122 3 Replace the drained oil receptacle O and the O ring P 4 When replacing the cover N ensure that the lug Q is positioned correctly 5 Clip the drained oil receptacle into the snap lock O P Q N ...

Страница 123: ...socket the plug 4 Turn the plug 90 clockwise until it clicks into place 9 13 Cleaning and maintenance Clean the exterior of the unit with a damp cloth as required If neces sary use a small amount of dishwashing detergent Do not use sol vents or scouring agents Check the service hoses 11 and 12 and the service couplings 13 and 14 for damage regularly Do not start up the A CServiceCenter if it is da...

Страница 124: ...ld be added to other recyclable waste 10 3 Scrapping the old unit If you wish to scrap the A CServiceCenter first completely drain it of all liquids and dispose of them in an environmentally responsible manner M Take the old unit to your nearest recycling centre or contact the customer service NOTE Used oil is hazardous waste Do not mix used oil with other fluids Keep used oil in suitable containe...

Страница 125: ...if the pressure in the air condition ing system after 8 minutes is still more than 50 mbar Check the air conditioning system or the connections between it and the A CServiceCenter for leaks The display shows A C system leakage Carry on Message at the end of the vacuum process The air conditioning system shows a vacuum loss of more than 120 mbar during the check ing time Check the air conditioning ...

Страница 126: ...gh refrigerant or if the valves of the external refrig erant container are open The display shows Change the equipment drier filter Go on This message appears when you switch on the A CServiceCenter Change the internal filter as soon as possible see chap ter Changing the dryer filter on page 109 To skip this press ENTER for 3 seconds The display shows Change the vacuum pump oil Go on This message ...

Страница 127: ...s not possible to drain any used oil during the Software test Insert receptacle for drained oil correctly Check that the solenoid valve can move freely Check that the scale is work ing properly The display shows Error 12 It was not possible to remove any refrigerant from the internal vessel during the Software test Check pressure transducer calibration Check if the valve on the internal vessel is ...

Страница 128: ...heck air conditioning system and connections for leaks The display shows Error 43 The device was not able to reduce the pressure suffi ciently to begin with the vac uum phase Check air conditioning system and connections for leaks Check pressure transducer calibration The display shows Error 60 During the hybrid service flushing the service hoses with hybrid oil a vacuum could not be achieved Are ...

Страница 129: ...003 Calibration with the ambient air failed Ensure the device is ade quately ventilated Leave any leaking refriger ant to drain off The display shows 00004 The device is operating out side the recommended tem perature range Only use the device in tem perature controlled rooms 10 C 45 C Ensure sufficient ventilation The display shows 00005 The refrigerant sample has a very high content of air or th...

Страница 130: ...V 50 Hz 60 Hz Refrigerant extraction rate 30 kg hr Vacuum pump output 5 cars hr Hermetic compressor output 0 32 kW Drier filter output 150 kg Filling cylinder accumulator capacity 16 kg Noise emission 55 5 dB A Accuracy of the electronic scale for refrigerant 10 g Accuracy of the electronic scale for old new oil 1 g Accuracy of the electronic scale for UV additive 1 g Operating temperature range 5...

Страница 131: ...a 142 6 2 Parte trasera y vista lateral 143 7 Primera puesta en funcionamiento 144 7 1 Desarrollo de la comprobación interna de estanqueidad 144 7 2 Instalación y encendido 144 7 3 Menú Stand by 146 7 4 Selección de idioma 146 7 5 Introducir los datos de la empresa 147 7 6 Introducir la fecha y la hora 148 7 7 Modificar los valores por defecto 149 7 8 Uso de los recipientes para aceites y aditivo ...

Страница 132: ... 179 9 7 Estados del contador 182 9 8 Corregir la cantidad de llenado para mangueras de servicio largas 183 9 9 Cambiar el papel de la impresora 184 9 10 Cambiar la tarjeta de memoria Flash 184 9 11 Cambiar el recipiente para aceite usado 186 9 12 Cambio del cable de red 188 9 13 Limpieza y mantenimiento 188 10Gestión de residuos 189 10 1 Gestión de los líquidos recuperados 189 10 2 Gestión del ma...

Страница 133: ...a detenidamente estas instrucciones de uso Tenga en cuenta además El manual de formación Climatización del vehículo bases técnicas de Dometic WAECO El folleto informativo Climatización del vehículo bases legales de Dometic WAECO Indicaciones del fabricante del refrigerante Indicaciones sobre la manipulación de gases inflamables por ejem plo por parte del fabricante del refrigerante En caso de habe...

Страница 134: ...gnificado Ejemplo Negrita Denominaciones que se encuentran en el aparato Pulse la tecla ENTER Negrita Mensajes en pantalla Selec automática Texto Texto Listado en orden arbitrario Presostato de seguridad Válvulas de sobrepresión 1 Texto 2 Texto 3 Texto Pasos que deben realizarse en el orden indicado 1 Conecte el aparato 2 Encienda el aparato 3 Pulse la tecla de selección Texto Resultado de un paso...

Страница 135: ...rsonal que pueda demos trar haber recibido una formación técnica adecuada y que conozca los efectos y principios básicos del A CServiceCenter de sistemas de refri geración y aire acondicionado y de refrigerantes Antes de poner el A CServiceCenter en servicio por primera vez lea detenidamente estas instrucciones de uso Utilice este aparato únicamente para los fines previstos No realice modificacion...

Страница 136: ...rviceCenter utilice únicamente botellas de refrige rante autorizadas con válvula de seguridad Antes de desconectar las mangueras de servicio vacíelas Utilice únicamente el refrigerante R 1234yf Mezclar este refrigerante con otros puede producir daños en el A CServiceCenter o en el equipo de aire acondicionado del vehículo Utilice únicamente aditivo UV de WAECO Utilizar otros aditivos UV puede prov...

Страница 137: ...igerante que pueda llegar al medio ambiente De esta forma no solo se cumple la legislación relativa al medio ambiente sino que además también se evita que debido a la presencia de refrigerante en el entorno del aparato se dificulte o imposibilite la loca lización de fugas en el vehículo o en el aparato No inhale los vapores de refrigerante Estos vapores no son tóxicos pero desplazan el oxígeno nec...

Страница 138: ...ses a presión normas de seguridad al manipular gases a presión medidas de higiene para la salud al manipular gases a presión Manejo del aparato y ejecución de los trabajos de mantenimiento en el mismo El explotador del aparato es el responsable de que el personal encar gado de los trabajos de mantenimiento y reparación y de la comproba ción de la estanqueidad tenga la certificación adecuada para l...

Страница 139: ...struido 2 6 Dispositivos de seguridad Presostato de seguridad desconecta el compresor cuando se sobre pasa la presión de servicio normal Válvulas de sobrepresión dispositivos de seguridad adicionales para evitar que revienten los conductos o recipientes en caso de que a pesar del presostato de seguridad siga aumentando la presión Ventilador y E Box circuito de retardo comprueba en el arranque si l...

Страница 140: ...ecipiente cerrado y patentado para aceite usado Botella de aceite de 250 ml 2 unidades Cubierta de protección del aparato Gafas de protección guantes de protección Instrucciones de uso AVISO Para garantizar un funcionamiento seguro y para calibrar se necesita el refrigerante R 1234yf no incluido en el volumen de entrega Actualmente se suministran botellas de refrigerante con distintas ros cas de c...

Страница 141: ... El aparato está diseñado para el uso comercial El A CServiceCenter debe ser manejado únicamente por personal con conocimientos técnicos acerca del mantenimiento de equipos de aire acondicionado Con el A CServiceCenter puede realizarse el mantenimiento de equipos de aire acondicionado que utilicen el refrigerante R 1234yf El A CServiceCenter solo es apropiado para insumos autorizados ...

Страница 142: ...a 1 Manómetro de baja presión 2 Piloto de estado rojo Rellenar 3 Piloto de estado azul Evacuar 4 Piloto de estado verde Recuperar 5 Manómetro de alta presión 6 Pantalla 7 Teclado de mando 8 Unidad de análisis del gas 9 Cubierta frontal 10 Ruedas delanteras inmovilizables 14 13 3 4 5 10 8 9 7 6 2 16 12 11 15 1 ...

Страница 143: ...to para la conexión de alta presión rojo 14 Racor de mantenimiento para la conexión de baja presión azul 15 Impresora 16 Unidad indicadora 6 2 Parte trasera y vista lateral 17 Lata de aceite nuevo no incluido en el volumen de entrega 18 Depósito de aditivo UV no incluido en el volumen de entrega 19 Recipiente patentado para aceite usado 20 Tapa 21 Interruptor principal 22 Ventilador 19 18 17 20 22...

Страница 144: ...to y a continuación se lleva a cabo una prueba de presión durante 6 minu tos con todas las electroválvulas correspondientes abiertas para poder detectar una caída de presión Una vez concluida la compro bación se recupera el refrigerante y el aparato está dispuesto para los trabajos de mantenimiento 7 2 Instalación y encendido 1 Lleve el A CServiceCenter al lugar de trabajo e inmovilice las rue das...

Страница 145: ...el software del A CServiceCenter Seguidamente se comprueba la estanqueidad Si la comprobación de la estanqueidad es correcta el aparato muestra el menú Stand By I Por favor espere Presión de tanque interno xxxx mbar Asegúrese de que haya suficiente ventilación Software test Por favor espere Tightness test Por favor espere Refrigerante g XXXX Aceite PAG ml XXX Aditivo UV ml XXX 11 56 35 10 03 15 NO...

Страница 146: ...cción de idioma 1 Pulse las teclas de dirección o para llegar al menú básico 2 Con las teclas de dirección o seleccione en el menú básico Otras selecciones 3 Para confirmar pulse la tecla ENTER 4 Con la tecla de dirección seleccione Servicio 5 Para confirmar pulse la tecla ENTER 6 Introduzca la contraseña 5264 7 Con las teclas de dirección o seleccione el idioma que desee 8 Para confirmar pulse la...

Страница 147: ...eres cada una En pantalla aparece el número de líneas con datos de la empresa mostradas detrás del mensaje Introducir datos de la empresa de 01 a 05 Con las teclas de dirección o se selecciona una línea de datos de la empresa 7 Con el teclado de mando 7 y las teclas de dirección introduzca los datos que desee Para cambiar entre mayúsculas y minúsculas pulse la tecla de infor mación Para borrar car...

Страница 148: ...e en el menú básico Otras selecciones 2 Para confirmar pulse la tecla ENTER 3 Con la tecla de dirección seleccione Servicio 4 Para confirmar pulse la tecla ENTER 5 Introduzca la contraseña 8463 6 Introduzca los datos que desee con el teclado de mando y las teclas de dirección 7 Para confirmar pulse la tecla ENTER 8 Pulse STOP para acceder al menú Stand by Selec automática Selección libre Otras sel...

Страница 149: ...as selecciones 2 Para confirmar pulse la tecla ENTER 3 Con la tecla de dirección seleccione Servicio 4 Para confirmar pulse la tecla ENTER 5 Introduzca la contraseña 3724 6 Introduzca los datos que desee con el teclado de mando y las teclas de dirección 7 Para confirmar pulse la tecla ENTER 8 Pulse STOP para acceder al menú Stand by Parámetro Valor por defecto de fábrica Aumento de presión test ti...

Страница 150: ...cie rres rápidos recipiente para aceite nuevo 17 recipiente para aditivo UV 18 y recipiente para aceite usado 19 2 Cierre la tapa 20 3 Especifique el tamaño de los recipientes para aceite nuevo y medio de contraste UV véase capítulo Introducir el tamaño de los reci pientes en la página 151 NOTA Utilice únicamente aceites y aditivos UV autorizados para R 1234yf Siga también las indicaciones del fab...

Страница 151: ...nter 1 Con las teclas de dirección o seleccione en el menú básico Otras selecciones 2 Para confirmar pulse la tecla ENTER 3 Con la tecla de dirección seleccione Servicio 4 Para confirmar pulse la tecla ENTER 5 Introduzca la contraseña 2688 6 Con las teclas de dirección active el campo que desee los campos activos son los oscuros 7 Para confirmar pulse la tecla ENTER 8 Pulse STOP para acceder al me...

Страница 152: ... wait se está analizando el refrigerante 7 10 1 Análisis del refrigerante satisfactorio Si el refrigerante no está contaminado el A CServiceCenter muestra lo siguiente al finalizar el análisis Ahora se puede trabajar con el A CServiceCenter NOTA El A CServiceCenter analiza el grado de pureza del refrigerante antes de recuperarlo Si fuese inferior al 95 el aparato no acepta el refrige rante Refrige...

Страница 153: ...ente 1 Confirme Try again con ENTER El A CServiceCenter hace un total de tres intentos Si el análisis del refri gerante no arroja un resultado satisfactorio el A CServiceCenter mues tra lo siguiente 2 Pulse STOP 3 Conecte el aparato externo de purga a la conexión de eliminación y confirme con ENTER Refrigerant Test Fail Try again ENTER OK No WARNING Bad refrigerant Read user manual Recovery ready ...

Страница 154: ...tulo Línea directa en la página 133 si no no no si si A C ServiceCenter OK A C ServiceCenter OK A C ServiceCenter OK 1 Lleve a cabo el análisis de refrigerante Conecte el A C ServiceCenter para verificación a una nueva botella de refrigerante con R 1234yf Resultado Refrigerante OK Resultado Refrigerante OK Resultado Refrigerante OK 1 Repetición del análisis de refrigerante 2 Repetición del análisi...

Страница 155: ...o ascendente Estas botellas de refrigerante tienen una conexión Al rellenar el A CServiceCenter la conexión debe estar arriba ponga la botella boca arriba Botellas de refrigerante con tubo ascendente Estas botellas de refrigerante están dotadas de dos conexiones Para llenar el A CServiceCenter se utilizará la conexión marcada con una L líquido Al rellenar el A CServiceCenter la conexión debe estar...

Страница 156: ... ENTER Se llena el recipiente interno de refrigerante El final del proceso de llenado se confirma con una señal acústica después del análisis Cierre las válvulas y confirme con ENTER 6 Tras el rellenado se mostrará la cantidad de refrigerante que hay en el recipiente interno Para salir del menú pulse STOP Para acceder al menú Stand by pulse de nuevo STOP El aparato está listo para funcionar Rellen...

Страница 157: ...peración del refrigerante Reciclaje del refrigerante grado de pureza según SAE J 2099 Comprobación del aumento de presión Vaciado del aceite usado Vaciado del equipo Antes de realizar cualquier trabajo en el equipo de aire acondicio nado de un vehículo se ha de comprobar la estanqueidad Para ello se ha de llenar dicho equipo con refrigerante de prueba Durante 5 minutos la presión debe permanecer c...

Страница 158: ...lo una alta presión o baja presión Confirme con ENTER Se inicia el mantenimiento plenamente automático Durante el mantenimiento del equipo de aire acondicionado se ana liza el refrigerante véase el capítulo Analizar refrigerante en la página 152 Cuando concluye el servicio de mantenimiento del aire acondicio nado aparece un mensaje exhortándole a desconectar las mangue ras de servicio 11 y 12 del ...

Страница 159: ... en el menú básico Otras selecciones 2 Para confirmar pulse la tecla ENTER 3 Con la tecla de dirección seleccione Servicio y confirme con ENTER 4 Introduzca la contraseña 9786 y confirme con ENTER para acce der al menú de administrador ADM 5 Introduzca el código de administrador 0000 ajuste de fábrica y confirme con ENTER I Selec automática Selección libre Otras selecciones ENTER OK Flushing Calib...

Страница 160: ...ato sólo podrá ponerse en marcha con dicho código 10 Para confirmar un nuevo código de usuario I 11 Introduzca los nombres de usuario correspondientes y confirme con ENTER ADM AREA Insert new code ADM AREA Confirm new code ADM AREA User number 1 ADM AREA User number 1 Insert new code ADM AREA User number 1 Confirm new code NOTA Con la tecla de información amarilla se puede cambiar entre mayúscu la...

Страница 161: ... uno para desbloquear la estación 1 Introduzca el código de usuario correspondiente Si introduce un código de usuario erróneo aparecerá el siguiente mensaje de error Si lo introduce correctamente la estación de desbloquea y se eleva Aparece el nombre del usuario NOTA El usuario ha sido creado y el menú vuelve a cambiar a la selección de usuario Ahora podrá crear otro usuario o salir del menú con S...

Страница 162: ...de dirección o seleccione Base de datos y confirme con ENTER 5 Seleccione Personal DB y confirme con ENTER 6 En esta base de datos vacía seleccione con las teclas de dirección o la entrada correspondiente y confirme con ENTER 7 Para modificar los datos introducidos pulse la tecla amarilla Info 8 Introduzca en los campos vacíos los datos del vehículo modelo tipo y confirme con ENTER Selec automátic...

Страница 163: ...as cronológicamente no en orden alfanumérico 8 4 Indicación del consumo de refrigerante La estación guarda los datos de las cantidades de refrigerante llenado y recuperado Éstas pueden imprimirse directamente como vista anual o vista mensual 1 Con las teclas de dirección o seleccione en el menú básico Otras selecciones 2 Para confirmar pulse la tecla ENTER 3 Con la tecla de dirección seleccione Se...

Страница 164: ...llenado del año correspondiente Pulsando la tecla de dirección se representa en la pantalla la vista mensual En este ejemplo se purgaron en enero de 2015 un total de 2400 g de refrigerante En la vista mensual se muestra alternativamente la cantidad llenada y la recuperada La vista general puede imprimirse en cualquier momento pulsando la tecla ENTER Con la tecla STOP se finaliza la vista general 2...

Страница 165: ... Seguidamente se aspiran la prueba y se evacúa el sistema de aire acondicionado Se rellena toda la cantidad pres crita para garantizar que se dispone de la cantidad correcta Rellenado con aceite nuevo con aditivo UV y con refrigerante Al concluir cada proceso se imprime un informe de servicio 1 Una las conexiones correspondientes del A CServiceCenter con el equipo de aire acondicionado del vehícul...

Страница 166: ...troduzca el tiempo de verificación de fuga que desee 4 Confirme los dos ajustes con ENTER I Recup Reciclado Sí fase No ENTER OK STOP EXIT Aumento de presión Test tiempo min 1 ENTER OK STOP EXIT NOTA El tiempo de espera garantiza que el refrigerante residual se evapore y se pueda entonces recuperar La evaporación del refrigerante residual provoca un aumento de presión Fase de vacío Sí No ENTER OK S...

Страница 167: ...nte 8 Confirme todos los ajustes con ENTER I Fase rellenado Sí No ENTER OK STOP EXIT Aceite nuevo ml 0 Aditivo UV ml 0 Refrigerante g 500 ENTER OK STOP EXIT NOTA Si durante el mismo ciclo del proceso tiene lugar también un proceso de recuperación la cantidad de aceite nuevo se considera cantidad de llenado extra que se añade a la cantidad de aceite usado previa mente recuperado Si se ajusta este v...

Страница 168: ...todos los ajustes inicie los procesos con ENTER 8 5 5 Tras finalizar el mantenimiento del equipo de aire acondicionado Cuando se termina el servicio de mantenimiento del aire acondicio nado aparece un mensaje exhortándole a desconectar las mangue ras de servicio del A CServiceCenter del equipo de aire acondicionado del vehículo 1 Desconecte las mangueras de servicio 11 y 12 y pulse ENTER para conf...

Страница 169: ...NTER para confirmar 8 Deseleccione Fase de rellenado con No la configuración selec cionada parpadea y pulse ENTER para confirmar 9 Seleccione Arrancar el proceso con ENTER 10 Una vez finalizado el proceso de absorción desconecte la estación del vehículo NOTA Con el menú Flushing se hace una limpieza del equipo de aire acon dicionado del vehículo con refrigerante nuevo Esta limpieza es ade cuada so...

Страница 170: ...co Otras selecciones 14 Para confirmar pulse la tecla ENTER 15 Con las teclas de dirección o seleccione Flushing 16 Cuando proceda introduzca los datos que desee con el teclado de mando 7 y pulse ENTER para confirmar Si no hace falta introducir ningún valor pulse ENTER para ir al siguiente paso del programa 17 Seleccione mediante las teclas de dirección o si debe limpiarse todo el equipo de aire a...

Страница 171: ...falta introducir ningún valor pulse ENTER para ir al siguiente paso del programa 25 Deseleccione Vaciar equipo A C con No la configuración selec cionada parpadea y pulse ENTER para confirmar 26 Seleccione Fase de vacío la configuración seleccionada parpa dea y pulse ENTER para confirmar 27 Cuando proceda introduzca los datos que desee con el teclado de mando 7 y pulse ENTER para confirmar Si no ha...

Страница 172: ... 9 2 Comprobar la calibración de las básculas de aceite I 1 Con las teclas de dirección o seleccione en el menú básico Otras selecciones 2 Para confirmar pulse la tecla ENTER 3 Con las teclas de dirección o seleccione Calibrado básculas NOTA Para un cálculo correcto de las cantidades de aceite y de aditivo UV es necesario comprobar regularmente la calibración de las básculas y corregirla en caso n...

Страница 173: ... usado 19 Cuando se haya descargado las básculas pulse ENTER para confir mar El mensaje exhortándole a retirar los recipientes de la báscula parpadea Cuando se haya concluido correctamente la calibración aparece de nuevo el menú de selección de básculas 5 Vuelva a poner los recipientes en la posición de trabajo Vuelva a acoplar los recipientes para aceites 17 y 19 y para el aditivo UV 18 en los ci...

Страница 174: ...e Fase de rellenado con No Para confirmar pulse la tecla ENTER 8 Seleccione Arrancar el proceso Para confirmar pulse la tecla ENTER Se vacían entonces las mangueras de servicio y se activa el menú básico del A CServiceCenter El compresor ha generado interna mente una ligera subpresión de tal forma que se puede cambiar el filtro sufriendo una pérdida mínima de refrigerante 9 Apague el aparato 10 Ex...

Страница 175: ...el secador sin inclinarlo 13 Cambie las juntas tóricas E Humecte las nuevas juntas tóricas con el aceite de refrigerante antes de montarlas 14 Coloque un nuevo secador y apriete el tornillo a 15 Nm 15 Conecte el enchufe 16 Encienda el aparato El aparato realiza un autocontrol 17 Vuelva a fijar la cubierta D E ...

Страница 176: ... la opción de menú Selec automática o también Selección libre Tiempo de vacío indica cuánto tiempo ha estado la bomba de vacío en funcionamiento desde la última puesta a cero ver fecha NOTA Después de realizar trabajos de mantenimiento debe borrar el mensaje de servicio correspondiente poner el contador a cero Para ello cam bie al menú Otras selecciones Servicio e introduzca aquí el código 7782 Co...

Страница 177: ...ad Una vez cambiado el filtro lleve a cabo un control de estanqueidad con un aparato de comprobación autorizado 9 5 Calibrar el sensor de presión I 1 Con las teclas de dirección o seleccione en el menú básico Otras selecciones 2 Despresurice el equipo como se describe en capítulo Cambiar el filtro del secador en la página 174 3 Para confirmar pulse la tecla ENTER Servicio completado 08 03 15 Total...

Страница 178: ...do 7 introduzca la presión atmosférica que haya en la localidad y pulse ENTER para confirmar I9 Cuando se haya concluido correctamente el calibrado pulse ENTER para salir del menú 10 Pulse dos veces STOP para acceder al menú Stand by 11 Vuelva a enroscar firmemente los acoplamientos de servicio 13 y 14 a las mangueras de servicio 11 y 12 Al hacerlo tenga en cuenta las marcas azules y rojas de los ...

Страница 179: ...manualmente mediante la selección de menú Los siguientes pasos solo los puede realizar personal técnico 2 Desmonte la cubierta frontal Desenrosque los tornillos D del panel de mando y abata éste hacia arriba Desenrosque entonces los tornillos E abajo en la cubierta frontal y retírela ADVERTENCIA Antes de abrir la carcasa del A CServiceCenter apáguelo y desenchú felo D E D E ...

Страница 180: ...o para bombas de vacío hasta la mitad de la mirilla H y vuelva a enroscar el tornillo de llenado de aceite G 8 Monte la cubierta frontal y el panel de mando y conecte el enchufe I NOTA Después de realizar trabajos de mantenimiento debe borrar el mensaje de servicio correspondiente poner el contador a cero Para ello cam bie al menú Otras selecciones Servicio e introduzca aquí el código 7782 Con las...

Страница 181: ...do tanque 1234yf a sistema indica la cantidad de gramos de refrigerante que se ha llenado en los equipos de aire acondicionado por medio de la opción de menú Selec automática o también Selección libre Tiempo de vacío indica cuánto tiempo ha estado la bomba de vacío en funcionamiento Servicio completado indica la cantidad de trabajos de mantenimiento realizados en el equipo de aire acondicionado 12...

Страница 182: ...ec auto mática o también Selección libre Tiempo de vacío indica cuánto tiempo ha estado la bomba de vacío en funcionamiento desde la última puesta a cero ver fecha NOTA El aparato guarda distintos estados del contador Para consultar los valores totales de forma ininterrumpida desde la fabricación del apa rato vaya al menú Otras selecciones Servicio e introduzca aquí el código 7783 Con la tecla de ...

Страница 183: ...nfirmar pulse la tecla ENTER 5 Introduzca la contraseña 7732 6 Introduzca la longitud de la manguera en centímetros 7 Para confirmar pulse la tecla ENTER Servicio completado 07 03 15 Total 4 STOP EXIT NOTA Si en el aparato se utilizan mangueras más largas o más cortas de lo previsto es necesario adecuar las cantidades de llenado a las lon gitudes de manguera La manguera de servicio para el lado de...

Страница 184: ...e llenado correspondientes para el equipo de aire acondicionado Para tener siempre los datos actualizados debe estar instalada la tarjeta de memoria Flash más nueva Para más información sobre la última tarjeta de memoria Flash contacte con la línea directa Tel 49 0 25 72 8 79 191 I La tarjeta de memoria Flash antigua no se va a necesitar más y puede eliminarse respetando el medio ambiente NOTA Al ...

Страница 185: ...ash y fíjela 4 Abata hacia abajo el panel de mando y atorníllelo 5 Cierre el panel de mando y conecte el enchufe 6 Encienda el aparato y siga las indicaciones de la pantalla I NOTA Tras volver a encender el aparato deben transmitirse los valores de la tarjeta de memoria Flash al aparato Para ello cambie al menú Otras selecciones Servicio e introduzca aquí la contraseña 1518 Con firme los mensajes ...

Страница 186: ...ridad garantiza el funciona miento seguro El recipiente para aceite usado se debe cambiar cada seis meses 1 Abra la tapa 20 del lado izquierdo y desacople el recipiente de aceite usado 19 del cierre rápido 2 Suelte el talón M y retire la tapa N NOTA Cambie el recipiente para aceite usado y la junta tórica de la tapa cada 6 meses Si se daña el recipiente para aceite usado cámbielo inmediata mente 1...

Страница 187: ...s de mantenimiento 3 Cambie el recipiente de aceite usado O y la junta tórica P 4 Al colocar la tapa N preste atención a que la pestaña Q tenga la posición correcta 5 Acople el recipiente de aceite usado al cierre rápido O P Q N ...

Страница 188: ...ire la clavija 90 en el sentido de las agujas del reloj hasta que encaje 9 13 Limpieza y mantenimiento Limpie la carcasa con un paño húmedo cuando sea necesario Si es necesario utilice también un poco de lavavajillas No utilice disolven tes ni productos de limpieza abrasivos Compruebe periódicamente que ni las mangueras de servicio 11 y 12 ni los acoplamientos de servicio 13 y 14 presenten daños N...

Страница 189: ...edor amarillo 10 3 Gestión del aparato usado Cuando vaya a desechar definitivamente el A CServiceCenter vacíe primero todos los líquidos del aparato y gestiónelos respetando el medio ambiente M Lleve el aparato al punto limpio más cercano o contacte con el servi cio de atención al cliente NOTA El aceite usado es un residuo especial No mezcle el aceite usado con otros líquidos Guarde el aceite usad...

Страница 190: ...durante el proceso de vacío cuando la presión en el equipo de aire acondi cionado sigue siendo supe rior a 50 mbares tras 8 minutos Compruebe si el equipo de aire acondicionado tiene fugas o bien compruebe las conexiones del A CServiceCenter con el equipo de aire acondicio nado En pantalla aparece Fuga en el sistema Desea continuar Mensaje al final del proceso de vacío El equipo de aire acondicion...

Страница 191: ... de refrigerante ajustada no puede llenarse Compruebe que las conexio nes del A CServiceCenter no están atascadas En pantalla aparece Botella ext vacía o válvula cerrada Compruébelo Mensaje al principio o durante el llenado del reci piente interior de refrige rante cuando la cantidad de refrigerante ajustada no se puede alcanzar Compruebe si aún hay bas tante refrigerante disponible en el recipien...

Страница 192: ...cir la presión Revise el equipo de aire acondicionado y las uniones en busca de fugas estrecha mientos y materia congelada Compruebe la calibración del sensor de presión En pantalla aparece Error 09 La conexión de baja presión no se ha unido al depósito de limpieza durante el proceso de limpieza Una la manguera de baja presión al recipiente de lim pieza y abra la válvula En pantalla aparece Error ...

Страница 193: ...del equipo En pantalla aparece Error 23 Vacío insuficiente Compruebe si el aparato está estanco Compruebe el funciona miento de la bomba de vacío En pantalla aparece Error 24 Aumento de presión durante la prueba de vacío Compruebe si el aparato está estanco En pantalla aparece Error 25 No hay suficiente presión para comprobar la presión de refrigerante Compruebe si hay fugas con siderables Comprue...

Страница 194: ...l funcionamiento híbrido barrido de las mangueras de servicio con aceite híbrido Están conectadas las man gueras de servicio al depó sito de barrido híbrido Está correctamente mon tado el depósito de barrido híbrido Están abiertos los acopla mientos de servicio En pantalla aparece Error G1 No se ha podido establecer ninguna conexión con el módulo de análisis Comprobar las conexiones Están activado...

Страница 195: ...ectadas que no estén dobladas y que estén libres de aceite A CServiceCenter VAS 581 001 Número de artículo ASE 581 01 00 000 Dimensiones anchura x altura x profundidad 560 mm x 1300 mm x 650 mm Peso 100 kg Alimentación de corriente 230 V 240 V 50 Hz 60 Hz Cantidad de refrigerante recuperado 30 kg hora Potencia de la bomba de vacío 5 vehíc h Potencia del compresor hermético 0 32 kW Potencia del fil...

Страница 196: ... 1 Face avant 207 6 2 Face arrière et vue latérale 208 7 Première mise en service 209 7 1 Déroulement de la vérification interne d étanchéité 209 7 2 Installation et mise en marche 209 7 3 Menu de mode veille 211 7 4 Sélection de la langue 211 7 5 Entrer les données 212 7 6 Saisie de la date et de l heure 213 7 7 Modification des valeurs présaisies 214 7 8 Mise en place des bouteilles d huile et d...

Страница 197: ... compteur 248 9 8 Ajustement de la capacité des flexibles de longueur supérieure 249 9 9 Remplacement du papier de l imprimante 250 9 10 Changement de la carte mémoire flash 250 9 11 Changement de bouteille d huile ancienne 252 9 12 Remplacement de câble de raccordement au secteur 254 9 13 Entretien et nettoyage 254 10Elimination 255 10 1 Elimination des liquides récupérés 255 10 2 Recyclage des e...

Страница 198: ...formation de Dometic WAECO Climatisation des véhicules bases techniques de la brochure d information de Dometic WAECO Climatisation des véhicules bases juridiques des indications du fabricant de réfrigérant des indications concernant la manipulation de gaz inflammables p ex du fabricant du réfrigérant d éventuelles indications spécifiques de votre entreprise concernant l entretien des climatisatio...

Страница 199: ...de ce produit Format Signification Exemple En gras Désignations se trouvant sur l appareil Appuyer sur ENTER Gras Affichages à l écran Sélection courte Texte Texte Enumération dans un ordre quelconque Dispositif de surveillance de la pression Soupapes de sécurité 1 Texte 2 Texte 3 Texte Actions à effectuer dans l ordre indiqué 1 Raccorder l appareil 2 Mettre l appareil en marche 3 Appuyer sur la t...

Страница 200: ...onnement et les principes de base de l A CServiceCenter des systèmes de refroidissement ou de climatisation ainsi que des réfrigérants est habilité à utiliser l A CServiceCenter Avant de mettre l A CServiceCenter en marche pour la première fois lisez attentivement ce manuel d utilisation Utilisez cet appareil uniquement pour l usage prévu Ne procédez à aucun travail de modification ou de transform...

Страница 201: ...teilles de réfrigérant autorisées avec vanne de sécurité Videz les flexibles d entretien avant de desserrer les raccords Utilisez uniquement le fluide frigorigène R 1234yf Le mélange du réfrigé rant à d autres réfrigérants peut entraîner des dommages de l A CServiceCenter ou de la climatisation du véhicule Utilisez exclusivement des traceurs WAECO L utilisation d autres tra ceurs risque d endommag...

Страница 202: ...de respecter les lois de protection de l environnement mais aussi d éviter que du fait de la présence de réfrigérant dans l environne ment de l appareil la recherche de fuites sur le véhicule ou sur l appareil ne soit difficile ou impossible Ne respirez pas les vapeurs du réfrigérant Les vapeurs de réfrigérant ne sont certes pas nocives mais elles repoussent l oxygène nécessaire à la respiration L...

Страница 203: ... sion Consignes de sécurité concernant la manipulation de gaz sous pres sion Mesures de santé publique concernant la manipulation de gaz sous pression Utilisation de l appareil et exécution de travaux de maintenance sur l appareil L exploitant de l appareil doit veiller à ce que le personnel chargé des tra vaux de maintenance et de réparation ainsi que de la vérification de l étanchéité soit certi...

Страница 204: ...spositifs de sécurité Dispositif de surveillance de la pression éteint le compresseur dès que la pression de service normale est dépassée Soupapes de sécurité dispositif de sécurité additionnel permettant d éviter un éclatement des conduites ou des bouteilles au cas où le dispositif de surveillance ne puisse stopper la montée de la surpres sion Ventilateurs et boîtier électrique commutation de tem...

Страница 205: ...lle d huile ancienne brevetée hermétique 2 bouteilles d huile de 250 ml Housse de protection pour l appareil Lunettes de protection gants de protection Notice d utilisation AVIS Pour un fonctionnement en toute sécurité et pour le calibrage vous avez besoin du réfrigérant R 1234yf non compris dans la livraison Actuellement des bouteilles de réfrigérants à différents filetages de rac cordement et ad...

Страница 206: ...est prévu pour l utilisation commerciale Seules des personnes possédant les connaissances techniques néces saires à l entretien des climatisations sont habilitées à utiliser l A CServiceCenter L A CServiceCenter permet l entretien des climatisations des véhicules utilisant le fluide frigorigène R 1234yf exclusivement L A CServiceCenter convient uniquement pour les liquides homologués ...

Страница 207: ...ter 6 1 Face avant 1 Manomètre basse pression 2 Voyant d état rouge Remplir 3 Voyant d état bleu Évacuer 4 Voyant d état vert Aspirer 5 Manomètre haute pression 6 Affichage 7 Clavier 8 Unité d analyse du gaz 9 Plaque avant 10 Roues avant avec freins 14 13 3 4 5 10 8 9 7 6 2 16 12 11 15 1 ...

Страница 208: ...accord haute pression rouge 14 Connecteur d entretien pour raccord basse pression bleu 15 Imprimante 16 Unité d affichage 6 2 Face arrière et vue latérale 17 Pulvérisateur d huile neuve non compris dans la livraison 18 Conteneur pour traceur non compris dans la livraison 19 Bouteille d huile ancienne brevetée 20 Volet de protection 21 Interrupteur principal 22 Ventilateur 19 18 17 20 22 21 ...

Страница 209: ...test de pression de 6 minutes est alors effectué Toutes les élec trovannes correspondantes restent alors ouvertes afin de pouvoir constater immédiatement une chute de pression Une fois le déroule ment terminé le réfrigérant est aspiré et l appareil est disponible pour des travaux de maintenance 7 2 Installation et mise en marche 1 Transporter l A CServiceCenter au poste de travail et bloquer les r...

Страница 210: ...e ensuite un test logiciel Une vérification de l étanchéité a lieu ensuite L appareil affiche le menu de veille après le contrôle d étanchéité I Attendez pression interne du réservoir xxxx mbar Ventilez suffisamment Test logiciel Attendez Vérifier l étanchéité Attendez Réfrigérant g XXXX Huile réfr ml XXX Traceur ml XXX 11 56 35 10 03 15 REMARQUE Passer les codes d erreur survenant lors de la prem...

Страница 211: ...e la langue 1 Appuyez sur les touches fléchées ou pour accéder au menu de base 2 Dans le menu de base sélectionner Autres menus à l aide de la touche fléchée ou 3 Confirmer en appuyant sur ENTER 4 Sélectionner Service avec la touche fléchée 5 Confirmer en appuyant sur ENTER 6 Entrer le mot de passe 5264 7 Sélectionner une langue avec la touche fléchée ou 8 Confirmer en appuyant sur ENTER 9 Appuyer...

Страница 212: ...gnes des données affichées apparaît à l écran après le message Entrez données 01 à 05 Les touches fléchées ou permettent de sélectionner la ligne souhaitée dans les données 7 Saisir les données souhaitées à l aide du clavier 7 et des touches fléchées Appuyer sur la touche d information afin de passer des majus cules aux minuscules et inversement Pour effacer les caractères appuyer brièvement sur l...

Страница 213: ... Autres menus à l aide de la touche fléchée ou 2 Confirmer en appuyant sur ENTER 3 Sélectionner Service avec la touche fléchée 4 Confirmer en appuyant sur ENTER 5 Entrer le mot de passe 8463 6 Saisir les données souhaitées à l aide du clavier et des touches flé chées 7 Confirmer en appuyant sur ENTER 8 Appuyer sur STOP pour accéder au menu de mode veille Sélection courte Sélection libre Autres men...

Страница 214: ...de de la touche fléchée ou 2 Confirmer en appuyant sur ENTER 3 Sélectionner Service avec la touche fléchée 4 Confirmer en appuyant sur ENTER 5 Entrer le mot de passe 3724 6 Saisir les données souhaitées à l aide du clavier et des touches flé chées 7 Confirmer en appuyant sur ENTER 8 Appuyer sur STOP pour accéder au menu de mode veille Paramètres Valeur présaisie en usine Temps pour la diff de pres...

Страница 215: ... placer les récipients sur les raccords rapides bouteille pour huile neuve 17 bouteille pour traceur 18 et bouteille d huile ancienne 19 2 Fermer le volet de protection 20 3 Saisir la taille de la bouteille d huile neuve et de traceur UV voir cha pitre Saisie de la taille de bouteille page 216 REMARQUE Utilisez exclusivement des huiles et traceurs homologués pour R 1234yf Tenez compte des indicati...

Страница 216: ...1 Dans le menu de base sélectionner Autres menus à l aide de la touche fléchée ou 2 Confirmer en appuyant sur ENTER 3 Sélectionner Service avec la touche fléchée 4 Confirmer en appuyant sur ENTER 5 Entrer le mot de passe 2688 6 Activer les champs souhaités à l aide des touches fléchées les champs noircis sont activés 7 Confirmer en appuyant sur ENTER 8 Appuyer sur STOP pour accéder au menu de mode...

Страница 217: ... 7 10 1 Analyse du réfrigérant réussie S il n y a pas d impuretés dans le réfrigérant l A CServiceCenter affiche à la fin de l analyse le message suivant Il est possible de travailler avec l A CServiceCenter REMARQUE L A CServiceCenter analyse le degré de pureté du réfrigérant avant l aspiration Si celui ci est en dessous de 95 l appareil n accepte pas le réfrigérant Test de réfrigérant Warm up Pl...

Страница 218: ... en appuyant sur ENTER L A CServiceCenter effectue jusqu à trois vérifications en tout Si la troi sième analyse n est toujours pas ok l A CServiceCenter affiche le mes sage suivant 2 Appuyer sur STOP 3 Branchez l appareil de retraitement externe au raccord de retraite ment et validez par ENTER Test de réfrigérant Fail Encore une fois ENTER OK Non WARNING Bad refrigerant Read user manual Recovery r...

Страница 219: ...sistance téléphonique page 198 oui non non non oui oui A C ServiceCenter OK A C ServiceCenter OK A C ServiceCenter OK 1 Effectuer une analyse du réfrigérant Raccorder l A C ServiceCenter à une nouvelle bouteille de réfrigérant avec R 1234yf Résultat Fluide frigorigène ok Résultat Fluide frigorigène ok Résultat Fluide frigorigène ok 1 Nouvelle analyse du réfrigérant 2 Nouvelle analyse du réfrigéran...

Страница 220: ...e refoulement Ces bouteilles de réfrigérant sont munies d un raccord Lors du remplissage de l A CServiceCenter le raccord doit se trouver en haut placer la bouteille verticalement Bouteilles de réfrigérant avec tuyau de refoulement Ces bouteilles disposent de deux raccords Pour remplir l A CServiceCenter on utilise le raccord marqué L liquide Lors du remplissage de l A CServiceCenter le raccord do...

Страница 221: ...bouteille interne de réfrigérant est remplie La fin du processus de remplissage est confirmée par un signal sonore après l analyse Fermer les vannes et confirmer en appuyant sur ENTER 6 Après le remplissage la quantité de réfrigérant présente dans la bouteille interne s affiche Appuyer sur STOP pour quitter le menu Appuyer une nouvelle fois sur STOP pour accéder au menu de mode veille L appareil e...

Страница 222: ...n du réfrigérant recyclage du réfrigérant pureté conforme à la norme SAE J 2099 contrôle de l augmentation de pression vidange de l huile ancienne évacuation de l installation Avant chaque travail sur une climatisation du véhicule une vérifica tion de l étanchéité doit être effectuée Pour ce faire la climatisation est remplie avec une charge test de réfrigérant Pendant une durée de 5 minutes la pr...

Страница 223: ...l haute pression ou basse pression Confirmer en appuyant sur ENTER L entretien automatique de la climatisation est lancé Pendant l entretien de la climatisation le réfrigérant est analysé voir chapitre Analyse du réfrigérant page 217 Une fois que l entretien de la climatisation est terminé l écran affiche un message demandant de déconnecter les flexibles d entretien 11 et 12 de l A CServiceCenter ...

Страница 224: ...nus à l aide de la touche fléchée ou 2 Confirmer en appuyant sur ENTER 3 Sélectionner Service avec la touche fléchée et confirmer en appuyant sur ENTER 4 Saisir le mot de passe 9786 et confirmer en appuyant sur ENTER pour accéder au menu administrateur ADM 5 Saisir le code administrateur 0000 réglage en usine et confir mer en appuyant sur ENTER I Sélection courte Sélection libre Autres menus ENTER...

Страница 225: ... obligatoire pour mettre l appareil en marche 10 Confirmer le nouveau code utilisateur I 11 Saisir le nom d utilisateur correspondant et confirmer la saisie en appuyant sur ENTER ADM AREA Insert new code ADM AREA Confirm new code ADM AREA User number 1 ADM AREA User number 1 Insert new code ADM AREA User number 1 Confirm new code REMARQUE La touche info jaune permet de commuter entre les majuscule...

Страница 226: ...t activé et démarre Le nom de l utilisateur s affiche 8 3 Configurer une base de données personnelle Il est possible de configurer dans cette base de données jusqu à 100 véhicules spécifiques au client avec les quantités de remplissage correspondantes 1 Dans le menu de base sélectionner Sélection courte à l aide de la touche fléchée ou 2 Confirmer en appuyant sur ENTER REMARQUE L utilisateur est c...

Страница 227: ...ppuyant sur ENTER 6 Sélectionner l entrée correspondante dans la base de données vide avec la touche fléchée ou et confirmer en appuyant sur ENTER 7 Pour modifier les entrées appuyer sur la touche jaune Info 8 Dans les champs libres saisir les données du véhicule modèle type et confirmer en appuyant sur ENTER Véhicules Plaque N Qt de charge g 500 Base de données ENTER OK STOP EXIT Personal DB ALFA...

Страница 228: ...par ordre chronologique et non par ordre alphanumérique 8 4 Affichage de la consommation de réfrigérant Le poste mémorise les données des quantités et d aspiration du réfrigé rant Elles peuvent être directement imprimées sous forme de vue annuelle ou de vue mensuelle 1 Dans le menu de base sélectionner Autres menus à l aide de la touche fléchée ou 2 Confirmer en appuyant sur ENTER 3 Sélectionner S...

Страница 229: ...correspondante s affiche ensuite Si vous appuyez sur la touche fléchée la vue mensuelle s affiche à l écran Dans cet exemple 2400 g de fluide frigorigène ont été aspirés en janvier 2015 Dans la vue mensuelle la quantité remplie et la quantité aspirée s affichent alternativement Il est à tout moment possible d imprimer la vue d ensemble en appuyant sur la touche ENTER Vous pouvez quitter la vue d e...

Страница 230: ...vidée La quantité de remplissage finale est complètement remplie afin de garantir une précision élevée des quantités de remplissage rajout d huile neuve de traceur et de réfrigérant Un rapport de service sera imprimé à la fin de chaque processus 1 Connecter les raccords correspondants de l A CServiceCenter au système de climatisation du véhicule et les ouvrir 2 Dans le menu de base sélectionner Sé...

Страница 231: ...aite pour la différence de pression standard 1 min et confirmer avec ENTER sinon poursuivre avec chapitre Phase de vide page 232 I Phase de Oui recyclage Non ENTER OK STOP EXIT Temps pour la diff de pression min 1 ENTER OK STOP EXIT REMARQUE Le temps d attente garantit que d éventuels résidus de réfrigérant puissent s évaporer et être aspirés ensuite L évaporation des résidus de réfrigérant entraî...

Страница 232: ...hée la durée de test de fuite de votre choix 4 Confirmer les deux réglages en appuyant sur ENTER I Phase de vide Oui Non ENTER OK STOP EXIT Vide min 20 Test de fuite min 10 ENTER OK STOP EXIT REMARQUE Le climatiseur est vidangé au moyen de la pompe à vide Ce processus sert à éliminer la présence de gaz étrangers ou humidité éventuels et à préparer le système pour la phase de charge Les résidus de ...

Страница 233: ...rigérant 8 Confirmer tous les réglages en appuyant sur ENTER I Phase de charge Oui Non ENTER OK STOP EXIT Huile réfr ml 0 Traceur ml 0 Réfrigérant g 500 ENTER OK STOP EXIT REMARQUE Si un processus d aspiration a lieu dans le même cycle de proces sus la quantité d huile neuve compte comme quantité extra ajoutée à la quantité d huile ancienne précédemment aspirée Si l on règle cette valeur sur 0 l e...

Страница 234: ...tués lancer les processus en appuyant sur ENTER 8 5 5 Après que l entretien de la climatisation est terminé Une fois que l entretien de la climatisation est terminé l écran affiche un message demandant de déconnecter les flexibles d entretien de l A CServiceCenter de la climatisation du véhicule 1 Déconnecter les flexibles de service 11 et 12 et appuyer sur ENTER pour valider Les flexibles d entre...

Страница 235: ...note et appuyer sur ENTER pour valider 8 Désactiver Phase de charge en appuyant sur Non le réglage sélectionné clignote et appuyer sur ENTER pour valider 9 Sélectionner Démarrer processus à l aide de la touche ENTER 10 Une fois terminé le processus d aspiration déconnecter le poste du véhicule REMARQUE Le menu Rinçage A C permet de rincer la climatisation du véhicule avec un réfrigérant neuf Le ri...

Страница 236: ... fléchée ou 14 Confirmer en appuyant sur ENTER 15 A l aide des touches fléchées ou sélectionner Rinçage A C 16 Saisir le cas échéant les données souhaitées à l aide du clavier 7 et appuyer sur ENTER pour confirmer S il n est pas nécessaire de saisir de données appuyer sur ENTER pour passer à l étape suivante du programme 17 A l aide des touches fléchées ou déterminer si toute la climati sation doi...

Страница 237: ...st pas nécessaire de saisir de données appuyer sur ENTER pour passer à l étape suivante du programme 25 Désactiver Phase de recyclage en appuyant sur Non le réglage sélectionné clignote et appuyer sur ENTER pour valider 26 Sélectionner Phase de vide le réglage sélectionné clignote et appuyer sur ENTER pour valider 27 Saisir le cas échéant les données souhaitées à l aide du clavier 7 et appuyer sur...

Страница 238: ...nt zéro des balances d huile I 1 Dans le menu de base sélectionner Autres menus à l aide de la touche fléchée ou 2 Confirmer en appuyant sur ENTER 3 A l aide de la touche fléchée ou sélectionner Remise à 0 REMARQUE Il est nécessaire de contrôler régulièrement les points zéro des balances ou de procéder le cas échéant à un nouveau réglage afin de pouvoir mesurer correctement les quantités d huile e...

Страница 239: ... 19 Une fois les balances déchargées confirmer en appuyant sur ENTER Le message demandant d enlever les récipients de la balance clignote Une fois effectué le réglage du point zéro le menu de sélection pour les balances réapparaît 5 Replacer les bouteilles en position de travail remettre les récipients pour huile 17 et 19 et pour traceur 18 sur les raccords rapides et refermer le volet 20 6 Appuye...

Страница 240: ... en appuyant sur ENTER 8 Sélectionner Démarrer processus Confirmer en appuyant sur ENTER Les flexibles de service sont alors vidangés et le menu de base de l A CServiceCenter est activé Le compresseur a créé une légère sous pression interne si bien que le filtre peut être changé avec très peu de perte de réfrigérant 9 Arrêter l appareil 10 Retirer la prise secteur 11 Retirer le cache arrière Seul ...

Страница 241: ...3 Remplacer les joints toriques E Humecter les nouveaux joints toriques avec de l huile réfrigérante avant le montage 14 Placer un nouveau sécheur et serrer la vis à 15 Nm 15 Enficher la prise secteur 16 Mettre l appareil en marche L appareil procède à un test automatique 17 Fixer de nouveau le cache D E ...

Страница 242: ...urte ou Sélection libre Temps de vide indique combien de temps la pompe à vide a fonctionné depuis la dernière remise à zéro voir date REMARQUE Une fois les travaux d entretien terminés vous devez effacer les messages de service correspondants remise à zéro du compteur Passez pour ce faire à Autres menus Service et entrez le mot de passe 7782 A l aide des touches fléchées ou sélectionner la saisie...

Страница 243: ...ctuez un contrôle d étanchéité avec un appareil de vérification agréé 9 5 Calibrage du capteur de pression I 1 Dans le menu de base sélectionner Autres menus à l aide de la touche fléchée ou 2 Mettre l installation hors pression comme décrit dans chapitre Changement du filtre du sécheur page 240 3 Confirmer en appuyant sur ENTER Service terminé 08 03 15 Nombre 4 STOP EXIT REMARQUE Pour que les mes...

Страница 244: ...aide du clavier 7 et appuyer sur ENTER pour confirmer I 9 Lorsque le calibrage a été effectué appuyer sur ENTER pour quitter le menu 10 Appuyer deux fois sur STOP pour accéder au menu de mode veille 11 Revisser fermement les connecteurs 13 et 14 sur les flexibles de service 11 et 12 en tenant compte des marquages bleus et rouges des connecteurs et flexibles Charge de bout inter Rinçage A C Remise ...

Страница 245: ...ction dans le menu Seul un personnel spécialisé est habilité à effectuer les étapes suivantes 2 Démonter la plaque avant Dévisser les vis D du tableau de commande et rabattre le tableau de commande vers le haut Ensuite dévisser les vis E en bas de la plaque avant et retirer la plaque avant AVERTISSEMENT Eteindre l A CServiceCenter et retirer la prise secteur avant d ouvrir le bâti D E D E ...

Страница 246: ...H et revisser la vis de remplissage d huile G 8 Monter la plaque avant et le tableau de commande et brancher la prise secteur I REMARQUE Une fois les travaux d entretien terminés vous devez effacer les mes sages de service correspondants remise à zéro du compteur Passez pour ce faire à Autres menus Service et entrez le mot de passe 7782 A l aide des touches fléchées ou sélectionner la saisie et co...

Страница 247: ...nter R1234 vers A C indique combien de grammes de réfrigérant ont été ajoutés dans les climatiseurs au moyen de l entrée de menu Sélection courte ou Sélection libre Temps de vide indique combien de temps la pompe à vide a fonc tionné en tout Service terminé indique la quantité de travaux d entretien ayant été effectués par l appareil d entretien de la climatisation R1234yf du système 07 03 15 g 41...

Страница 248: ...mps de vide indique combien de temps la pompe à vide a fonc tionné depuis la dernière remise à zéro voir date REMARQUE L appareil mémorise différents statuts du compteur Afin d appeler les valeurs totales consécutivement depuis que l appareil a été produit rendez vous au menu Autres menus Service et saisissez y le code 7783 Sélectionner la saisie que vous souhaitez à l aide des touches fléchées ou...

Страница 249: ...n appuyant sur ENTER 5 Entrer le mot de passe 7732 6 Entrer la longueur de flexible en centimètres 7 Confirmer en appuyant sur ENTER Service terminé 07 03 15 Nombre 4 STOP EXIT REMARQUE Si des flexibles plus longs ou plus courts doivent être utilisés pour l appareil il est nécessaire d adapter les quantités de remplissage aux nouvelles longueurs des flexibles Le flexible de service pour le côté ha...

Страница 250: ... la climatisation Pour toujours disposer de données actuelles il faut que la dernière carte mémoire flash soit installée Contactez notre service d assistance téléphonique pour de plus amples informations sur les dernières cartes mémoire flash tél 49 0 25 72 8 79 191 I Une carte mémoire flash ancienne n a plus d utilité et peut être recyclée selon les directives relatives à la protection de l envir...

Страница 251: ... fixer 4 Rabattre le tableau de commande vers le bas et le visser 5 Fermer le tableau de commande et brancher la prise secteur 6 Mettre l appareil en marche et suivre les instructions affichées à l écran I REMARQUE Après une nouvelle mise en marche les valeurs de la carte flash mémoire doivent être transmises à l appareil Passez pour ce faire à Autres menus Service et entrez le mot de passe 1518 C...

Страница 252: ...tion La bouteille d huile ancienne doit être remplacée tous les 6 mois 1 Ouvrir le volet de protection 20 sur le côté gauche et retirer la bou teille d huile ancienne 19 se trouvant sur le raccord rapide 2 Desserrer l étrier M et retirer le couvercle N REMARQUE Changez la bouteille d huile ancienne et le joint torique du couvercle tous les 6 mois Si la bouteille d huile ancienne est endommagée rem...

Страница 253: ...d entretien 3 Remplacer la bouteille d huile ancienne O et le joint torique P 4 Faire attention en plaçant le couvercle N à ce que le nez Q soit bien positionné 5 Fixer la bouteille d huile ancienne sur le raccord rapide O P Q N ...

Страница 254: ...prise 4 Tournez le connecteur à 90 dans le sens des aiguilles d une montre jusqu à ce qu il s enclenche 9 13 Entretien et nettoyage Si nécessaire nettoyez l extérieur de l appareil avec un chiffon humide Le cas échéant utilisez en outre un peu de produit vaisselle N utilisez pas de dissolvants ni de produits détergents Vérifiez régulièrement que les flexibles 11 et 12 et les connecteurs 13 et 14 n...

Страница 255: ...ceCenter définitivement hors service vidangez d abord l appareil pour éliminer tous les liquides et recyclez les liquides en tenant compte des directives relatives à la protection de l environnement M Remettez l appareil usagé au centre de recyclage le plus proche ou adressez vous au service après vente REMARQUE L huile ancienne doit être recyclée comme un déchet spécial Ne mélangez pas l huile us...

Страница 256: ...es sus de vide lorsque la pres sion dans le système de climatisation est encore supérieure à 50 mbars au bout de 8 minutes Vérifier que le système de cli matisation ne fuit pas et véri fier les raccordements de l A CServiceCenter avec le système de climatisation Affichage à l écran Sys A C non étanche Continuer Message à la fin du proces sus de vide Le système de climatisation a une perte de vide ...

Страница 257: ...est impossible d ajouter la quantité de réfri gérant déterminée Vérifier que le liquide peut s écouler dans les raccords de l A CServiceCenter Affichage à l écran Bouteille ext vide ou vanne fermée Contrôlez Message au début du rem plissage ou pendant le rem plissage de la bouteille interne de réfrigérant si la quantité prédéterminée de réfrigérant n a pu être atteinte Vérifier qu il y a encore su...

Страница 258: ...inçage la pression ne peut pas être réduite Vérifier si la climatisation et les raccords manquent d étanchéité sont rétrécis ou oxydés Vérifier le calibrage du cap teur de pression Affichage à l écran Error 09 Le raccord basse pression n est pas raccordé au réser voir de rinçage pendant le processus de rinçage Raccorder le flexible basse pression au bac de rinçage et ouvrir la vanne Affichage à l ...

Страница 259: ...érifier que la pompe à vide fonctionne Affichage à l écran Error 24 Hausse de pression durant le test de vide Vérifier si l appareil fuit Affichage à l écran Error 25 Pas assez de pression pour la vérification de la pression du réfrigérant Vérifier si l appareil présente des fuites évidentes Contrôler le niveau de réfri gérant La température ambiante est elle supérieure à 10 C Affichage à l écran ...

Страница 260: ...rinçage hybride Le réservoir de rinçage hybride est il monté dans la bonne direction Les connecteurs de service sont ils ouverts Affichage à l écran Error G1 La connexion au module d analyse n a pu être établie Contrôlez le raccordement DEL activées sur le module Affichage à l écran 00001 Valeurs de mesure instables Éloignez les sources d inter férence électrique télé phones mobiles appareils de s...

Страница 261: ...81 01 00 000 Dimensions largeur x hauteur x profondeur 560 mm x 1300 mm x 650 mm Poids 100 kg Alimentation 230 V 240 V 50 Hz 60 Hz Débit d aspiration du réfrigérant 30 kg heure Puissance de la pompe à vide 5 véhicules heure Puissance du compresseur hermétique 0 32 kW Puissance du filtre sec 150 kg Capacité utile du réservoir du cylindre de charge 16 kg Emission sonore 55 5 dB A Précision de la bal...

Страница 262: ...ению 272 6 Общий вид A CServiceCenter 273 6 1 Лицевая сторона 273 6 2 Задняя сторона и вид сбоку 274 7 Первый ввод в эксплуатацию 275 7 1 Процесс внутренней проверки герметичности 275 7 2 Установка и включение 275 7 3 Меню режима готовности 277 7 4 Выбор языка 277 7 5 Ввод данных о компании 278 7 6 Ввод даты и времени 279 7 7 Изменение заданных значений 280 7 8 Установка емкостей для масел и УФ пр...

Страница 263: ...зания счетчиков 314 9 8 Коррекция заливаемого объема для длинных сервисных шлангов 315 9 9 Замена бумаги для принтера 316 9 10 Замена карты флэш памяти 316 9 11 Замена емкости для отработавшего масла 318 9 12 Замена сетевого кабеля 320 9 13 Чистка и уход 320 10Утилизация 321 10 1 Утилизация собранных жидкостей 321 10 2 Утилизация упаковочного материала 321 10 3 Утилизация отслужившего свой срок пр...

Страница 264: ...ьно прочтите данную инструкцию Кроме того соблюдайте Руководство по обучению Кондиционирование воздуха в авто мобилях Технические основы компании Dometic WAECO Информационная брошюра Кондиционирование воздуха в автомобилях Юридические основы компании Dometic WAECO Указания изготовителя хладагента Указания по обращению с горючими газами например изготови телей хладагентов Возможно имеющиеся на Ваше...

Страница 265: ... по управлению продуктом Формат Значение Пример Жирный шрифт Надписи имеющиеся на приборе Нажать ENTER Жирный шрифт Сообщения на дисплее Быстрый пуск Текст Текст Перечни в любой последова тельности Защитное реле давления Предохранительные клапаны 1 й текст 2 й текст 3 й текст Операции которые должны быть выполнены в указанной последовательности 1 Присоединить прибор 2 Включить прибор 3 Нажать кноп...

Страница 266: ... использовать только персоналу которые может подтвердить подходящее техническое обучение и знает принцип действия и основные сведения о A CServiceCenters холодильных системах кондиционерах и хладагентах Прежде чем в первый раз ввести A CServiceCenter в эксплуатацию внимательно прочтите данную инструкцию Используйте данный прибор только для указанных целей Не выполняйте каких либо изменений или пер...

Страница 267: ...ользуйте только допущенные баллоны с предохранительным клапаном Перед отсоединением прибора опорожняйте все сервисные шланги Используйте только хладагент R 1234yf Смешивание хладагента с другими хладагентами может приводить к повреждению A CServiceCenter и автомобильного кондиционера Используйте только УФ присадки WAECO Использование других УФ присадок может приводить к повреждениям A CServiceCent...

Страница 268: ...ва нию хладагент не выливался и не попадал в окружающую среду Благодаря этому не только соблюдаются законы по охране окружа ющей среды Также предотвращается что наличие хладагента в окружении привода усложняет или делает невозможным обнаруже ние утечек в автомобиле или приборе Не вдыхайте пары хладагента Пары хладагента хотя и неядовиты но вытесняют необходимый для дыхания кислород Хладагент запре...

Страница 269: ...по следующим пунктам особые опасности при обращении со сжатыми газами меры предосторожности при обращении со сжатыми газами меры по охране здоровья при обращении со сжатыми газами управление прибором и выполнение обслуживания прибора Эксплуатационник прибора должен обеспечить чтобы персонал занятый сервисными и ремонтными работами а также проверкой герметичности был сертифицирован по обращению с х...

Страница 270: ...Обученный персонал 2 6 Предохранительные устройства Защитное реле давления выключает компрессор если превы шено нормальное рабочее давление Предохранительные клапаны дополнительное предохранитель ное устройство для предотвращения разрыва линий или емко стей если несмотря на защитное реле давления избыточное давление продолжает расти Вентиляторы и электронные блоки схема задержки проверяет при пуск...

Страница 271: ...вежим маслом и УФ контрастным средством Закрытая запатентованная емкость для отработавшего масла Бутылка с маслом 250 мл 2 шт Защитный кожух Защитные очки защитные рукавицы Инструкция по эксплуатации ВНИМАНИЕ Для надежной эксплуатации и калибровки требуется хладагент R 1234yf не входит в объем поставки В настоящее время поставляются баллоны с хладагентом с раз личными соединительными резьбами и пе...

Страница 272: ...ых кондиционеров Прибор рассчи тан на коммерческое использование Управлять A CServiceCenter разрешается только лицам имеющим достаточные знания по обслуживанию кондиционеров С помощью A CServiceCenter разрешается обслуживать только автомобильные кондиционеры использующие хладагент R 1234yf A CServiceCenter подходит только для допущенных эксплуатацион ных материалов ...

Страница 273: ...анометр низкого давления 2 Красная лампа состояния Заполнение 3 Синяя лампа состояния Вакуумирование 4 Зеленая лампа состояния Отсос 5 Манометр высокого давления 6 Дисплей 7 Клавиатура управления 8 Газоанализатор 9 Лицевая панель 10 Фиксируемые передние колеса 14 13 3 4 5 10 8 9 7 6 2 16 12 11 15 1 ...

Страница 274: ...подключения высокого давления красная 14 Сервисная муфта для подключения низкого давления синяя 15 Принтер 16 Блок индикации 6 2 Задняя сторона и вид сбоку 17 Емкость со свежим маслом не входит в объем поставки 18 Емкость для УФ присадки не входит в объем поставки 19 Запатентованная емкость для отработавшего масла 20 Заслонка 21 Главный выключатель 22 Вентилятор 19 18 17 20 22 21 ...

Страница 275: ...нутные испыта ния давлением при котором все соответствующие электромаг нитные клапаны остаются открытыми чтобы сразу же можно было определить падение давления После успешного оконча ния хладагент отсасывается и прибор находится в распоряже нии для сервисных работ 7 2 Установка и включение 1 A CServiceCenter подвести к рабочему месту и зафиксировать передние колеса 10 I 2 A CServiceCenter присоедин...

Страница 276: ...rviceCenter После этого выполняется проверка герметичности После успешного завершения проверки герметичности на устройстве появляется меню режима ожидания I Please wait Internal vessel pressure xxxx mbar Ensure sufficient ventilation Software test Please wait Tightness test Please wait Refrigerant g XXXX PAG oil ml XXX UV tracer ml XXX 11 56 35 10 03 15 УКАЗАНИЕ Коды ошибок появляющиеся при первом...

Страница 277: ...Дата 7 4 Выбор языка 1 Для входа в базовое меню нажать кнопки со стрелками или 2 В базовом меню кнопками со стрелками или выбрать Other selections 3 Для подтверждения нажать ENTER 4 Кнопкой со стрелкой выбрать Service 5 Для подтверждения нажать ENTER 6 Ввести пароль 5264 7 Кнопками со стрелками или выбрать требуемый язык 8 Для подтверждения нажать ENTER 9 Нажать STOP Выбранный язык становится акти...

Страница 278: ...дисплее появляется число показываемых строк с данными о компании под сообщением Enter company data 01 05 Кнопками со стрелками или выбирается требуемая строка с данными о компании 7 С клавиатуры управления 7 и кнопками со стрелками ввести требуемые данные Для переключения между заглавными или строчными буквами нажать информационную кнопку Для стирания отдельных символов коротко нажать кнопку C Для...

Страница 279: ...ми со стрелками или выбрать Other selections 2 Для подтверждения нажать ENTER 3 Кнопкой со стрелкой выбрать Service 4 Для подтверждения нажать ENTER 5 Ввести пароль 8463 6 С клавиатуры управления и кнопками со стрелками ввести тре буемые данные 7 Для подтверждения нажать ENTER 8 Для возврата в меню режима готовности нажать STOP Short selection Free selection Other selections ENTER OK ...

Страница 280: ...ns 2 Для подтверждения нажать ENTER 3 Кнопкой со стрелкой выбрать Service 4 Для подтверждения нажать ENTER 5 Ввести пароль 3724 6 С клавиатуры управления и кнопками со стрелками ввести тре буемые данные 7 Для подтверждения нажать ENTER 8 Для возврата в меню режима готовности нажать STOP Параметры Значение завод ской настройки Время ожидания роста давл мин 1 Время вакуума мин 20 Время контроля ваку...

Страница 281: ...тановить емкости на быстродействующие муфты емкость для свежего масла 17 емкость для УФ присадки 18 и емкость для отработавшего масла 19 2 Закрыть заслонку 20 3 Ввести размеры емкостей для свежего масла и УФ контрастного средства см гл Ввод размеров емкостей на стр 282 УКАЗАНИЕ Используйте только масла и УФ присадки допущенные для R 1234yf Соблюдайте указания изготовителя автомобиля 19 18 17 20 ...

Страница 282: ...ы в A CServiceCenter 1 В базовом меню кнопками со стрелками или выбрать Other selections 2 Для подтверждения нажать ENTER 3 Кнопкой со стрелкой выбрать Service 4 Для подтверждения нажать ENTER 5 Ввести пароль 2688 6 Кнопками со стрелками активировать требуемые поля темные поля активны 7 Для подтверждения нажать ENTER 8 Для возврата в меню режима готовности нажать STOP Short selection Free selectio...

Страница 283: ... что выполняется анализ хладагента 7 10 1 Анализ хладагента пройден Если хладагент не загрязнен то после окончания анализа на A CServiceCenter появляется следующее сообщение С A CServiceCenter можно выполнять работы УКАЗАНИЕ A CServiceCenter анализирует степень чистоты хладагента перед отсасыванием Если она составляет менее 95 то прибор не акцептирует хладагент Refrigerant Test Warm up Please wait...

Страница 284: ... Try again подтвердить нажатием ENTER A CServiceCenter проверяет до трех раз Если и третий анализ не в порядке то на A CServiceCenter появляется следующее сообщение 2 Нажать STOP 3 Присоединить внешнее очистное устройство к утилизационному штуцеру и нажать ENTER Refrigerant Test Fail Try again ENTER OK No WARNING Bad refrigerant Read user manual Recovery ready ENTER OK ...

Страница 285: ...линия на стр 264 да нет нет нет да да A C ServiceCenter в порядке A C ServiceCenter в порядке A C ServiceCenter в порядке 1 Выполнить анализ хладагента Для верификации присоединить A C ServiceCenter к новому баллону с R 1234yf Результат Хладагент в порядке Результат Хладагент в порядке Результат Хладагент в порядке 1 Повторение анализа хладагента 2 Повторение анализа хладагента Неисправность в A C...

Страница 286: ...ют один штуцер При заполнении A CServiceCenter штуцер должен находиться вверху баллон расположить вертикально Баллоны с хладагентом с напорной трубкой Эти баллоны имеют два штуцера Для заполнения A CServiceCenter используется штуцер обозначенный буквой L liquid жидкость При заполнении A CServiceCenter штуцер должен находиться вверху баллон расположить вертикально 1 В базовом меню кнопками со стрел...

Страница 287: ...мкость для хладагента заполняется Окончание процесса заполнения подтверждается после анализа акустическим сигналом Закрыть клапаны и подтвердить нажатием ENTER 6 После заполнения указывается количество хладагента во вну тренней емкости Для выхода из меню нажать STOP Для возврата в меню режима готовности еще раз нажать STOP Теперь прибор готов к работе Int vessel filling Flushing Reset scales Servi...

Страница 288: ...та чистота соответствует SAEJ2099 Проверка роста давления Слив отработавшего масла Вакуумирование системы Перед любыми работами на автомобильном кондиционере необходимо выполнить проверку герметичности Для этого кондиционер заряжают пробной заправкой хладагента В тече ние 5 минут давление в кондиционере должно оставаться постоянным Полная заправка кондиционера возможна только в том случае если был...

Страница 289: ...низкое давление или только один штуцер высокое или низкое давление Подтвердить нажатием ENTER Запускается автоматическое обслуживание кондиционера Во время обслуживания кондиционера анализируется хладагент см гл Анализ хладагента на стр 283 После того как обслуживание кондиционера закончено появля ется требование отсоединить сервисные шланги 11 и 12 при бора A CServiceCenter от автомобильного конд...

Страница 290: ...ми со стрелками или выбрать Other selections 2 Для подтверждения нажать ENTER 3 Кнопкой со стрелкой выбрать Service и подтвердить нажа тием ENTER 4 Ввести пароль 9786 и подтвердить нажатием ENTER чтобы попасть в меню администратора ADM 5 Ввести код администратора 0000 заводская настройка и под твердить нажатием ENTER I Short selection Free selection Other selections ENTER OK Flushing Reset scales ...

Страница 291: ...ор можно ввести в работу только с этим кодом 10 Подтвердить новый код пользователя I11 Ввести соответствующие имена пользователей и подтвердить нажатием ENTER ADM AREA Insert new code ADM AREA Confirm new code ADM AREA User number 1 ADM AREA User number 1 Insert new code ADM AREA User number 1 Confirm new code УКАЗАНИЕ Желтой кнопкой Информация можно переключать регистры ADM AREA User number 1 Use...

Страница 292: ...блокировать стан цию 1 Ввести соответствующий код пользователя При вводе неверного кода пользователя появляется следующее сообщение об ошибке После успешного ввода станция деблокируется и запускается На дисплее появляется имя пользователя УКАЗАНИЕ Пользователь создан и меню снова переходит к выбору пользова телей Вы можете создать следующего пользователя или выйти из меню нажатием STOP ENTER USER ...

Страница 293: ...лучае можно также и пропустить подтвердить нажатием ENTER 4 Кнопками со стрелками или выбрать Database и под твердить нажатием ENTER 5 Выбрать Personal DB и подтвердить нажатием ENTER 6 В этой пустой здесь базе данных выбрать кнопками со стрел ками или соответствующую запись и подтвердить нажа тием ENTER 7 Для изменения записей нажать желтую кнопку Информация Short selection Free selection Other s...

Страница 294: ...после обновления программного обеспечения Записи сохраняются в хронологическом порядке не в алфа витно цифровом 8 4 Показ расхода хладагента Станция сохраняет данные о залитом и отсосанном количестве хла дагента Они могут быть распечатаны в виде годового или месяч ного протокола 1 В базовом меню кнопками со стрелками или выбрать Other selections 2 Для подтверждения нажать ENTER 3 Кнопкой со стрелк...

Страница 295: ...ество залитого хладагента за соответствующий год После нажатия кнопки со стрелкой на дисплее появляется месяч ный протокол В данном примере в январе 2015 года было отсосано 2400 г хлада гента В месячном протоколе залитое и отсосанное количество всегда ука зываются попеременно Протокол можно в любой момент распечатать нажимая кнопку ENTER После нажатия кнопки STOP показ протокола заканчи вается Ser...

Страница 296: ...гента отсасывается и кондиционер вакуумируется Окончательная заправка залива ется полностью чтобы обеспечить высокую точность заполне ния заливка свежего масла заливка УФ присадки заливка хлада гента В заключение каждого проведенного процесса распечатывается протокол обслуживания 1 Соответствующие штуцеры A CServiceCenter вначале соеди нить с автомобильным кондиционером и открыть их 2 В базовом ме...

Страница 297: ...та давления по умолчанию 1 мин и подтвердить нажатием ENTER в остальных случаях продолжить с гл Процесс вакуумизации на стр 298 I Rec Recycling Yes phase No ENTER OK STOP EXIT Pressure increase Test time min 1 ENTER OK STOP EXIT УКАЗАНИЕ Благодаря времени ожидания обеспечивается что возможно име ющиеся остатки хладагента может испариться а затем быть отсо сан Испаряющиеся остатки хладагента вызыва...

Страница 298: ...трелкой ввести требуемое время контроля вакуума 4 Обе настройки подтвердить нажатием ENTER I Vacuum phase Yes No ENTER OK STOP EXIT Vacuum time min 20 Leak Test min 10 ENTER OK STOP EXIT УКАЗАНИЕ Кондиционер вакуумируется вакуумным насосом Это служит для того чтобы удалить возможно имеющиеся посторонние газы или влагу и подготовить кондиционер к процессу заполнения Отсасы ваемые остатки хладагента...

Страница 299: ...тройки подтвердить нажатием ENTER I Filling phase Yes No ENTER OK STOP EXIT PAG oil ml 0 UV tracer ml 0 Refrigerant g 500 ENTER OK STOP EXIT УКАЗАНИЕ Если в ходе того же процесса происходит процесс отсоса то количество свежего масла считается дополнительным количе ством которое добавляется к ранее отсосанному количеству отработавшего масла Если установить это значение на 0 но заливается ровно тако...

Страница 300: ... 3 Когда выполнены все настройки начать процессы нажатием ENTER 8 5 5 После окончания обслуживания кондиционера После того как обслуживание кондиционера закончено появля ется требование отсоединить сервисные шланги прибора A CServiceCenter от автомобильного кондиционера 1 Отсоединить сервисные шланги 11 и 12 и подтвердить нажа тием ENTER Сервисные шланги опорожняются После этого прибор снова готов...

Страница 301: ...ранная настройка мигает и подтвердить нажатием ENTER 8 Отменить выбор Filling phase посредством No выбранная настройка мигает и подтвердить нажатием ENTER 9 Выбрать Process start нажатием ENTER 10 После окончания процесса отсоса отсоединить станцию от авто мобиля УКАЗАНИЕ С помощью меню Flushing автомобильный кондиционер промы вается свежим хладагентом Промывка прежде всего служит для замены старо...

Страница 302: ...выбрать Other selections 14 Для подтверждения нажать ENTER 15 Кнопками со стрелками или выбрать Flushing 16 При необходимости с клавиатуры управления 7 ввести требуе мые данные и подтвердить нажатием ENTER Если данные не должны быть введены нажать ENTER чтобы перейти к следующему шагу программы 17 Кнопками со стрелками или выбрать должен ли быть про мыт весь кондиционер или один компонент 18 Для п...

Страница 303: ...вердить нажатием ENTER Если данные не должны быть введены нажать ENTER чтобы перейти к следующему шагу программы 25 Отменить выбор Rec Recycling phase посредством No выбранная настройка мигает и подтвердить нажатием ENTER 26 Выбрать Vacuum phase выбранная настройка мигает и под твердить нажатием ENTER 27 При необходимости с клавиатуры управления 7 ввести требуе мые данные и подтвердить нажатием EN...

Страница 304: ...оверка нуля весов для масла I 1 В базовом меню кнопками со стрелками или выбрать Other selections 2 Для подтверждения нажать ENTER 3 Кнопками со стрелками или выбрать Reset scales УКАЗАНИЕ Для правильного измерения количества масла и УФ присадки тре буется регулярная проверка нулей весов и при необходимости подрегулировка Подрегулировка требуется если количество в емкости более чем на 10 мл отлича...

Страница 305: ...отавшего масла 19 Когда весы разгружены для подтверждения нажать ENTER Мигает требование снять емкость с весов Если подрегулировка нуля успешно проведена снова появля ется меню выбора для весов 5 Установить емкость обратно в рабочее положение Емкости для масла 17 и 19 и УФ присадки 18 присоединить к быстродейстьвующим муфтам и закрыть заслонку 20 6 Для возврата в меню режима готовности два раза на...

Страница 306: ...вом No Для подтверждения нажать ENTER 8 Выбрать Process start Для подтверждения нажать ENTER Сервисные шланги опорожняются и активируется базовое меню A CServiceCenter Компрессор создает небольшое внутреннее разрежение благодаря чему фильтр можно заменить с мини мальными потерями хладагента 9 Выключить прибор 10 Вытянуть сетевую вилку 11 Снять заднюю крышку Следующие операции разрешается выполнять...

Страница 307: ... его прямо 13 Заменить кольца круглого сечения E Перед монтажом смазать новые кольца круглого сечения холодильным маслом 14 Установить новый осушитель и затянуть винт с моментом затяжки не более 15 Нм 15 Вставить сетевую вилку 16 Включить прибор Прибор выполняет самопроверку 17 Установить крышку на место D E ...

Страница 308: ...акже Free selection Vacuum time указывает сколько времени вакуумный насос находился в работе с момента последнего сброса см дату УКАЗАНИЕ После выполнения сервисных работ Вы должны удалить сервис ные сообщения сбросить счетчик на нуль Для этого перейдите в меню Other selections Service и введите код 7782 Кноп ками со стрелками или выбрать требуемую запись и подтвер дить нажатием ENTER Следовать ук...

Страница 309: ...ильтра выполните контроль герметичности допу щенным измерительным прибором 9 5 Калибровка датчика давления I 1 В базовом меню кнопками со стрелками или выбрать Other selections 2 Стравить из системы давление как описано в гл Замена фильтра осушителя на стр 306 3 Для подтверждения нажать ENTER Service completed 08 03 15 Total 4 STOP EXIT УКАЗАНИЕ Для правильного измерения давления требуется правиль...

Страница 310: ...чение атмосферного давления и подтвердить нажатием ENTER I 9 После успешного выполнения калибровки нажать ENTER чтобы выйти из меню 10 Для возврата в меню режима готовности два раза нажать STOP 11 Сервисные муфты 13 и 14 навинтить руками на сервисные шланги 11 и 12 при этом учитывать маркировку синего и красного цвета на сервисных муфтах и шлангах Int vessel filling Flushing Reset scales Service У...

Страница 311: ...минут вручную посредством выбора меню Следующие операции разрешается выполнять только специали стам 2 Демонтировать лицевую панель Вывинтить винты D панели управления и откинуть ее верх Затем вывинтить винты E под лицевой панелью и снять ее ПРЕДУПРЕЖДЕНИЕ Перед открытием корпуса выключите A CServiceCenter и выта щите сетевую вилку из розетки D E D E ...

Страница 312: ...трового стекла H и ввинтить пробку маслоналивного отверстия G 8 Установить лицевую панель и панель управления и вставить вилку в розетку I УКАЗАНИЕ После выполнения сервисных работ Вы должны удалить сервис ные сообщения сбросить счетчик на нуль Для этого перейдите в меню Other selections Service и введите код 7782 Кноп ками со стрелками или выбрать требуемую запись и подтвер дить нажатием ENTER Сл...

Страница 313: ...ing R1234 to system указывает сколько граммов хладагента было залито в кондиционеры через пункт меню Short selection или также Free selection Vacuum time указывает сколько всего времени вакуумный насос находился в работе Service completed указывает количество сервисных работ которое было выполнено с помощью прибора R1234 from system 07 03 15 g 4155 STOP EXIT R1234 from tank 07 03 15 g 3395 STOP EX...

Страница 314: ... selection Vacuum time указывает сколько времени вакуумный насос нахо дился в работе с момента последнего сброса см дату УКАЗАНИЕ Прибор сохраняет различные показания счетчиков Для вызова суммарных значений текущих с момента производства прибора перейдите в меню Other selections Service и введите код 7783 Кнопками со стрелками или выбрать требуемую запись Эти показания счетчиков не возможно сброси...

Страница 315: ...vice 4 Для подтверждения нажать ENTER 5 Ввести пароль 7732 6 Ввести длину шланга в сантиметрах 7 Для подтверждения нажать ENTER Service completed 07 03 15 Total 4 STOP EXIT УКАЗАНИЕ Если для прибора используются длинные или короткие сервис ные шланги то необходимо согласовать заливаемый объем с длиной новых шлангов Сервисные шланги для стороны высокого и низкого давления всегда должны иметь одинак...

Страница 316: ...етствующие заливаемые объемы Для того чтобы постоянно поддерживать актуальное состояние дан ных необходимо устанавливать новые карты флэш памяти Информацию о новых картах флэш памяти Вы можете получить по горячей линии тел 49 0 25 72 8 79 191 I Устаревшая карта флэш памяти WAECO более не требуется и может быть должным образом утилизирована УКАЗАНИЕ При замене старой карты флэш памяти на новую инди...

Страница 317: ...мяти 4 Откинуть вниз и привинтить панель управления 5 Закрыть панель управления и вставить вилку в розетку 6 Включить прибор и следовать указаниям на дисплее I УКАЗАНИЕ После повторного включения данные с карты флэш памяти должны быть переданы в прибор Для этого перейдите в меню Other selections Service и введите пароль 1518 Подтвер дите последующие сообщения на дисплее нажатием кнопки ENTER D D L...

Страница 318: ...ную работу Емкость для отработавшего масла необходимо заменять каждые 6 месяцев 1 Открыть заслонку 20 на левой стороне и снять емкость для отработавшего масла 19 с быстродействующей муфты 2 Отпустить хомут M и снять крышку N УКАЗАНИЕ Заменяйте емкость для отработавшего масла и кольцо круглого сечения в крышке каждые 6 месяцев Если емкость для отработавшего масла повреждена то неза медлительно заме...

Страница 319: ...е работы 3 Заменить емкость для отработавшего масла O и кольцо кру глого сечения P 4 При установке крышки N следить за правильностью положения выступа Q 5 Емкость для отработавшего масла надеть на быстродействую щую муфту O P Q N ...

Страница 320: ... Повернуть штекер на 90 по часовой стрелке так чтобы он зафиксировался 9 13 Чистка и уход При необходимости очистите корпус влажной тряпкой Если тре буется можно добавить немного средства для мытья посуды Не используйте растворители или абразивные чистящие средства Регулярно проверяйте сервисные шланги 11 и 12 и сервисные муфты 13 и 14 на предмет повреждений В случае поврежде ний не вводите A CSer...

Страница 321: ...тилизация отслужившего свой срок прибора Если Вы окончательно выводите прибор A CServiceCenter из эксплуатации вначале опорожните его от всех жидкостей и ути лизируйте их должным образом M Сдайте прибор в ближайший пункт приема вторсырья или обра титесь в сервисный центр УКАЗАНИЕ Отработавшее масло является специальными отходами Не смешивайте отработавшее масло с другими жидкостями До утилизации х...

Страница 322: ...нере имеется давление Никаких мер не требуется Процесс автоматически продолжается На дисплее появляется Not enough vacuum Carry on Сообщение во время про цесса вакуумизации если давление в кондиционере через 8 минут составляет более 50 мбар Проверить кондиционер на предмет утечек и соедине ния A CServiceCenter на кондиционере На дисплее появляется A C system leakage Carry on Сообщение в конце про ...

Страница 323: ...ть залито уста новленное количество хла дагента Проверить свободный про ход штуцеров A CServiceCenter На дисплее появляется External tank empty or closed valve Check Сообщение в начале или во время наполнения вну тренней емкости для хла дагента если установленное количество хладагента не может быть достигнуто Проверить имеется ли во внешней емкости еще достаточно хладагента или проверить открыты л...

Страница 324: ...авлено давление Проверить кондиционер и соединения на предмет негерметичности сужений и обледенения Проверить калибровку дат чика давления На дисплее появляется Error 09 Патрубок низкого давле ния во время промывки не присоединен к промывному баку Шланг низкого давления присоединить к промывной камере и открыть вентиль На дисплее появляется Error 10 Во время Software test программной проверки давл...

Страница 325: ...рметичность прибора Проверить работу вакуум ного насоса На дисплее появляется Error 24 Рост давления во время проверки вакуума Проверить герметичность прибора На дисплее появляется Error 25 Недостаточное давление для проверки давления хладагента Проверить герметичность прибора Проверить уровень хлада гента Окружающая температура превышает 10 C На дисплее появляется Error 30 Падение давления во вре...

Страница 326: ... промывной бак Открыты ли сервисные муфты На дисплее появляется Error G1 Не удалось установить связь с аналитическим модулем Проверить соединения Светодиоды на модуле активны На дисплее появляется 00001 Нестабильные результаты измерений Не приближать к устрой ству возможные электриче ские источники помех например мобильные телефоны или сварочные аппараты На дисплее появляется 00002 Результаты изме...

Страница 327: ...00 000 Размеры ширина x высота x глубина 560 мм x 1300 мм x 650 мм Вес 100 кг Электропитание 230 В 240 В 50 Гц 60 Гц Отсос хладагента 30 кг ч Производительность вакуумного насоса 5 автомобилей в час Мощность герметичного компрессора 0 32 кВт Производительность сухого фильтра 150 кг Полезный объем накопителя заполнительного цилиндра 16 кг Уровень шума 55 5 дБ A Точность электронных весов для хладаг...

Страница 328: ...4106 52 55 5393 4683 Mail info dometic com mx NORWAY Dometic Norway AS Skolmar 24 N 3232 Sandefjord 47 33428450 47 33428459 Mail firmapost waeco no POLAND Dometic Poland Sp z o o Ul Puławska 435A 02 801 Warszawa 48 22 414 32 00 48 22 414 32 01 Mail info dometic pl RUSSIA Dometic RUS LLC Komsomolskaya square 6 1 107140 Moscow 7 495 780 79 39 7 495 916 56 53 Mail info dometic ru SINGAPORE Dometic Pt...

Отзывы: