Dolby Laboratories LS5000DVD Скачать руководство пользователя страница 14

14

INSTALLATION

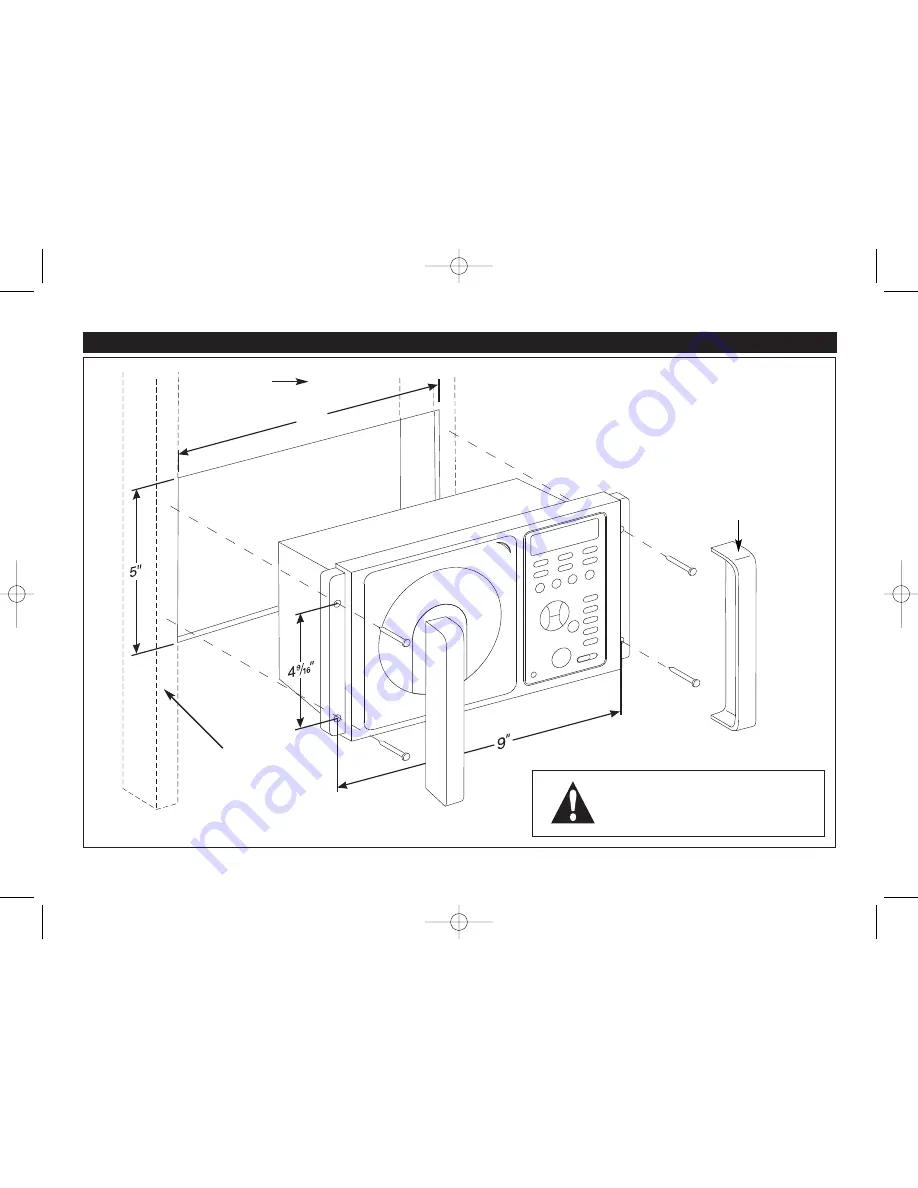
Caution: Do not install radio without rear
cover installed. No user-serviceable parts 
inside. Rear cover provides protection 
against potential fire hazard.

8

1

/

2

"

Wall Panel

Structural 
Stud

End Caps

LS5000DVD_UM.qxp  4/18/05  10:37  Page 14

Содержание LS5000DVD

Страница 1: ...es Motor Homes and Mobile Housings A Registered Trademark of Magnadyne Corporation Manufactured under license from Dolby Laboratories Dolby and the double D symbol are trademarks of Dolby Laboratories...

Страница 2: ...m your new AM FM Stereo Receiver with DVD CD Player WARNING To prevent fire or electrical shock hazard do not expose this product to moisture or remove cover or bottom screws No user serviceable parts...

Страница 3: ...ized radio station 3 DVD Mode Stops disc play 12 Preset 2 Pause Button Radio Mode Recalls memorized radio station 2 DVD Mode Pauses disc play 3 13 Display Area Displays all digital messages 14 Preset...

Страница 4: ...ment cover Point the remote control at the unit s infrared sensor to operate the player 1 Power Mode Button PWR 2 Menu 3 Display Button DISP 4 Fast Forward Fast Reverse Buttons 5 Skip Up Skip Down But...

Страница 5: ...2 Press the Power Mode button momentarily until the Radio Mode is selected 3 Press the Band button to select either the AM1 AM2 FM1 FM2 or FM3 radio band 4 Manually tune in the desired radio station...

Страница 6: ...eset Scan Select a Band if needed Press the AS PS button The tuner scans for preset stations stored in the current band and paus es for five seconds at each station When a desired station is reached p...

Страница 7: ...rm Mode Indicator 7 SETTING THE SLEEP TIMER 1 Press and hold the Sleep button until 00 is displayed 2 Within 5 seconds continuously press the Fast Forward Fast Reverse button until the desired sleep t...

Страница 8: ...always pull at the top left edge of the disc until it snaps loose from the hub There are indenta tions in the plastic for your fingers at this point 3 Always keep your discs clean and free from scratc...

Страница 9: ...play will return to the normal title and track info Random On Indicator Repeat All Indicator Repeat One Indicator Track Scan Feature The Track Scan Feature plays the first 10 seconds each track allowi...

Страница 10: ...n to turn the unit On 2 Press on the disc door next to the word PUSH the door will open slightly Then gently pull the door fully open 3 Insert a disc onto the hub until it snaps into place 4 Close the...

Страница 11: ...lect a title Confirm the title by pressing the Enter button Zooming the Image To enlarge the onscreen image during disc play press the Zoom button Each time the button is pressed the magnifica tion in...

Страница 12: ...menu Options Downmix Lt Rt or Stereo Audio Setup Submenu Use the Skip Up Skip Down buttons or the Fast Forward Fast Reverse buttons to scroll between the menu items Make a selection by pressing the En...

Страница 13: ...ake a selection by pressing the Enter button Preferences Setup Submenu Options TV Display Normal PS Normal LB Wide TV Type Multi System NTSC PAL Audio English French Spanish Chinese Japanese Subtitle...

Страница 14: ...Do not install radio without rear cover installed No user serviceable parts inside Rear cover provides protection against potential fire hazard 81 2 Wall Panel Structural Stud End Caps LS5000DVD_UM qx...

Страница 15: ...15 POWER CONNECTIONS RED Wire To 12 Volt DC Power BLACK Wire Ground This unit for use only with a 12 Volt DC power source with a negative ground LS5000DVD_UM qxp 4 18 05 10 37 Page 15...

Страница 16: ..._ Left Speaker B Left Speaker A Right Speaker B Right Speaker A BROWN Wire ORANGE Wire GREEN Wire GRAY Wire WHITE Wire BLUE Wire Speaker Connections Do not confuse the A and B speaker sets LS5000DVD_...

Страница 17: ...anten na If an automotive antenna is used insert the male plug from the antenna into the female receptacle provided on the unit If an automotive antenna is not available or is undesired we recom mend...

Страница 18: ...A type input jacks are provided on the back panel for connection to a second sound source such as a TV system or component cassette deck Connect a stereo male to male patch cord to the units input jac...

Страница 19: ...Mounting The appliance should be mounted to a wall or cabinet only recommended by the manufacturer Heat The appliance should be situated away from heat sources such as radiators heat registers stoves...

Страница 20: ...E SET FORTH HEREIN NO IMPLIED WARRANTY SHALL EXTEND BEYOND ONE YEAR FROM THE DATE OF SALE This warranty extends only to the original purchaser of the product and is not transferable Some states do not...

Отзывы: