background image

19

10. Code Setting

Follow the steps below to code an EDGE RT transmitter to 
a new or existing receiver. 

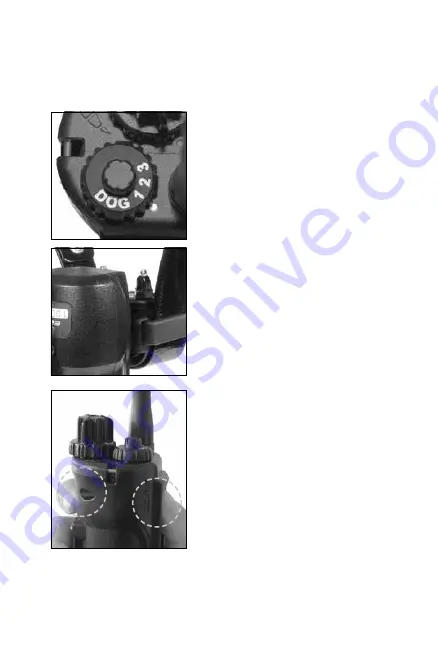
1.  Set the Selector Dial to level 1 

and set the Dog Selector Dial 
to the number you want to 
code the receiver to.

2. With the receiver turned off, 

place the red dot on the back 
of the transmitter to the red 
dot on the receiver. Hold the 
two red dots together for 
about 5 seconds until the 
green LED blinks rapidly on the 
receiver.

3. While the green LED is rapidly 

blinking on the receiver, 
separate the two devices and 
press the top orange button 
on the front of the transmitter 
and the Pager button on 
the back of the transmitter 
simultaneously. The LED light 
on the receiver will blink every 
4 seconds when coding is 
complete.

Содержание Edge RT

Страница 1: ...1 EDGE RT EXPANDABLE TO 3 DOG SYSTEM Owner s Manual Please read this manual thoroughly before operating the EDGE RT training e collar ...

Страница 2: ...oducts Closely observe your dog when determining the right training method to use with your Dogtra product Aggressive Dogs Do not use Dogtra products with aggressive dogs as such dogs may react adversely and cause injury to people or other dogs Seek the assistance of a dog training specialist or veterinarian when dealing with aggressive dogs Children Dogtra products are not toys Adult supervision ...

Страница 3: ...nadvertent Activation The digital microprocessor offers thousands of unique codes to eliminate frequency match up with other Dogtra e collars The Constant button will automatically shut down after being held down for 12 seconds or more as a safety feature UNAUTHORIZED USE Your Dogtra product should be used only in a humane manner to train and educate your dog Dogtra products are not intended for u...

Страница 4: ...RECEIVER FITTING FINDING THE RIGHT STIMULATION MAXIMIZING THE DISTANCE LED INDICATOR CHARGING THE BATTERY CHANGING THE CONTACT POINT LENGTH CODE SETTING ATTACHING THE BELT CLIP USING THE TEST LIGHT GENERAL TRAINING TIPS MAINTENANCE TROUBLESHOOTING GUIDE WARRANTY AND REPAIR INFORMATION 5 6 7 9 10 12 12 13 14 15 16 17 19 20 21 22 24 25 27 1 2 3 4 5 6 7 8 9 10 11 12 ...

Страница 5: ...r Dogtra s European chargers are designed for use with a 230V AC electrical outlet To purchase accessories please visit www dogtra com or call customer service at 888 811 9111 Owner s Manual Belt Clip Test Light Receiver Transmitter Battery Charger Splitter Cable Contact Point Extension Washer Adjustment Tool AT A GLANCE ...

Страница 6: ...nt stimulation types Nick Constant Pager vibration feature Stimulation Combination buttons Expandable to a 3 dog system Fully waterproof Enhanced contact points Belt clip 2 hour rapid charge batteries High stimulation output For dogs as small as 35 lbs MAIN FEATURES ...

Страница 7: ...imulation Black Low Nick Stimulation Black Low Constant Stimulation Orange Battery Charging Receptacle Rubber Plug Medium Constant Stimulation Orange High Constant Stimulation Orange High Nick Stimulation Black Pager Button Gray On Off Magnetic Red Dot OVERVIEW EDGE RT Transmitter ...

Страница 8: ...8 Contact Points Collar Strap LED Indicator Light On Off Magnetic Red Dot Battery Charging Receptacle Rubber Plug EDGE RT Receiver ...

Страница 9: ...her for a moment until the LED light on the receiver comes on To turn the receiver off repeat the same procedure holding the two red dots together momentarily The LED light will turn red for a brief moment indicating that the receiver is now off The transmitter does not have an on off button and it will only activate when the buttons are pressed UNDERSTANDING YOUR SYSTEM ...

Страница 10: ... 12 seconds If the button is not released after 12 seconds the stimulation will automatically turn off as a safety feature The receiver will be ready to be reactivated once the button has been released Low Constant Stimulation Press the lower orange button for a low power Constant stimulation Medium Constant Stimulation Press the top orange button for a medium power Constant stimulation High Const...

Страница 11: ... Stimulation Press the lower black button for Low a low power Nick stimulation Medium Nick Stimulation Press the top black button for a medium power Nick stimulation High Nick Stimulation Press both black buttons together for a high power Nick stimulation 3 Pager Button The Pager button is located on the back of the transmitter Pressing it will give a vibration for as long as the button is pressed...

Страница 12: ...eceiver to move around on the dog s neck When this happens the contact points may rub against the skin and cause irritation If the receiver is too loose the contact will not be consistent and cause the corrections to be inconsistent Dogtra uses surgical stainless steel contact points and anti microbial plastic to protect the dog s skin Change the dial to select the number of the receiver that you ...

Страница 13: ...h a mild reaction Also as the dog s attitude changes especially during times of increased excitement or distraction you may need to adjust the intensity level NOTE The stimulation intensity can be adjusted even while the stimulation is in use Attention Leaving the receiver in the same location on the dog s neck for an extended period of time can cause skin irritation If the dog is to wear the rece...

Страница 14: ...u use your transmitter the transmitter range may vary To get the greatest range hold the transmitter away from your body and avoid touching the antenna Keep your unit properly charged for maximum signal strength Typical range Maximum range Minimum range ...

Страница 15: ...The LED indicator will blink on both the transmitter and the receiver when the transmitter buttons are pressed The LED indicator color indicates the battery life level Green Full charge Amber Medium charge Red Needs charge If the unit is used while the LED indicator is red it may shut down automatically ...

Страница 16: ...and accessories for your Dogtra e collars This will prevent any damage that can be incurred from attempting to use a different charger NOTE 2 The unit has a partial charge when it leaves the Dogtra facility Upon receipt of the system be sure to give it a full 2 hour initial charge before the first use away from any flammable substances NOTE 3 When a charger is not in use disconnect it from the pow...

Страница 17: ...y is fully charged within 2 hours The lights will stay red during the charging process and turn green once the unit is fully charged 4 After charging cover the battery charging receptacles with the rubber plugs 9 Changing the Contact Point Length The Dogtra EDGE RT comes equipped with standard 5 8 contact points that can be extended to 3 4 contact points to use on dogs with longer coats To increas...

Страница 18: ...ul not to over tighten To shorten the contact points back to the standard 5 8 start with the adjustment tool with the side marked 3 4 remove the contact point extensions and tighten the contact points with the adjustment tool with the side marked 5 8 ...

Страница 19: ...dot on the back of the transmitter to the red dot on the receiver Hold the two red dots together for about 5 seconds until the green LED blinks rapidly on the receiver 3 While the green LED is rapidly blinking on the receiver separate the two devices and press the top orange button on the front of the transmitter and the Pager button on the back of the transmitter simultaneously The LED light on t...

Страница 20: ...tach the included belt clip to the transmitter 1 Align the belt clip to the grooves on the back of the transmitter 2 With a firm grip screw on the belt clip s Phillips head screws with a screwdriver Caution Tighten until firmly in place Be careful not to over tighten ...

Страница 21: ...nsity level the brighter the test light will be 4 Watch the test light as you press the Constant button on the transmitter It should light up as long as the button is pressed However as a safety feature the receiver will automatically stop the stimulation if the Constant button is pressed for 12 seconds or longer 5 Turn the Selector Dial on the transmitter clockwise and then counterclockwise The t...

Страница 22: ...ash attached to a standard collar is used to teach the dog the basic obedience commands here heel sit and stay A tug on the leash collar is used to reinforce the command When the dog complies with the command use positive reinforcement praise Once the dog understands these commands the e collar can be used to reinforce them Beginning E Collar Training When you feel your dog understands the obedien...

Страница 23: ...ing sessions short and positive as dogs have a short attention span How Much Stimulation to Use Always start with low levels of stimulation and work your way up depending on the disposition of your dog and the given situation By using the correct amount of stimulation to get your point across you will have a more controllable environment and a dog that is under less stress Animals and humans perfo...

Страница 24: ...ceiver and clean out any dirt or debris Storage maintenance The EDGE RT should be fully charged before storing for extended periods While in storage the unit should be given a full charge once a month and before the first use Store the units in room temperature Do not keep the units exposed to extreme climates Troubleshooting If the unit is malfunctioning please refer to the Troubleshooting Guide ...

Страница 25: ... hair on the dog s neck so both contact points are touching the dog s skin The intensity level may be too low for your dog Keep increasing the stimulation until the dog responds usually with neck movement head shaking looking over its shoulder etc response may be very subtle 2 The test light comes on but I do not feel any stimulation Your tolerance may be higher than your dogs We recommend placing...

Страница 26: ...erly or the charger splitter and the charging port may not be functioning properly You can send in your charging units to have us inspect them The charging pin may be damaged Inside the charging port there is a metal pin that should be standing straight up and stiff If the pin is wobbling broken or missing you will need to send the unit in to the Repair Department The charging port must be clean p...

Страница 27: ...and Extended Warranties are not transferrable and apply to your Dogtra product only if 1 You are the original retail purchaser of the product 2 You bought the product from a Dogtra Authorized Dealer and 3 You present a receipt or other proof of purchase showing a valid purchase date the name and address of the Dogtra Authorized Dealer and the purchased product identified by model and or serial num...

Страница 28: ...CLAIMS ANY IMPLIED WARRANTIES INCLUDING BUT NOT LIMITED TO THE IMPLIED WARRANTIES OF MERCHANTABILITY AND FITNESS FOR A PARTICULAR PURPOSE Limitation of Remedies Dogtra s liability is limited to the cost of repair or replacement of the Dogtra product under the Original Warranty or Extended Warranty Any claim or action to enforce the Original and or Extended Warranties must be commenced within thirt...

Страница 29: ...e useful information and updates about your existing and future Dogtra products To register your product visit www dogtra com product registration If your product is not registered with Dogtra You will be required to provide a receipt or other proof purchase as provided above to qualify for warranty service How to Obtain Warranty Service Should your Dogtra product require warranty service please c...

Отзывы: