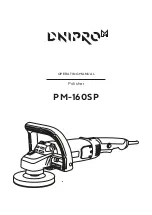
Polisher
16
ENG
•
smoke or smell characteristic for insulation ignition;
•
damages or cracks in the body parts;
Keep the product in good repair. In case of failure or appearance of smell
characteristic for insulation burning, loud knocks, noise, or sparks, you shall
immediately stop works and call to service centre.
This manual cannot take into account all cases that may occur under real
operating conditions. Therefore, you must be very attentive and careful when
working with this tool.
7. MAKEREADY
ATTENTION!
•
Use the tool and accessories in accordance with this manual and the purpose they are
intended for.
•
Use changeable attachments that are designed only for this tool, the permissible
revolution rate of which is higher than maximum speed of the polisher spindle.
•
Use of the tool for other operations and purposes, and an excessive overload or
continuous work for more than 30 minutes may result in its failure.
•
Read SAFETY MEASURES section and follow the requirements stated there.
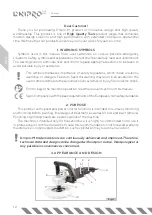
Shaft lock (fig. 3)
The shaft lock button (1) used for prevention its rotation when installing or removing
heads is provided in the main part of the gear unit body. To disable the shaft press and hold
the lock button.
It is prohibited to impede the shaft while spindle rotates. You can damage the
machine.
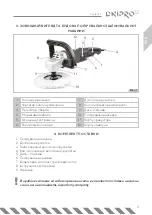
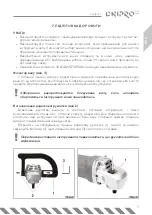
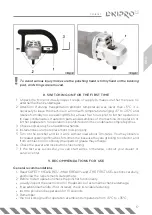
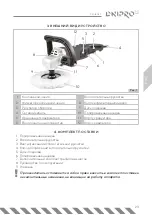
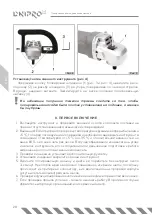
Additional handle installation (fig. 2)
An additional handle is included into the set of supply and can be fixed on either side of
the gear unit body. An additional handle should always be used to maintain full control over
the tool when performing any operations.
Fit an additional handle (1) (fig. 2) on the polisher and securely fasten it with bolts (2) using
the hex wrench (3) supplied.
Before using the machine make sure that the handle is securely fixed.
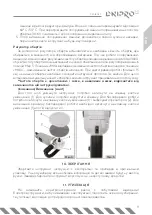
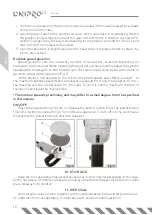
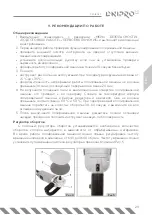
Installing/removing changeable attachments (fig. 4)
While holding the spindle lock button (1) (fig.3 and fig.4) screw on the backing pad (2) to
the spindle thread (3) until it stops, turning it clockwise. Securely tighten by hand. Secure the
polishing head (4) to the backing pad.
Содержание PM-160SP
Страница 1: ...MANUAL POLISHER PM 160SP UA PM 160SP RU PM 160SP...
Страница 2: ......
Страница 3: ...PM 160SP 2 OPERATION MANUAL Polisher 12 22...
Страница 4: ...PM 160SP...
Страница 5: ...1 2 2 2 3 3 4 3 5 4 6 4 7 7 8 8 9 8 10 9 11 9...
Страница 6: ...2 Dnipro M High Quality Tools 1 2 Dnipro M...
Страница 7: ...PM 160SP 3 3 1 7 2 8 3 9 4 10 5 11 6 12 4 1 2 3 4 5 6 7 8 9 1 3 4 2 5 6 12 7 11 10 9 8 1...
Страница 8: ...4 5 PM 160SP 230 50 1600 600 3600 180 M14 IP20 4 2 4 4 6...
Страница 9: ...PM 160SP 5 Dnipro M Dnipro M Dnipro M...
Страница 10: ...6 1 2 3 4 5...
Страница 11: ...PM 160SP 7 7 30 3 1 2 1 2 2 3 1 2 3...
Страница 12: ...8 4 1 3 4 2 3 4 8 1 2 5 5 35 80 3 4 5 3 6 7 9 1 2 10 3 5 35 30 20 4...
Страница 13: ...PM 160SP 9 60 C 50 30 60 5 600 3600 6 5 MIN MAX 15 3 1 1 1 2 1 10 11 4 5...
Страница 14: ...PM 160SP OPERATING MANUAL Polisher...
Страница 23: ...PM 160SP 19 ENG NOTES...
Страница 24: ...PM 160SP...
Страница 25: ...1 22 2 22 3 23 4 23 5 24 6 24 7 27 8 28 9 29 10 30 11 30...
Страница 26: ...22 Dnipro M High Quality Tools 1 2 Dnipro M...
Страница 27: ...PM 160SP 23 3 1 7 2 8 3 9 4 10 5 11 6 12 4 1 2 3 4 5 6 7 8 9 1 3 4 2 5 6 12 7 11 10 9 8 1...
Страница 28: ...24 5 PM 160SP 230 50 1600 600 3600 180 M14 IP20 4 2 4 4 6...
Страница 29: ...PM 160SP 25 Dnipro M...
Страница 30: ...26 Dnipro M Dnipro M...
Страница 31: ...PM 160SP 27 7 30 3 1 2 1 2 2 3...
Страница 32: ...28 4 1 3 4 2 3 4 8 1 2 5 5 35 80 3 4 5 3 6 7 1 2 3...
Страница 33: ...PM 160SP 29 9 1 2 10 3 5 35 30 20 4 60 50 30 60 5 600 3600 6 5 4 5...
Страница 34: ...30 MIN MAX 15 3 1 1 2 1 10 11...
Страница 35: ......
Страница 36: ......

