background image

En

gl

is

h

Safety & Regulatory Statements  

Page 19

Legal and Trademark Notices

“Made for iPod” and “Made for iPhone” mean that an electronic 

accessory has been designed to connect spec

ifi

cally to iPod or 

iPhone, respectively, and has been certi

ed by the developer to 

meet Apple performance standards. Apple is not responsible for the 

operation of this device or its compliance with safety and regulatory 

standards. iPod and iPhone are trademarks of Apple Inc., registered 

in the U.S. and other countries.
iPod and iPhone are trademarks of Apple Inc., registered in the U.S. 

and other countries.

This symbol on the product or in the instructions means 

that your electrical and electronic equipment should be 

disposed at the end of its life separately from your 

household waste. 
There are separate collection systems for recycling in 

the EU.

Содержание Vitruvian CSMP175 Series

Страница 1: ...ian SoundSystemforiPod iPhone Please read carefully before use Läs noggrant före användning For series För serierna CSMP175 Table of Contents Page2 EN Vitruvian ljudsystemföriPod ochiPhone Innehåll Page20 SV ...

Страница 2: ...ance 5 Main Unit 5 Remote Control 7 About the Remote Control Battery 9 Getting Started 10 Connections 10 Connecting Power 10 Connecting an iPod or iPhone 10 Connecting an Auxiliary Device 11 Basic Controls 11 Using iPod iPhone Mode 12 Controls 12 Browsing iPod iPhone Menus with the Remote 13 Rotating the Dock 13 ...

Страница 3: ...English Table Of Contents Page 3 USING AUX MODE 14 Controls 14 SPECIFICATIONS 15 SAFETY REGULATORY STATEMENTS 16 ...

Страница 4: ... from whom you purchased this product This package may contain plastic bags or other materials that pose a hazard to children Be sure to safely dispose of all packing materials after opening Features Premium sound system designed for iPod iPhone Built in Universal dock charges and plays your iPod iPhone One touch dock rotation lets you browse with Cover Flow or watch movies in land scape mode Bass...

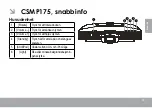
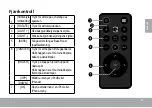
Страница 5: ... Unit 1 Rotate Press to rotate the dock 2 Volume Press to decrease the volume level 3 Volume Press to increase the volume level 4 Standby Press to turn the unit on or off 5 AUX iPod Press to switch between AUX and iPod modes 6 Light Press to increase or decrease the intensity of the background light ...

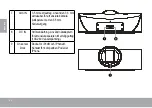
Страница 6: ...tor Use a 3 5mm auxiliary cable to connect portable audio devices with a 3 5mm headphone output 8 DC IN Power connector Use the AC adapter to connect to an AC 100 240V power outlet 9 Universal Dock Dock for iPod and iPhone Connector for your compatible iPod or iPhone ...

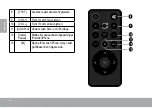
Страница 7: ...ress to decrease the intensity of the background light 5 BASS Press to turn the Bass Boost enhancement on or off 6 LEFT Press to skip to the previous track Hold to scan in reverse quickly through the current track RIGHT Press to skip to the next track Hold to scan forward quickly through the current track UP Use to browse iPod or iPhone menus DOWN 7 OK Press to enter an iPod or iPhone menu selecti...

Страница 8: ...put 9 VOL Press to increase the volume level 10 VOL Press to decrease the volume level 11 AUX iPod Press to switch between AUX and iPod modes 12 Play Pause Press to start or pause iPod or iPhone playback 13 M Press to access the iPod or iPhone menu or to return to a previous screen ...

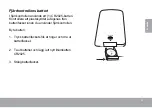
Страница 9: ...e battery Before using the remote be sure to remove the plastic protective tab from the battery compartment To replace the battery Squeeze the tab of the battery compartment 1 to the right while drawing the compartment out Remove the battery and replace it with a 2 new CR2025 lithium battery Replace the compartment 3 ...

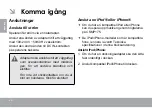
Страница 10: ...d here or on the label as this may result in the risk of fire or electric shock Do not handle the power plug with wet hands Doing so may cause electric shock Connecting an iPod or iPhone If you have a compatible iPod or iPhone you can play it through the speakers of the CSMP175 Compatible iPod iPhone models are listed in the Specifications section of this manual To connect your iPod iPhone If you h...

Страница 11: ... device Connect one end of a 3 5mm auxiliary cable 1 to the headphone out line out jack of the audio device Connect the other end of the cable to AUX 2 IN connector located on the rear of the CSMP175 Basic Controls To do this do this Turn the unit on or off Press Standby Change between iPod iPhone and AUX playback mode Press AUX iPod Adjust the volume level Press VOL or VOL Start pause or resume i...

Страница 12: ...hone is connected to the Universal Dock and the CSMP175 is in iPod mode the following controls are available Remote Key Function Play Pause Start or pause resume playback RIGHT Skip to the next track Remote Key Function LEFT Skip to the previous track Hold RIGHT Scan forward quickly through the current track Hold LEFT Scan in reverse quickly through the current track VOL Increase the volume level ...

Страница 13: ...iPod or iPhone menu selection For iPod touch and iPhone models you may need to start the Music Video player application before the remote controls will work Rotating the Dock Rotate the dock horizontally to view your compatible iPod touch or iPhone in landscape position Press ROTATE to rotate the dock to land scape position Press ROTATE again to return the dock to its normal vertical position When...

Страница 14: ...5 to 3 AUX mode The auxiliary device must have a 3 5mm headphone out or line out connection Controls When the CSMP175 is in AUX mode the follow ing controls are available Remote Key Function VOL Increase the volume level VOL Decrease the volume level MUTE Disable or enable speaker output BASS Turn the Bass Boost enhancement on or off ROTATE Rotate the dock AUX iPod Press to switch between AUX and ...

Страница 15: ... 000Hz Impedance 4Ω 8Ω Aux Input 3 5mm stereo Power Input AC 100 240V 50 60Hz Output DC 20V 1 8A Remote CR2025 battery x 1 Unit Dimensions LWH 4 4 x 15 9 x 6 2 in Made for iPhone 3GS iPhone 3G iPhone 4G iPhone iPod classic iPod touch iPod touch 2G iPod touch 3G iPod touch 4G iPod nano iPod nano 2G iPod nano 3G iPod nano 4G iPod nano 5G iPod nano 6G iPod 5G iPod photo iPod 4G iPod 3G iPod mini ...

Страница 16: ...the Electronics Industries Alliance www eiae org For Customer Use Enter below the serial number that is located on the rear of the unit Retain this information for future reference Model No Serial No WARNING To prevent fire or shock hazard do not expose this device to rain or moisture Dangerous high voltage is present inside the enclosure Do not open the cabinet CAUTION To prevent electric shock ma...

Страница 17: ...equipment itself Always place the equipment on the floor or on a surface that is sturdy level stable and strong enough to support the weight of the equipment Use only a cart or stand recommended 6 by the manufacturer This equipment and recommended cart or stand should be handled with care Quick stops excessive force and uneven surfaces may cause the equipment and cart stand to overturn Do not disab...

Страница 18: ...pparatus has been damaged in any way such as power supply cord or plug is damaged liquid has been spilled or objects have fallen into the apparatus the apparatus has been exposed to rain or moisture does not operate normally or has been dropped Always remove the power cord from the outlet before 21 cleaning the equipment Never use liquid or aerosol cleaners on the equipment 22 Clean only with a so...

Страница 19: ...sible for the operation of this device or its compliance with safety and regulatory standards iPod and iPhone are trademarks of Apple Inc registered in the U S and other countries iPod and iPhone are trademarks of Apple Inc registered in the U S and other countries This symbol on the product or in the instructions means that your electrical and electronic equipment should be disposed at the end of...

Страница 20: ...enhet 23 Fjärrkontroll 25 Fjärrkontrollens batteri 27 Komma igång 28 Anslutningar 28 Ansluta till ström 28 Ansluta en iPod eller iPhone 28 Ansluta en extern enhet 29 Basfunktioner 29 Använda iPod iPhone läge 30 Knappar 30 Bläddra i iPod eller iPhone menyer med fjärrkontrollen 31 Rotera dockan 31 ...

Страница 21: ...Svenska 21 Avända AUX läge 32 Knappar 32 Tekniska specifikationer 33 Säkerhet och bestämmelser 34 ...

Страница 22: ...lla plastpåsar eller annat material om kan utgöra fara för barn Lägg allt emballage på ett säkert ställe när du har öppnat paketet Funktioner Mycket bra ljudsystem utformat för iPod och iPhone Inbyggd universaldocka Universal dock för att ladda och spela upp ljud från iPod iPhone Touch funktion för att rotera dockan så att du kan bläddra med Cover Flow eller se filmer med liggande skärm Bass Boost...

Страница 23: ...Rotate Tryck för att rotera dockan 2 Volume Tryck för att sänka volymen 3 Volume Tryck för att höja volymen 4 Standby Tryck här för att slå på och stänga av spelaren 5 AUX iPod Växla mellan AUX och iPod läge 6 Light Öka eller minska bakgrundsbelysnin gens styrka Svenska ...

Страница 24: ...abel för att ansluta bärbara ljudspelare med en 3 5 mm hörlursutgång 8 DC IN Strömanslutning Använd nätadaptern för att ansluta spelaren till ett vägguttag 100 240 V växelspänning 9 Universal Dock Docka för iPod och iPhone Kontakt för kompatibel iPod eller iPhone ...

Страница 25: ...elysningens styrka 5 BASS Slå på eller stäng av Bass Boost basförstärkning 6 VÄNSTER Tryck för att hoppa till föregående låt Håll knappen nere för att snabbspola bakåt på aktuellt spår HÖGER Tryck på knappen för att hoppa till nästa spår Håll knappen nere för att snabbspola framåt på aktuellt spår UPP Bläddra i menyer i iPod eller iPhone DOWN 7 OK Öppna ett alternativ i en iPod eller iPhone meny ...

Страница 26: ... VOL Tryck för att höja volymen 10 VOL Tryck för att sänka volymen 11 AUX iPod Växla mellan AUX och iPod läge 12 Spela Pausa Starta eller pausa under uppspelning av iPod eller iPhone 13 M Öppna iPod eller iPhone menyn eller gå tillbaka till en tidigare sida ...

Страница 27: ...t 1 CR2025 batteri Kontrollera att plastskyddet avlägsnas från batterifacket innan du använder fjärrkontrollen Byta batteri Tryck batterifackets flik åt höger och dra ut batterifacket 1 Ta ut batteriet och lägg i ett nytt litiumbatteri CR2025 2 Stäng batterifacket 3 ...

Страница 28: ...n du spela upp musiken genom högtalarna på CSMP175 De iPod iPhone modeller som är kompatibla finns i en lista i avsnitt Tekniska specifikationer i denna bruksanvisning Ansluta iPod iPhone Om du har en dockningsadapter ska den sitta fast ordentligt i dockan 1 Anslut kompatibel iPod iPhone till dockan 2 Komma igång Adaptern ska anslutas till ett vägguttag som överensstämmer med märknin gen för att u...

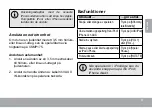
Страница 29: ...s baksida 2 Basfunktioner Omduvill gör så här Slå på eller stänga av spelaren Tryck på Strömbry tare Standby Växla mellan uppspelning från iPod iPhone och AUX Tryck på AUX iPod Ställa in volymen Tryck på VOL eller VOL Starta pausa eller återta uppspelning av iPod iPhone Tryck på Spela Pausa Rotera dockan Tryck på ROTATE När spelaren är i iPod läge kan du använda knapparna på din iPod iPhone direkt...

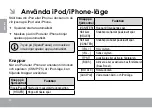
Страница 30: ...uten till dockan och spelaren CSMP175 är i iPod läge kan följande knappar användas Knapp på fjärrkontroll Funktion Spela Pausa Starta eller pausa återta uppspelning HÖGER Hoppa till nästa spår VÄNSTER Hoppa till föregående spår Snabbspola framåt på aktuellt spår Håll kvar VÄNSTER Håll kvar HÖGER Snabbspola bakåt på aktuellt spår VOL Höj volymen VOL Sänk volymen TYST Avaktivera eller aktivera högta...

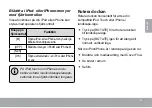
Страница 31: ...Öppna ett alternativ i en iPod eller iPhone meny På iPod touch och iPhone kan du behöva starta musik videospelarappli kationen innan fjärrkontrollen fungerar Rotera dockan Rotera dockan horisontellt för att se din kompatibla iPod Touch eller iPhone i landscape läge Tryck på ROTATE för att rotera dockan till landscape läge Tryck på ROTATE igen för att återgå till normalt vertikalt läge När din iPod...

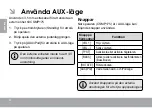
Страница 32: ... läge på spelaren 3 Den externa enheten måste ha ett 3 5 mm hörlursuttag eller en lineout anslutning Knappar När spelaren CSMP175 är i AUX läge kan följande knappar användas Knapp på fjärrkontroll Funktion VOL Höj volymen VOL Sänk volymen TYST Avaktivera eller aktivera högtalaren BASS Aktivera eller avaktivera basförstärkaren Bass Boost ROTATE Rotera dockan AUX iPod Växla mellan AUX och iPod läge ...

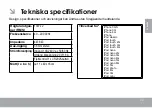
Страница 33: ...Ω 8Ω Aux ingång 3 5mm stereo Strömförsörjning Ingång 100 240 V ac 50 60 Hz Utgång likspänning 20 V 1 8 A Fjärrkontroll 1 x CR2025 batteri Mått l x b x h ca 11 x 40 x 16 cm Tillverkad för iPhone 3GS iPhone 3G iPhone 4G iPhone iPod classic iPod touch iPod touch 2G iPod touch 3G iPod touch 4G iPod nano iPod nano 2G iPod nano 3G iPod nano 4G iPod nano 5G iPod nano 6G iPod 5G iPod photo iPod 4G iPod 3G...

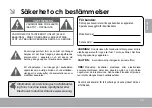
Страница 34: ...LÅT BEHÖRIG PERSONAL SKÖTA ALL SERVICE En varningssymbol i form av en blixt i en triangel betyder att det finns frilagda spänningsförande komponenter i apparaten och att dessa vid beröring kan ge upphov till svåra personskador Ett utropstecken i en triangel gör användaren uppmärksam på viktiga bruks och underhållsan visningar i servicesyfte i dokumentationen som medföljer apparaten Undvik risken f...

Страница 35: ...et eller på en yta som är robust jämn stabil och tillräck ligt stark för att tåla utrustningens vikt Använd endast vagnar eller ställ som rekommenderas av tillverkaren Denna utrustning med vagn eller ställ ska hanteras försiktigt Plötsliga stopp för stor kraft och ojämna ytor kan leda till att apparaten och vagnen välter Kontrollera att apparaten är korrekt jordad Om stickkontakten inte passar i u...

Страница 36: ...ndvika hörselskador och vrid upp till önskad nivå när uppspelningen har börjat Försök inte att själv utföra service Installera inte apparaten i närheten av värmekällor såsom t ex element värmefläktar spis förstärkare eller andra apparater som genererar värme Om du öppnar eller tar bort höljet utsätter du dig för elektriska stötar och andra risker Låt behörig personal sköta all service Var försikti...

Страница 37: ...ar inte för användningen av denna spelare eller uppfyllandet av dess säkerhets och lagstandarder iPod och iPhone är varumärken som tillhör Apple Inc registrerat i USA och andra länder Den här symbolen på produkten eller i instruktionerna betyder att den elektriska och elektroniska utrustningen ska slängas separat från annat hushållsavfall när den inte fungerar längre Inom EU finns separata återvin...

Отзывы: