DMEGC DM315G1-60HBB-A Скачать руководство пользователя страница 6

DMEGC AC Module Installation Manual

- 4 -

WARNING:

Risk of equipment damage

The Enphase Microinverter is not protected from damage due to moisture trapped in cabling systems. Never mate

microinverters to cables that have been left disconnected and exposed to wet conditions. This voids the Enphase

warranty.

NOTES:

The Enphase Microinverter has field-adjustable voltage and frequency trip points that may need to be set,

depending upon local requirements. Only an authorized installer with the permission and following requirements

of the local electrical authorities should make adjustments.

Enphase Q Cable and Accessory Safety

DANGER:

Risk of electric shock. Risk of fire.

Do not install the Enphase Q Cable terminator while power is connected.

WARNING:

Risk of electric shock. Risk of fire.

When stripping the sheath from the Q Cable, make sure the conductors are not damaged. If the exposed wires are

damaged, the system may not function properly.

Do not leave AC connectors on the Q Cable uncovered for an extended period. You must cover any unused

connector with a sealing cap.

Make sure protective sealing caps have been installed on all unused AC connectors. Unused AC connectors are

live when the system is energized.

WARNING:

Use the terminator only once. If you open the terminator following installation, the latching mechanism is

destroyed. If the latching mechanism is defective, do not use the terminator. Do not circumvent or manipulate the

latching mechanism.

When installing the Enphase Q Cable, secure any loose cable to minimize tripping hazard.

NOTES:

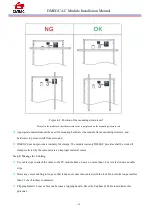
When looping the Enphase Q Cable, do not form loops smaller than 4.75 (12 cm) in diameter.

If you need to remove a sealing cap, you must use the Enphase disconnect tool.

When installing the Enphase Q Cable and accessories, adhere to the following

Do not expose the terminator cap or cable connections to directed, pressurized liquid (water jets, etc.).

Do not expose the terminator or cable to continuous immersion.

Содержание DM315G1-60HBB-A

Страница 1: ...GC Magnetics Co Ltd DMEGC Solar Energy Hengdian Industrial Area Dongyang City Zhejiang Province China Tel 86 579 86554950 Fax 86 579 86554845 Email solar dmegc com cn DMEGC AC Module Installation Manu...

Страница 2: ...2 SYSTEM MONITORING 6 2 3 OPTIMAL RELIABILITY 6 2 4 EASE OF DESIGN 6 3 PREPARATION 7 4 ENPHASE MICROINVERTER INSTALLATION 8 5 TROUBLESHOOTING 20 5 1 STATUS LED INDICATIONS AND ERROR REPORTING 20 5 2 T...

Страница 3: ...with these instructions will invalidate the DMEGC Warranty and may cause loss damage injury or death Module limited warranty is described in The DMEGC Warranty document If there are any questions ple...

Страница 4: ...ith a 20 A maximum breaker or fuse as appropriate DANGER Risk of electric shock Do not use Enphase equipment in a manner not specified by the manufacturer Doing so may cause death or injury to persons...

Страница 5: ...cabling are rated as a disconnect only when used with an Enphase Microinverter Protection against lightning and resulting voltage surge must be in accordance with local standards Perform all electrica...

Страница 6: ...posed wires are damaged the system may not function properly Do not leave AC connectors on the Q Cable uncovered for an extended period You must cover any unused connector with a sealing cap Make sure...

Страница 7: ...e Envoy is a communication device that provides network access to the PV array The Envoy collects production and performance data from the Enphase IQ Microinverters over on site AC power lines and tra...

Страница 8: ...y S or Enphase IQ Combiner and provide an internet connection through a broadband router or modem the Enphase IQ Microinverters automatically begin reporting to Enlighten Enlighten presents current an...

Страница 9: ...G1 60HSW A DM340G1 60HSW A IQ7 C In addition to the Enphase Microinverters PV modules and racking you will need these Enphase items Enphase Envoy S model ENV S WM 230 or ENV S WB 230 F G I communicati...

Страница 10: ...16 13 IQ 7 Modules single phase IQ 7 Modules three phase 48 39 Limits may vary Refer to local requirements to define the number of modules per branch in your area G Size the AC wire gauge to account f...

Страница 11: ...ated only in terrestrial applications The operating module temperature must be within 30 22 F to 85 185 F The wind pressure load of the installation site should be less than Load Resistance shown in M...

Страница 12: ...e microinverter to return it to the shipping position See Figure 4 1 If the problem persists contact Customer Support at Website as follows https enphase com en us company Figure 4 1 How to move to th...

Страница 13: ...pecially pay attention to avoid partially shading the modules by objects during the daytime If a part of the PV module is always shaded hot spots may occur and the PV module may break down Water stain...

Страница 14: ...oof surface and the module is more than 100mm 4 inches or more Clearance of 7 mm or more between modules is required to allow for thermal expansion of the frames Figure 4 6 shows using a bolt and nut...

Страница 15: ...h Clamps Do not contact allow the bolt to contact the back sheet of the module when securing the module to the mounting rail Do not allow the microinverter to interfere with the mounting structure rai...

Страница 16: ...ovide a warranty for clamps The module warranty DMEGC provides shall be voided if clamps selected by the customer are an improper material or size Step 8 Manage the Cabling Use cable clips to attach t...

Страница 17: ...the hex nut to prevent the conductors from twisting out of the separator Turn only the hex nut to prevent conductors from twisting out of the separator Attach the terminated cable end to the PV racki...

Страница 18: ...it breaker Your system starts producing power after a five minute wait time Check the LED on the connector side of the microinverter LED color Indicates Flashing green Normal operation AC grid functio...

Страница 19: ...be of the same model number and or type Refer to the Enphase IQ 7 Installation and Operation Manual for instructions on Q Cable connection AC connector connection and other connections Refer to the E...

Страница 20: ...using Method A B or C B Be sure that the grounding device will fully contact the inner side of the aluminum alloy and penetrate the frame surface oxide film C Make a connection from the grounding con...

Страница 21: ...ng Refer to the Enphase Envoy S Quick Install Guide to install the Envoy S and set up system monitoring and grid management functions This guide leads you through the following Connecting the Envoy S...

Страница 22: ...rter for ACM models a solid red status LED when DC power has been cycled indicates the microinverter has detected a DC Resistance Low Power Off event The LED will remain red and the fault will continu...

Страница 23: ...verter To troubleshoot an inoperable microinverter follow the steps in the order shown WARNING Risk of electric shock Always de energize the AC branch circuit before servicing Never disconnect the DC...

Страница 24: ...module this indicates that the PV module is not functioning correctly If the problem stays in place the problem is with the original microinverter Contact Enphase Customer Support for help in reading...

Страница 25: ...tiating a device scan using one of the following methods Method 1 Initiate a scan using the Installer Toolkit mobile app a In Installer Toolkit once connected to the Envoy S navigate to the Overview s...

Страница 26: ...PV modules are not shaded by unwanted obstacles and or foreign material Corrosion along the cell busbar The corrosion is caused by moisture intrusion thought the module back sheet Check the back shee...

Страница 27: ...ons or methods of installation operation use and maintenance of photovoltaic PV product are beyond DMEGC s control DMEGC does not accept responsibility and expressly disclaims liability for loss damag...

Отзывы: