background image

The DVD setup menu

This is the place where you arrange all important settings for the cooperation of the DVD
with the TV set and other audio equipment. Press the

SETUP

button to access those menus

shown below. Use the navigation keys

3456

to operate the menu.

To activate or confirm the marked items please press the

ENTER

button. When you have

highlighted a menu item but want to change to an other menu page, please press the

3

button (once or twice) before. Having done all desired settings press SETUP button again to
leave the menu and resume playback.

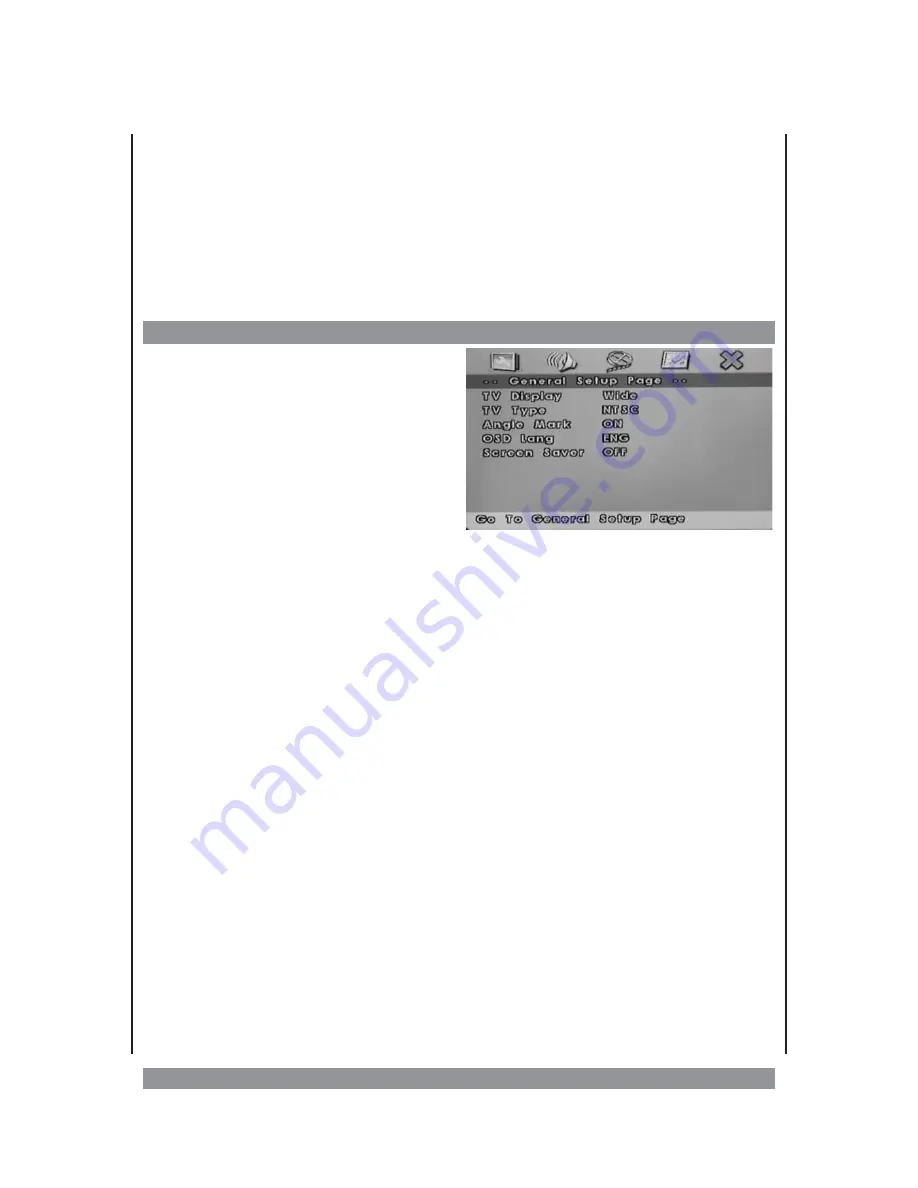
The menu’s in detail - general setup page

TV-Display

The program’s screen format (4 : 3 normal
TV / 16 : 9 wide screen) is fixed by the DVD.
Please note that this format might not
necessarily match the built-in screen format
or your TV’s screen format.

Then this will be helpful:

NORMAL/PS

: Choose this mode when the

connected TV set has 4 : 3 screen format.
The picture will fill the screen but some right and left portion will be cut.

NORMAL/LB

: Choose this mode when the connected TV set has 4 : 3 screen format. The

picture will appear in its entire width but framed by black bars at the top and the bottom.

WIDE

: Choose this mode when using the built-in screen or a 16 : 9 wide scrren TV set.

TV-TYP

This lets you choose the connected TV’s color system, either NTSC (American standard) or
PAL (Europe).

ANGLE MARK

If this function is enabled the camera symbol appears on the screen as soon as various
perspectives are available on the DVD. Choose “OFF” and no camera symbol will appear.

OSD LANG

(uage)

Please select the preferred language for the OSD menus. English, Spanish, German,
French, Italian and Dutch are available.

SCREEN SAVER

When you enable this function a moving DVD symbol appears on the screen when ths unit is
stopped or showing a still picture for more than 1 minute. This saves to screen from getting
damaged by constant pictures. Choose “OFF” to disable the feature.

20

Содержание DVP-800

Страница 1: ...3...

Страница 2: ...players For your own safety and in order to learn all about the functions available please read this manual and keep it for future reference And if you once sell the unit please include the manual ww...

Страница 3: ...ct it immediately from its actual voltage supply and consult qualified service personnel Never let children play with the unit or stick anything into it Otherwise you face the risk of electric shock D...

Страница 4: ...Chapter 14 Skip Search 14 Titel Chapter Search 15 Zoom 15 Various Camera Angles 16 Repeat Modes 16 A B Repeat Mode 16 Toggle Audio Language 16 Show Subtitles 16 DVD Menu 16 Display button 17 Programmi...

Страница 5: ...lay DVD ROM CD ROM etc The types of functions and operations that can be used for a particular disc vary depending on the features of that disc In some cases these functions and operations may differ...

Страница 6: ...on the back of the unit or lay it flat You can also hold it in your hand during operation To protext the laser pick up please don t operate the unit in dusty environments If necessary please use a cle...

Страница 7: ...retention clip in the direction of arrow and pull out the battery mounting 2 Before you take out the empty battery please memorise its position The marking must show upwards otherwise the r c will not...

Страница 8: ...S headphones sockets 3 VOLUME volume control 4 S VIDEO S video output 5 VIDEO video line socket 6 AUDIO audio line socket 7 POWER on off switch 8 DC IN connect the mains adaptor cable or the cigarette...

Страница 9: ...o track CD 15 STANDBY standby indicator 16 CHARGE indicates the charging of the battery 17 FULL indicates that the battery is fully charged 18 Disc compartment cover 19 TFT display 20 SETUP calls up t...

Страница 10: ...The Remote Control Handset R C 10...

Страница 11: ...8 speeds up playback forward 2 4 8 up to 16fold 16 7 speeds up playback backward 2 4 8 up to 16fold 17 skips to next chapter DVD or audio track CD 18 9 skips to previous chapter DVD or audio track CD...

Страница 12: ...hearing A too high volume may lastingly impair the hearing ability of your ears 2 Although this unit has its own screen you can surely connect it to an external television set as well Connect the vide...

Страница 13: ...nt lid Play back starts automatically Usually DVD discs now show a menu to choose from You can control this menu with the navigation buttons 3445 Mark the desired option and press ENTER to activate Mo...

Страница 14: ...layback jump to a specific chapter Simply enter the number of the chapter you want Playback will then continue from this chapter Skip Search Press SKIP 9 or to let playback jump to the beginning of th...

Страница 15: ...ime HH MM SS within the title and playback jumps exactly there If you want to skip playback to a certain point in time of the chapter please press SEARCH 3 times Now for 5 seconds you see Type in the...

Страница 16: ...ng its end Press REPEAT twice and the complete DVD title or all CD tracks will be repeated Press the button again to cancel the repeat function A B Repeat Mode If you want the player to repeat a certa...

Страница 17: ...ed by the chapter number both in two digit format Repeat this input until all desired chapters are stored Then press the navigation keys 3456 to highlight START and press ENTER Now you see the program...

Страница 18: ...choose EXIT to leave the digest function Bookmark During playback of a DVD this unit allows you setting and storing bookmarks for up to 12 different locations This function lets you jump to one of th...

Страница 19: ...the following effects for your selection SURROUND ROCK SURROUND POP SURROUND LIVE SURROUND DANCE SURROUND TECHNO SURROUND CLASSIC SURROUND SOFT SURROUND OFF Do NOT use this feature if you have more th...

Страница 20: ...the connected TV set has 4 3 screen format The picture will fill the screen but some right and left portion will be cut NORMAL LB Choose this mode when the connected TV set has 4 3 screen format The...

Страница 21: ...o call up the Preference SETUP playback has to be stopped completely press stop button twice Otherwise you can t activate it Here is its structure AUDIO Please select your preferred language to playba...

Страница 22: ...cause kids can also read manuals PASSWORD Here you can change the password you need to adapt the parental control level Having activated CHANGE please enter the old password factory setting is 1234 N...

Страница 23: ...echarging of a fully charged battery Special Information about playing CDs During playback of a CD MP3 as well the AUDIO MENU button lets you choose various audio modes Depending on the disc type inse...

Страница 24: ...ress the REPEAT button once the currently played track will be repeated The SKIP buttons are deactivated in this operation mode When you press the REPEAT button twice all files within the folder will...

Страница 25: ...layed Use the navigation keys 56to choose the desired file and press the ENTER button That picture will be displayed This starts your modern slide show because the unit will change to the next picture...

Страница 26: ...e Then the sound is muted Press the PLAY key to resume normal playback with sound No operations can be performed with the remote control handset Check whether the battery is installed with the correct...

Страница 27: ...recorded on the DVD The change of the subtitle s language can only be done using the DVD menu The subtitles cannot be turned off when you play a DVD Depending on the DVD you may not be able to turn th...

Страница 28: ...ts 1 DVD VIDEO disc 12 cm single sided single layer 12 cm single sided dual layer 12 cm double sided single layer 8 cm single sided single layer 8 cm single sided dual layer 8 cm double sided single l...

Страница 29: ...29...

Страница 30: ...30...

Страница 31: ...31...

Страница 32: ...rect errors and make technical alterations This manual is copyrighted All rights reserved Neither the manual as a whole nor excerpts may be reproduced without our prior written permission DK digital A...

Отзывы: