background image

46

RU

Использование Phantom 3 SE

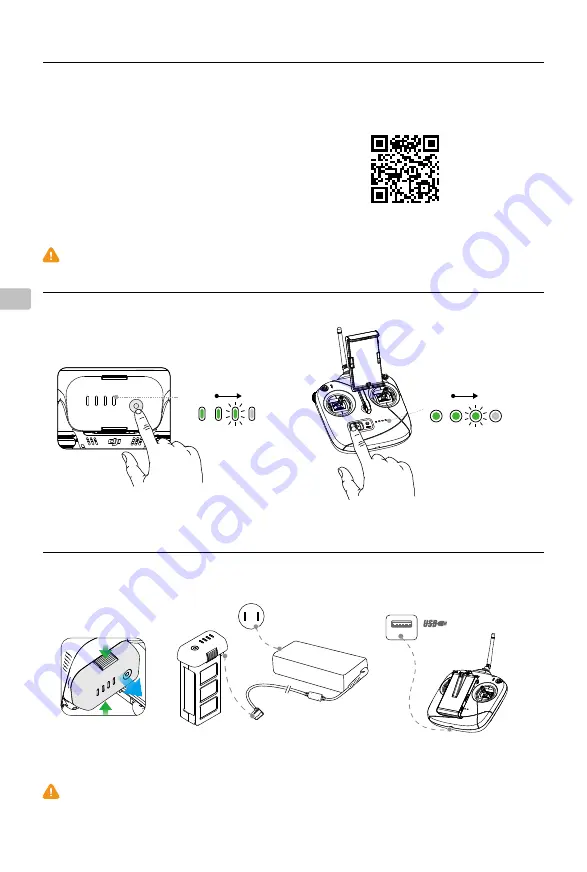
 По завершении зарядки индикаторы уровня заряда аккумулятора автоматически выключатся и светодиодный 

индикатор состояния поменяет цвет с красного на зеленый.

 Приложение DJI GO поддерживает iOS 8.0 (или более позднюю версию) и Android 4.1.2 (или более 

позднюю версию). 

2. Проверьте уровень заряда аккумулятора

3. Зарядите аккумуляторы

Нажмите один раз для проверки уровня заряда аккумулятора.

Нажмите один раз, затем нажмите и удерживайте для включения/выключения.

Вытащите аккумулятор.

Зарядное устройство из комплекта 

Время зарядки: ~1,5 ч 

Время зарядки адаптера USB: 2.5 часа

( во время зарядки при силе тока 1.5 A)

Розетка электросети

100–240 В

Высокий

Низкий

Высокий

1. Загрузите приложение DJI GO

Найдите приложение «DJI GO» в App Store или Google Play 

и загрузите его на свое мобильное устройство.

Приложение 

DJI GO

Низкий

Содержание Phantom 3 SE

Страница 1: ...V1 0 Quick Start Guide Kurzanleitung Guía de inicio rápido Guide de démarrage rapide Guida di avvio rapido Snelstartgids Guia de início rápido Краткое руководство пользователя SE PHANTOM 3 ...

Страница 2: ...ck Start Guide 2 Kurzanleitung 8 Guía de inicio rápido 14 Guide de démarrage rapide 20 Guida di avvio rapido 26 Snelstartgids 32 Guia de início rápido 38 Краткое руководство пользователя 44 EN ES DE FR IT NL PT RU ...

Страница 3: ...raft Status Indicators 10 Antennas 11 Intelligent Flight Battery 12 Power Button 13 Battery Level Indicators 14 Link Button 15 Camera Micro USB Port 2 7 4 5 8 6 1 3 9 10 12 11 13 2 7 4 5 8 6 1 3 9 10 12 11 15 14 13 The PHANTOMTM 3 SE s camera records video at up to 4K and captures 12 megapixel photos Review the diagram to learn the names and locations of various Phantom 3 SE components ...

Страница 4: ...ile Device Holder 8 Switch S2 9 Gimbal Dial 10 Micro USB Port 11 Built in Antennas 12 Handle Bar Here are the default flight controls Mode 2 The left stick controls the aircraft s altitude and heading while the right stick controls its forward backward left and right movements The gimbal dial controls the camera s tilt Left Stick Right Stick UP Down T u r n R i g h t T u r n L e f t Forward Backwa...

Страница 5: ... Check the Battery Levels 3 Charge the Batteries Press once to check the battery level Press once then again and hold to turn on off Remove the battery Provided Charger Charge Time 1 5 hours USB Adapter Charge Time 2 5 hours when charging at 1 5 A Power Outlet 100 240V Low High Low High 1 Download the DJI GO App Search DJI GO on the App Store or Google Play and download the app to your mobile devi...

Страница 6: ...p Place your mobile device into the clamp and adjust it so that the mobile device is held securely in place Remove the gimbal clamp from the camera Remove the gimbal packing Launch the app Black propeller nuts go on motors with black dots Silver propeller nuts go on motors without black dots Power on the remote controller and the aircraft On your mobile device select Phantom3SE_XXXXXX from the Wi ...

Страница 7: ... slowly until you touch the ground Hold a few seconds to stop the motors It s important to understand basic flight guidelines for the safety of both you and those around you Don t forget to read the Disclaimer and Safety Guidelines Auto Takeoff The aircraft will take off and hover at an altitude of 4 feet 1 2 meters Auto Landing The aircraft will land vertically and stop its motors Return To Home ...

Страница 8: ...080 24 25 30 48 50 60p HD 1280 720 24 25 30 48 50 60p Max Bitrate of Video Storage 60 Mbps Supported File Systems FAT32 32 GB exFAT 32 GB Photo Formats JPEG DNG Video Formats MP4 MOV MPEG 4 AVC H 264 Supported SD Card Types Micro SD Max capacity 64GB Class 10 or UHS 1 rating required Operating Temperature Range 32 to 104 F 0 to 40 C Remote Controller Operating Frequency 2 400 GHz 2 4835 GHz 5 725 ...

Страница 9: ... Phantom 3 SE 1 Gimbal und Kamera 2 Optisches Positionsbestimmungssystem 3 Schlitz für die Micro SD Karte 4 Micro USB Anschluss am Fluggerät 5 Status LED der Kamera 6 Vordere LEDs 7 Motoren 8 Propeller 9 Status LEDs des Fluggeräts 10 Antennen 11 Intelligent Flight Battery 12 Ein Aus Taste 13 Akkuladezustandsanzeige 14 Koppeltaste 15 Micro USB Anschluss an der Kamera 2 7 4 5 8 6 1 3 9 10 12 11 13 2...

Страница 10: ...al Rädchen 10 Micro USB Anschluss 11 Integrierte Antennen 12 Haltegriff Hier sehen Sie die Standardeinstellungen der Fernbedienung Modus 2 Mit dem linken Steuerhebel steuern Sie die Höhe und Flugrichtung der Drohne und mit dem rechten Steuerhebel steuern Sie ihre Vorwärts Rückwärts Links oder Rechtsbewegung Mit dem Gimbal Rädchen wird die Neigung der Kamera verstellt Linker Hebel Rechter Hebel Ste...

Страница 11: ...cken Sie die Taste einmal um den Akku Ladezustand zu überprüfen Drücken Sie die Taste noch einmal und halten Sie sie gedrückt um das Gerät ein auszuschalten Entfernen Sie den Akku Mitgeliefertes Ladegerät Ladezeit 1 5 Stunden Aufladezeit bei Verwendung des USBAdapters 2 5 Stunden Aufladen bei 1 5 A Steckdose 100 240 V Niedrig Hoch Niedrig Hoch 1 DJI GO App herunterladen Suchen Sie im App Store ode...

Страница 12: ...Mobilgerät in die Klemme und stellen Sie die Klemmbacken so ein dass das Mobilgerät sicher gehalten wird Entfernen Sie die Gimbal Klemme von der Kamera Entfernen Sie die Gimbal Verpackung Starten Sie die App Die schwarzen Propellermuttern passen zu Motoren mit schwarzem Punkt Die silbernen Propellermuttern passen zu Motoren ohne schwarzen Punkt Schalten Sie die Fernbedienung und die Drohne ein Wäh...

Страница 13: ...inige Sekunden halten um die Motoren auszuschalten Um Ihre eigene Sicherheit und die Sicherheit der Menschen in Ihrer Umgebung zu gewährleisten ist es wichtig dass Sie die nötigen Grundregeln kennen Lesen Sie sich den Haftungsausschluss und die Sicherheitsvorschriften durch Automatisches Starten Das Fluggerät hebt ab und verharrt bei einer Flughöhe von 1 20 m im Schwebeflug Automatisches Landen Da...

Страница 14: ... 2 7K 2704 1520 24 25 30p FHD 1920 1080 24 25 30 48 50 60p HD 1280 720 24 25 30 48 50 60p Max Bitrate des Videospeichers 60 Mb s Unterstützte Dateisysteme FAT32 32 GB exFAT 32 GB Fotoformate JPEG DNG Videoformate MP4 MOV MPEG 4 AVC H 264 Unterstützte SD Speicherkarten Micro SD Max Kapazität 64 GB Klasse 10 oder UHS 1 Betriebstemperatur 0 bis 40 C Fernbedienung Betriebsfrequenz 2 400 GHz 2 4835 GHz...

Страница 15: ... de posicionamiento visual 3 Ranura para tarjeta MicroSD de la cámara 4 Puerto Micro USB de la aeronave 5 Indicador de estado de la cámara 6 Indicadores LED delanteros 7 Motores 8 Hélices 9 Indicadores de estado de la aeronave 10 Antenas 11 Batería de Vuelo Inteligente 12 Botón de encendido 13 Indicadores del nivel de batería 14 Botón de vinculación 15 Puerto Micro USB de la cámara 2 7 4 5 8 6 1 3...

Страница 16: ...r S2 9 Dial del estabilizador 10 Puerto Micro USB 11 Antenas integradas 12 Empuñadura Estos son los controles de vuelo predeterminados modo 2 La palanca izquierda controla la altitud y la dirección de la aeronave mientras que la derecha controla los movimientos hacia delante atrás izquierda y derecha El selector del estabilizador controla la inclinación de la cámara Palanca izquierda Palanca derec...

Страница 17: ...e las baterías Pulse una vez para comprobar el nivel de batería Pulse una vez después otra y mantenga pulsado para encender o apagar Retire la batería Cargador suministrado Tiempo de carga 1 5 horas Tiempo de carga con el adaptador USB 2 5 horas al cargar a 1 5 A Toma de alimentación 100 240 V Bajo Alto Bajo Alto 1 Descargue la aplicación DJI GO Busque DJI GO en el App Store o en Google Play y des...

Страница 18: ...adera y ajústelo de manera que quede firmemente sujeto en su lugar Retire la abrazadera del estabilizador de la cámara Retire la pieza de embalaje del estabilizador Ejecute la aplicación Las tuercas negras de la hélice se utilizan en motores con puntos negros Las tuercas plateadas de la hélice se utilizan en motores sin puntos negros Encienda el control remoto y la aeronave En el dispositivo móvil...

Страница 19: ...rda abajo despacio hasta tocar el suelo Mantenga unos segundos para detener los motores Es importante conocer las directrices básicas de vuelo para su propia seguridad y la de quienes le rodean No olvide leer la Renuncia de responsabilidad y las directrices de seguridad Despegue automático La aeronave despegará y volará en modo estacionario a una altitud de 1 2 metros 4 pies Aterrizaje automático ...

Страница 20: ...K 2704 1520 24 25 30p FHD 1920 1080 24 25 30 48 50 60p HD 1280 720 24 25 30 48 50 60p Tasa de bits máx de almacenamiento de vídeo 60 Mbps Sistemas de archivo admitidos FAT32 32 GB exFAT 32 GB Formatos fotográficos JPEG DNG Formatos de vídeo MP4 MOV MPEG 4 AVC H 264 Tipos de tarjetas SD admitidas MicroSD Capacidad máxima 64 GB Se necesita clasificación clase 10 o UHS 1 Intervalo de temperaturas de ...

Страница 21: ...tom 3 SE 1 Nacelle et Caméra 2 Positionnement visuel 3 Logement de carte Micro SD 4 Port Micro USB de l appareil 5 Voyant d état de la caméra 6 LED avant 7 Moteurs 8 Hélices 9 Indicateurs LED d état de l appareil 10 Antennes 11 Batterie de Vol Intelligente 12 Bouton d alimentation 13 Indicateurs de niveau de batterie 14 Bouton d appairage 15 Port Micro USB de la caméra 2 7 4 5 8 6 1 3 9 10 12 11 1...

Страница 22: ...ur S2 9 Molette de la nacelle 10 Port Micro USB 11 Antennes intégrées 12 Poignée Voici les commandes de vol par défaut Mode 2 Le manche gauche agit sur l altitude et l orientation de l appareil tandis que le manche droit contrôle ses mouvements vers l avant l arrière la gauche et la droite Le cadran de la nacelle contrôle l inclinaison de la caméra Manche gauche Manche droit Haut Bas T o u r n e r...

Страница 23: ...une fois pour vérifier le niveau de la batterie Appuyez à nouveau puis encore une fois et maintenez enfoncé pour allumer éteindre Retirez la batterie Chargeur fourni Temps de charge environ 1 heure et demie Temps de chargement de l adaptateur USB 2 5 heures avec un chargement à 1 5 A Prise de courant 100 à 240 V Faible Élevé Faible Élevé 1 Téléchargement de l application DJI GO Recherchez DJI GO s...

Страница 24: ...ans la bride et ajustez la pour bien fixer l ensemble Retirez la bride de la nacelle sur la caméra Sortez la nacelle de son emballage Lancez l application Les écrous noirs des hélices se placent sur les moteurs comportant un repère noir Les écrous argentés des hélices se placent sur les moteurs ne comportant aucun repère noir Allumez la radiocommande et l appareil Sur votre appareil mobile sélecti...

Страница 25: ...s pour couper les moteurs Il est important que vous compreniez les consignes de vol fondamentales afin d assurer votre sécurité et celle de votre entourage N oubliez pas de lire la clause d exclusion de responsabilité et les consignes de sécurité Décollage automatique L appareil décollera automatiquement et maintiendra un vol stationnaire à 1 2 mètre 4 pieds d altitude Atterrissage automatique L a...

Страница 26: ... 30p FHD 1 920 1 080 24 25 30 48 50 60p HD 1 280 720 24 25 30 48 50 60p Bitrate de stockage vidéo 60 Mbit s Systèmes de fichiers pris en charge FAT32 32 Go exFAT 32 Go Formats photo JPEG DNG Formats vidéo MP4 MOV MPEG 4 AVC H 264 Types de cartes SD prises en charge Micro SD capacité max 64 Go Classe 10 ou type UHS 1 minimum Plage de température de fonctionnement 0 à 40 C 32 à 104 F Radiocommande F...

Страница 27: ...mento visivo 3 Slot per scheda micro SD per telecamera 4 Porta micro USB del velivolo 5 Indicatore di stato della videocamera 6 LED anteriori 7 Motori 8 Eliche 9 Indicatori di stato del velivolo 10 Antenne 11 Batteria di volo intelligente 12 Pulsante di accensione 13 Indicatori del livello di carica della batteria 14 Tasto di collegamento 15 Porta micro USB della videocamera 2 7 4 5 8 6 1 3 9 10 1...

Страница 28: ...S2 9 Selettore del gimbal 10 Porta micro USB 11 Antenna integrata 12 Impugnatura Di seguito sono riportati i comandi di volo predefiniti Modalità 2 La levetta sinistra controlla l altitudine e la direzione del velivolo mentre la levetta destra controlla i movimenti in avanti all indietro a sinistra e a destra dello stesso Il quadrante della sospensione cardanica controlla l inclinazione della foto...

Страница 29: ...care le batterie Premere una volta per verificare il livello di carica della batteria Premere due volte e tenere premuto per accendere spegnere Rimuovere la batteria Caricabatterie in dotazione Tempo di ricarica circa 1 5 ore Tempo di carica dell adattatore USB 2 5 ore quando si ricarica a 1 5 A Presa di alimentazione 100 240V Basso Alto Basso Alto 1 Scaricare l app DJI GO Cercare DJI GO in App St...

Страница 30: ...e nella staffa e regolarlo in modo che il dispositivo mobile sia mantenuto saldamente in posizione Rimuovere la staffa del gimbal sulla telecamera Rimuovere la protezione in espanso del gimbal Avviare l app I dadi neri sull elica vanno sui motori con i punti neri I dadi argentati sull elica vanno sui motori senza i punti neri Accendere il dispositivo di controllo remoto e il velivolo Sul dispositi...

Страница 31: ... atterraggio Tenere premuto alcuni secondi per arrestare i motori Per la sicurezza propria e delle altre persone presenti nelle vicinanze è importante comprendere le linee guida di base del volo Leggere le Direttive sulla sicurezza e limitazioni di responsabilità Decollo automatico Il velivolo decolla e si porta a un altezza di 1 2 metri 4 piedi Atterraggio automatico Il velivolo atterra verticalm...

Страница 32: ... 30p 2 7 K 2704 1520 24 25 30 p FHD 1920 1080 24 25 30 48 50 60p HD 1280 720 24 25 30 48 50 60 p Massima velocità di trasmissione per memorizzazione video 60 Mbps File system supportati FAT32 32 GB exFAT 32 GB Formati foto JPEG DNG Formati video MP4 MOV MPEG 4 AVC H 264 Tipi di schede SD gestiti Micro SD capacità massima 64 GB Caratteristiche richieste Classe 10 o UHS 1 Intervallo di temperature d...

Страница 33: ... 3 SE 1 Gimbal en camera 2 Vision Positioning System Visueel positioneringssysteem 3 Micro SD kaartsleuf camera 4 Micro USB poort drone 5 Camerastatusindicator 6 Voorste LED s 7 Motoren 8 Propellers 9 Drone statusindicatoren 10 Antennes 11 Intelligent Flight Battery 12 Aan uitknop 13 Indicators accuniveau 14 Koppeltoets 15 Micro USB poort camera 2 7 4 5 8 6 1 3 9 10 12 11 13 2 7 4 5 8 6 1 3 9 10 1...

Страница 34: ...Houder mobiel apparaat 8 Schakelaar S2 9 Gimbalwiel 10 Micro USB poort 11 Ingebouwde antennes 12 Handvat Dit is de standaard vliegbediening Modus 2 Met de linkerjoystick regel je de hoogte en koers terwijl je met de rechterjoystick vooruit achteruit naar links en rechts kunt bewegen Met de gimbal regel je de kanteling van de camera Linkerjoystick Rechterjoystick Omhoog Omlaag R e c h t s a f L i n...

Страница 35: ...roleren 3 Accu s opladen Druk eenmaal op de knop om het accuniveau te controleren Druk eenmaal en druk vervolgens opnieuw en houd vast om aan uit te zetten Verwijder de accu Meegeleverde lader Oplaadtijd 1 5 uur Oplaadtijd USB adapter 2 5 uur bij opladen op 1 5 A Stopcontact 100 240 V Laag Hoog Laag Hoog 1 DJI GO app downloaden Zoek DJI GO in de App Store of in Google Play en download de app naar ...

Страница 36: ...delen Plaats je mobiele apparaat in de klem en stel deze zo af dat het mobiele apparaat stevig op zijn plaats blijft Verwijder de gimbalklem van de camera Verwijder de dop van de gimbal Start de app Zwarte propellermoeren horen bij motoren met zwarte stippen Zilveren propellermoeren horen bij motoren zonder zwarte stippen Schakel de afstandsbediening en de drone in Selecteer op je mobiele apparaat...

Страница 37: ...je de grond raakt Wacht enkele seconden om de motoren uit te schakelen Het is belangrijk de basisvluchtrichtlijnen te begrijpen voor uw veiligheid en die van uw medemens Vergeet niet de disclaimer en veiligheidsrichtlijnen te lezen Automatisch opstijgen De drone zal opstijgen en zweven op een hoogte van 1 2 meter 4 ft Automatisch landen De drone zal verticaal landen en de motoren uitschakelen Retu...

Страница 38: ...50 60 p HD 1280 720 24 25 30 48 50 60p Max bitrate van video opslag 60 Mbps Ondersteunde bestandssystemen FAT32 32 GB exFAT 32 GB Fotoformaten JPEG DNG Videoformaten MP4 MOV MPEG 4 AVC H 264 Ondersteunde SD kaarttypen Micro SD max capaciteit 64 GB Klasse 10 of UHS 1 rating vereist Bedrijfstemperatuurbereik 0 C tot 40 C 32 F tot 104 F Afstandsbediening Bedrijfsfrequentie 2 400 GHz 2 4835 GHz 5 725 ...

Страница 39: ...stema de posicionamento por visão 3 Ranhura para cartão Micro SD 4 Porta micro USB da aeronave 5 Indicador de estado da câmara 6 LED frontais 7 Motores 8 Hélices 9 Indicadores de estado da aeronave 10 Antenas 11 Bateria de voo inteligente 12 Botão de alimentação 13 Indicadores do nível da bateria 14 Botão de ligação 15 Porta micro USB da câmara 2 7 4 5 8 6 1 3 9 10 12 11 13 2 7 4 5 8 6 1 3 9 10 12...

Страница 40: ... S2 9 Botão da suspensão cardã 10 Porta micro USB 11 Antenas integradas 12 Guiador Os controlos de voo de série são os seguintes Modo 2 O seletor esquerdo controla a altitude e o rumo da aeronave e o seletor direito controla os movimentos para a frente para trás para a esquerda e para a direita O botão da suspensão cardã controla a inclinação da câmara Manípulo esquerdo Manípulo direito PARA CIMA ...

Страница 41: ...Carregar as baterias Prima uma vez para verificar o nível da bateria Prima uma vez e em seguida prima novamente de forma contínua para ligar desligar Retire a bateria Carregador fornecido Tempo de carregamento 1 5 horas Tempo de carga do adaptador USB 2 5 horas quando carrega a 1 5 A Tomada elétrica 100 240 V Baixo Alto Baixo Alto 1 Transferir a DJI GO App Pesquise DJI GO na App Store ou no Google...

Страница 42: ...móvel na braçadeira e ajuste a de modo que o dispositivo móvel fique fixo de forma segura Retire a braçadeira do balanceiro da câmara Retire a embalagem da suspensão cardã Inicie a aplicação As porcas de hélice pretas aplicam se aos motores com pontos pretos As porcas de hélice prateadas aplicam se aos motores sem pontos pretos Ligue o telecomando e a aeronave No seu dispositivo móvel selecione Ph...

Страница 43: ...erdo para baixo lentamente até tocar no solo Mantenha premido durante alguns segundos para parar os motores É importante compreender as diretrizes básicas de voo para a segurança do utilizador e dos que o rodeiam Não se esqueça de ler a Declaração de exoneração de responsabilidade e diretrizes de segurança Descolagem automática A aeronave descola e voa em voo estacionário a uma altitude de 1 2 m 4...

Страница 44: ...0 24 25 30p FHD 1920 1080 24 25 30 48 50 60p HD 1280 720 24 25 30 48 50 60p Taxa de bits máx de armazenamento de vídeo 60 Mbps Sistemas de ficheiros suportados FAT32 32 GB exFAT 32 GB Formatos de fotografia JPEG DNG Formatos de vídeo MP4 MOV MPEG 4 AVC H 264 Tipos de cartões SD suportados Micro SD capacidade máxima 64 GB Classificação necessária de Classe 10 ou UHS 1 Intervalo de temperaturas de f...

Страница 45: ...го позиционирования 3 Слот для карты памяти Micro SD 4 Порт Micro USB на летательном аппарате 5 Индикатор состояния камеры 6 Передние огни 7 Электродвигатели 8 Пропеллеры 9 Индикаторы состояния дрона 10 Антенны 11 Аккумулятор Intelligent Flight Battery 12 Кнопка питания 13 Индикаторы уровня заряда аккумулятора 14 Кнопка сопряжения 15 Порт Micro USB на камере 2 7 4 5 8 6 1 3 9 10 12 11 13 2 7 4 5 8...

Страница 46: ...лючатель S1 7 Держатель мобильного устройства 8 Переключатель S2 9 Колесико наклона камеры 10 Порт Micro USB 11 Встроенные антенны 12 Ручка для переноса Здесь описаны органы управления полетом по умолчанию Режим 2 Левый джойстик используется для управления высотой и поворотом правый для управления движением вперед назад влево и вправо Стабилизатор управляет наклоном камеры Левый джойстик Правый дж...

Страница 47: ...да аккумулятора 3 Зарядите аккумуляторы Нажмите один раз для проверки уровня заряда аккумулятора Нажмите один раз затем нажмите и удерживайте для включения выключения Вытащите аккумулятор Зарядное устройство из комплекта Время зарядки 1 5 ч Время зарядки адаптера USB 2 5 часа во время зарядки при силе тока 1 5 A Розетка электросети 100 240 В Высокий Низкий Высокий 1 Загрузите приложение DJI GO Най...

Страница 48: ...атель и отрегулируйте его так чтобы он надежно удерживало устройство Снимите фиксатор стабилизатора с камеры Снимите упаковку стабилизатора Запустите приложение Пропеллеры с черными кольцами следует устанавливать на электродвигатели отмеченные черными точками Пропеллеры с серебристыми кольцами следует устанавливать на электродвигатели не отмеченные черными точками Включите пульт дистанционного упр...

Страница 49: ...держивайте джойстик в нижнем положении в течение нескольких секунд Для обеспечения своей безопасности и безопасности окружающих важно понимать основные принципы полета Для получения дополнительной информации обратитесь к отказу от ответственности и руководству по технике безопасности Автоматический взлет Дрон взлетит и зависнет в воздухе на высоте 1 2 м 4 фута Автоматическая посадка Дрон выполнит ...

Страница 50: ...0 кадров с FHD 1920 1080 24 25 30 48 50 60 кадров с HD 1280 720 24 25 30 48 50 60 кадров с Макс скорость сохранения видео 60 Мбит с Поддерживаемые файловые системы FAT32 32 Гбайт exFAT 32 Гбайт Фото JPEG DNG Видео MP4 MOV MPEG 4 AVC H 264 Типы карт памяти Micro SD Максимальная емкость 64 Гбайт Класс скорости Class 10 UHS 1 Рабочий диапазон температур от 0 до 40 C от 32 до 104 F Пульт дистанционног...

Страница 51: ...www dji com SE PHANTOM 3 ...

Отзывы: