SUB-1G DVK development kit product manual
SUB-1G DVK PM
(
Rev1.0
)
SUB-1G DVK Development Kit
Product Manual
Страница 1: ...SUB 1G DVK development kit product manual SUB 1G DVK PM Rev1 0 SUB 1G DVK Development Kit Product Manual ...
Страница 2: ... used It has different module antenna combinations for selection Seamlessly link to IAR for STM8 Development boards can be used as hardware platform for trials USB drivers can be downloaded from www cdiyue com Development Kit Components 2 X SUB 1G EVB Development Boards 2 X USB data cable A to micro USB 2 X SEG07R1L1 on Carrier Board 2 X SEG07R1L3 on Carrier Board 2 X SIG06R1P1 on Carrier Board 2 ...
Страница 3: ...e SUB 1G EVB 2 3 2 SUB 1G Wireless Communication Module 2 4 SUB 1G DVK Development Kit Overview 3 5 SUB 1G EVB Development Board 3 6 Driver Installation and Operation 6 7 Use Configure of DIYUE Terminal 9 7 1 SUB 1G AT Command 9 7 2 DIYUE Terminal 9 7 2 1 Com Setting 10 7 2 2 Command Sending 10 7 2 3 Data Receiving 12 7 2 4 Common Instruction Zone 13 8 The schematic of SUB 1G EVB board 18 9 Order ...
Страница 4: ...ithout batteries inserted Table 1 1 Limit Parameters Notes The limit values given in Table 1 1 shall not be exceeded under any condition and exceeding any one of the limit values may cause permanent damage to the device 2 Environmental characteristics of the SUB 1G EVB Parameters Min Typical Max Environment Supply voltage 1 VBUS 4 5 5V 6 5 Powered by USB2 0 Supply voltage 2 VEXT 1 8 3 3V 3 8 Exter...
Страница 5: ...G07R1L1 SEG07R1L3 SEG07M1L1 SEG07M1L3 SIG06R1P1 and SIG06M1P1 For more information about these modules please read the product manuals of SUB 1G series modules For more information about SUB 1G series wireless modules please refer to the following product manuals SEG07R1L1 SEG07R1L1 Product Manual SEG07R1L3 SEG07R1L3 Product Manual SEG07M1L1 SEG07M1L1 Product Manual SEG07M1L3 SEG07M1L3 Product Man...
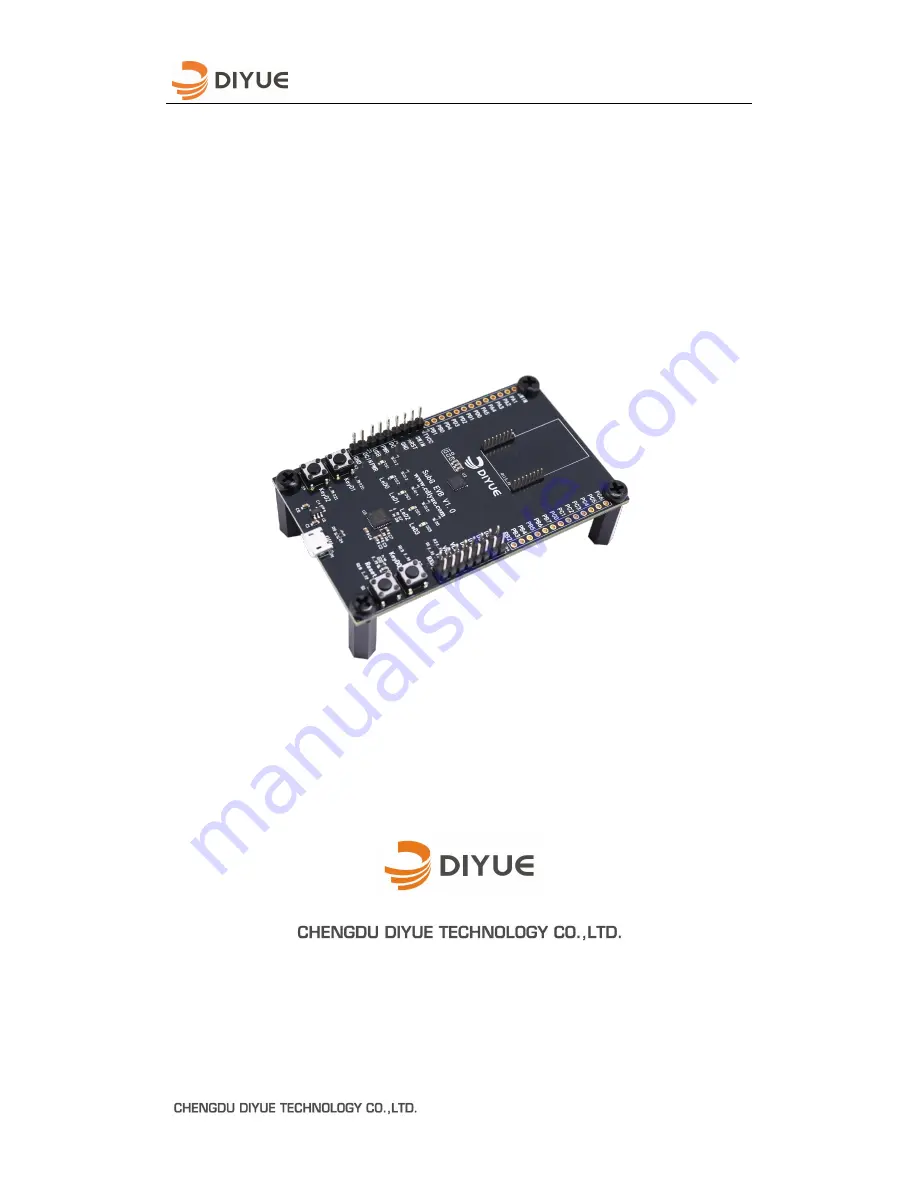
Страница 6: ...ier Board 2 X 2 0dbi antenna 2 X RF feeder DIYUE Terminal and user manual SUB 1G Development Kit User Manual This development kit manual describes the hardware and software tools of the SUB 1G EVB development board which is used for application product development and design evaluation system 5 SUB 1G EVB Development Board SUB 1G EVB development board is a platform for evaluating the SUB 1G series...
Страница 7: ...mum supply voltage is 3 8V Power switch J4 is the power switch When connecting the PWR to USB that means the system power is powered by USB supply when connecting PWR to DC that means the system power is powered by external DC supply SWIM debug port J4 is the SWIM debug port for the STM8 MCU USB port P7 is a standard USB interface for connecting to PC This port provides access to the command line ...
Страница 8: ... PIN2 DIO0 PIN2 PD0 D0 PD1 D1 PD2 D2 PD3 D3 PD4 PB0 GPIO0 PIN3 DIO1 PIN3 PB1 GPIO1 PIN4 DIO2 PIN4 PB2 NIRQ PIN5 RX_SW PIN5 PB3 SDN PIN13 DIO5 PIN13 PB4 NSEL PIN9 NSEL PIN9 PB5 SCLK PIN6 SCLK PIN6 PB6 SDI PIN10 SDI PIN10 PB7 SDO PIN7 SDO PIN7 PC0 D4 PC1 D5 PC2 UART_RXD PC3 UART_TXD PC4 GPIO3 PIN12 DIO4 PIN12 PC5 GPIO2 PIN11 DIO3 PIN11 PC6 Table 5 2 Development Board IO Extended Interface ...
Страница 9: ... it is necessary to ensure that SUB 1G EVB board works stably Before installing the USB to UART driver you need to download the driver file from www cdiyue com and then unzip it into a local folder 1 Connect the SUB 1G EVB to a PC with an USB data cable 2 Double click CP210x_Windows_Drivers CP210xVCPInstaller_x64 exe then you can see the following appearance Fig 6 1 Diver Installation 1 3 Click Ne...
Страница 10: ...SUB 1G DVK development kit product manual 7 Fig 6 2 Diver Installation 2 Fig 6 3 Driver Installing 4 Click Finish ...
Страница 11: ...ion Completed 5 Please open the Device Manager under the Windows Computer Management screen see Fig 6 5 and click on the Ports COM LPT section where you may find out the new COM port that means the hardware s driver has been successfully installed Fig 6 5 Device Manager ...
Страница 12: ...and so on For more details about SUB 1G AT command please refer to SUB 1G AT Command Manual which is available from www cdiyue com 7 2 DIYUE Terminal DIYUE Terminal is used to configure the SUB 1G AT Command when you are going to develop design your customized application product based on SUB 1G series modules as shown in Fig 7 1 This tool has the following functions Com setting Receive options Se...
Страница 13: ...is from 9600bps to 115200bps for selection and the default value should be 9600bps Parity Bit the default value is no parity Data Bit it contains 8 bit and 7 bit for selection and the default value is 8 bits Stop Bit has 1 bit or 2 bits for selection and the initialization is 1 bit stop bit Fig 7 2 UART Parameter 7 2 2 Command Sending 1 Sending Mode The SUB 1G AT command s operating mode is divide...
Страница 14: ...n to edit it after that if you click the command button you have modified the command will be displayed in the Send Zone for editing again or send it to UART port directly see Fig 7 5 Fig 7 4 Common Command Zone Fig 7 5 Send Command 2 Timing Sending If you want to send the command you desired periodically such as transmitting data you can select the Send Recycle mode as shown in Fig 7 6 Of course ...
Страница 15: ...ing data as shown in Fig 7 7 The displayed data can be saved or cleared Fig 7 7 Data Receiving Zone 1 Save the Displayed Data You can select the button Receive to file to save the displayed data The default path is C COMDATA and the file format is txt or log Also you can press the File button to edit the file saving path and file name see Fig 7 8 ...
Страница 16: ... 2 4 Common Instruction Zone Click the Cmd Mgr Command Management button there will be pop up one command management window as shown in Fig 7 10 You can add modify and delete commands In the command list the first column is the serial number starting from zero the second column is the command names which will display on the button in the Common Instruction zone the third column is the contents of ...
Страница 17: ...ould go into the Command Management interface and then click the Add Cmd button there will be pop out an Edit Cmd window as shown in Fig 7 12e Fig 7 12 Command Edit interface b Edit the command name and data then click the OK button to complete the operation as shown in Fig 7 13 Fig 7 13 Edit Command data ...
Страница 18: ...shown in Fig 7 14 Fig 7 14 The new Common Command Buttons 2 Modify Command a First you should go into the Command Management interface then click the Modify Cmd button there will be pop out an Edit Cmd window as shown in Fig 7 15 Fig 7 15 The Command Needed to Modify b Then you can modify the command name and data as shown in Fig 7 16 Fig 7 16 Post editing ...
Страница 19: ... in Cmd Mgr d Click the OK button on the Cmd Mgr window you will see the modified command button in the Common Instruction zone as shown in Fig 7 18 Fig 7 18 The modified Common Command Buttons 3 Delete Command a Select the the command that you want to delete as shown in Fig 7 19 Fig 7 19 Select the Command need to be deleted ...
Страница 20: ...e OK button on the Cmd Mgr window you will see that the Router button in the Common Instruction zone as shown in Fig 7 21 Fig 7 21 The Router button has disappeared in the Common Command window Note Do remember to click the OK button on the Cmd Mgr window after adding editing and deleting commands otherwise the common command buttons on the main interface won t be updated ...
Страница 21: ...SUB 1G DVK development kit product manual 18 8 The schematic of SUB 1G EVB board ...
Страница 22: ...SUB 1G DVK development kit product manual 19 ...
Страница 23: ...bi antenna 2 X RF feeder DIYUE Terminal and user manual SUB 1G Development Kit User Manual 10 Trademark All trademarks registered trademarks and product names are independent properties of Chengdu Diyue Technology LTD 11 Disclaimer We reserve the right to modify or improve the product company name and LOGO at any time without prior notice In addition Chengdu Diyue Technology Co Ltd does not convey...
Страница 24: ...Block A Gaofa Building No 6 Jiuxing Avenue High tech Zone Chengdu Tel 0086 28 85138368 Fax 0086 28 85189190 E mail public cdiyue com Sales In China Tel 0086 28 85106132 Fax 0086 28 85189190 E mail sales cdiyue com International sales Tel 0086 28 85327536 Fax 0086 28 85189190 E mail wsales cdiyue com ...