Dixon D25K48YT Скачать руководство пользователя страница 14

14

TOWING CARTS AND OTHER AT TACH MENTS

Tow only the attachments that are recommended by and 

comply with specifications of the manufacturer of your trac-

tor. Use common sense when towing. Too heavy of a load, 

while on a slope, is dangerous. Tires can lose traction with 

the ground and cause you to lose control of your tractor.

SERVICE REMINDER/HOUR METER

Service reminder shows the total number of hours the engine 

has run and flashes to indicate that the engine or mower 

needs servicing. When service is required, the service 

reminder will flash for two hours. To service engine and 

mower, see the Maintenance section of this manual.

NOTE

: Service reminder runs when the ignition key is in 

any position but "STOP". For accurate reading, be sure key 

remains in the "STOP" position when engine is not running. 

BEFORE STARTING THE ENGINE

CHECK ENGINE OIL LEVEL

The engine in your tractor  has been shipped, from the 

factory, already filled with sum mer weight oil.  
•  Check engine oil with tractor on level ground.  
• 

Remove oil fill cap/dipstick and wipe clean, reinsert the 

dipstick and screw cap tight, wait for a few seconds, 

remove and read oil level.  If necessary, add oil until  

“FULL” mark on dipstick is reached.  Do not overfill.

•  For cold weather operation you should change oil for 

easier starting (See “OIL VISCOSITY CHART” in the 

Maintenance sec tion of this manual).   

•  To change engine oil, see the Maintenance section in 

this manual.

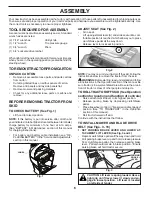
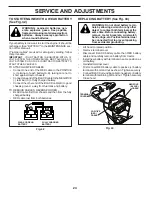
TRANSMISSION ENGAGED

TRANSMISSION DISENGAGED

Fig. 24

Fig. 25

•  Do not  push or tow tractor at more than two (2) MPH.
•  To reengage transmission, reverse above procedure.

NOTE

:  To protect hood from damage when transporting 

your tractor on a truck or a trailer, be sure hood is closed 

and secured to tractor.  Use an appropriate means of tying 

hood to tractor (rope, cord, etc.).

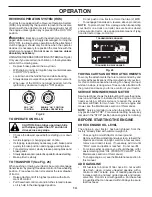
REVERSE OPERATION SYSTEM (ROS)

Your tractor is equipped with a Reverse Operation System 

(ROS). Any attempt by the operator to travel in the reverse 

direction with the attachment clutch engaged will shut off 

the engine unless ignition key is placed in the ROS "ON" 

position.

 WARNING:

  Backing up with the attachment clutch en-

gaged while mowing is strongly discouraged. Turning the 

ROS "ON", to allow reverse operation with the attachment 

clutch engaged, should only be done when the operator 

decides it is necessary to reposition the machine with the 

attachment engaged. 

Do not mow in reverse unless 

absolutely necessary

.

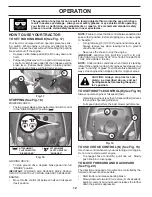
USING THE REVERSE OPERATION SYSTEM (See Fig. 24)

Only use if you are certain no children or other bystanders 

will enter the mowing area.
•  Depress brake pedal all the way down.
• 

With engine running, turn ignition key counterclockwise 

to ROS "ON" position.

•  Look down and behind before and while backing.
• 

Slowly depress reverse drive pedal to start movement.

•  When use of the ROS is no longer needed, turn the 

ignition key clockwise to engine "ON" position.

ROS "ON" 

POSITION

ENGINE "ON" POSITION

(NORMAL OPERATING)

02828

TO OPERATE ON HILLS 

CAUTION: Do not drive up or down hills 

with slopes greater than 15° and do not 

drive across any slope.

•  Choose the slowest speed before starting up or down 

hills.

•  Avoid stopping or changing speed on hills.
•  If stopping is absolutely necessary, push brake pedal 

quickly to brake position and engage parking brake.

• 

To restart movement, slowly release parking brake and 

brake pedal.

• 

Slowly depress appropriate drive pedal to slowest set ting.

•  Make all turns slowly.

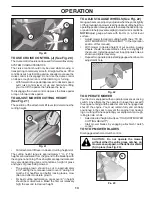
TO TRANSPORT (See Fig. 25)

When pushing or towing your tractor, be sure to disengage 

transmission by placing freewheel control in free wheel ing  

po si tion.  Free wheel control is located at the rear drawbar 

of tractor.
•  Raise attachment lift to highest position with at tach-

 ment lift control. 

• 

Pull freewheel control out and into the slot and release 

so it is held in the disengaged position.

ADD GASOLINE 

•  Fill fuel tank to bottom of filler neck. Do not overfill.  

Use fresh, clean, regular un lead ed gasoline with a 

minimum of 87 octane.  (Use of  leaded gasoline will 

increase carbon and lead oxide deposits and reduce 

valve life).  Do not mix oil with gasoline.  Purchase fuel 

in quan ti ties that can be used within 30 days to assure 

fuel freshness.

OPERATION

Содержание D25K48YT

Страница 1: ...Operator s Manual D25K48YT 435068 02 10 10 AP Printed in the U S A...

Страница 2: ...p engine and remove keys before dismounting Disengage blades when not mowing Shut off engine and wait for all parts to come to a complete stop before cleaning the machine removing the grass catcher or...

Страница 3: ...h towed equipment except at the hitch point Follow the manufacturer s recommendation for weight limits for towed equipment and towing on slopes Never allow children or others in or on towed equipment...

Страница 4: ...oper tools to service or repair this tractor Please read and retain this manual The instructions will enable you to assemble and maintain your tractor properly Always observe the SAFETY RULES CUSTOMER...

Страница 5: ...Wheel 5 Large Retainer Springs 7 16 2 Smaller Retainer Springs 5 16 1 Locknut 3 8 16 1 Oil Drain Tube For Future Use 1 Shoulder Bolt Mower Front Wheel 1 Anti Sway Bar 1 3 4 O D Washers 1 1 1 4 O D Was...

Страница 6: ...stments section in this manual Fig 1 LABEL ADJUST SEAT See Fig 2 Sit in seat Lift up adjustment lever A and slide seat until a com fortable position is reached which allows you to press clutch brake p...

Страница 7: ...4 SLIDE MOWER UNDER TRACTOR See Fig 8 Bring belt forward and check belt for proper routing in all mower pulley grooves NOTE Be sure mower side suspension arms A are point ing forward before sliding mo...

Страница 8: ...t F Insert other end of link E into hole in front mower bracket H and secure with washer and small retainer spring J NOTE Requires deck lifting Fig 14 FRONT LINK LOCATION E G F M E FRONT LIFT LINK ASS...

Страница 9: ...manual CHECKLIST BEFORE YOU OPERATE YOUR NEW TRACTOR WE WISH TO ASSURE THAT YOU RECEIVE THE BEST PERFORMANCE AND SATISFACTION FROM THIS QUALITY PRODUCT PLEASE REVIEW THE FOLLOWING CHECKLIST All assem...

Страница 10: ...ty inform ation about hazards which can result in death serious injury and or property damage DANGER indicates a hazard which if not avoided will result in death or serious injury WARNING indicates a...

Страница 11: ...ctor F IGNITION SWITCH Used for starting and stopping the engine G REVERSE OPERATION SYSTEM ROS ON POSITION Allows operation of mower or other powered attachment while in reverse H LIGHT SWITCH Turns...

Страница 12: ...nd full speed fast position before stopping may cause engine to backfire Turnignitionkey F to STOP positionandremovekey Always remove key when leaving tractor to prevent unauthorized use Never use the...

Страница 13: ...ctorshield S in place See Fig 23 TO STOP MOWER BLADES Disengage attachment clutch control FIG 23 J K L S TO USE CRUISE CONTROL J See Fig 20 Thecruisecontrolfeaturecanbeusedforforwardtravelonly SYSTEM...

Страница 14: ...ment clutch engaged will shut off the engine unless ignition key is placed in the ROS ON position WARNING Backing up with the attachment clutch en gaged while mowing is strongly discouraged Turning th...

Страница 15: ...for normal operation OPERATION TO START ENGINE See Fig 16 When starting the engine for the first time or if the engine has run out of fuel it will take extra cranking time to move fuel from the tank...

Страница 16: ...After one or two rounds mow in the opposite direction making left hand turns until finished See Fig 26 Fig 26 If grass is extremely tall it should be mowed twice to reduce load and possible fire haza...

Страница 17: ...e warranty on this tractor does not cover items that have beensubjectedtooperatorabuseornegligence Toreceive full value from the warranty operator must maintain tractor as instructed in this manual So...

Страница 18: ...witch in the ROS ON position and the attachment clutch engaged any attempt by the operator to shift into reverse should NOT shut off the engine BLADE CARE Forbestresultsmowerbladesmustbekeptsharp Repl...

Страница 19: ...mely dusty dirty conditions remove the blower housing and other cooling shrouds Clean the cooling fins and external surfaces as necessary Ensure the cooling shrouds are reinstalled NOTE Operating the...

Страница 20: ...the tractor to a dry area preferably a concrete or paved area Place the attachment clutch control in the ENGAGED position to remove excess water and to help dry before putting the tractor away WARNING...

Страница 21: ...ee Fig 34 MOWER DRIVE BELT REMOVAL Park tractor on a level surface Engage parking brake Lower attachment lift lever to its lowest position Disengage belt tension rod K from lock bracket L CAUTION Belt...

Страница 22: ...ppearance Readjust if necessary until you are satisfied with the results A Turn nut left to lower mower Turn nut right to raise mower Fig 35 Fig 36 PRECISION SIDE TO SIDE ADJUSTMENT See Fig 36 With al...

Страница 23: ...tall mower See TO INSTALL MOWER section in this manual electric 02953 E A F B J G C H D Fig 39 TO CHECK BRAKE If tractor requires more than five 5 feet to stop at highest speed in highest gear on a le...

Страница 24: ...rom fuel tank and battery TO REMOVE CABLES REVERSE ORDER BLACK cable first from chassis and then from the fully charged battery RED cable last from both batteries WEAK OR DEAD BATTERY FULLY CHARGED BA...

Страница 25: ...e procedure ENGINE TO ADJUST THROTTLE CONTROL CABLE The throttle control has been preset at the factory and adjustment should not be necessary If adjustment is nec essary see engine manual TO ADJUST C...

Страница 26: ...UELSYSTEMPARTSSUCH AS CARBURETOR FUEL FILTER FUEL HOSE OR TANK DURING STORAGE ALSO EXPERIENCE INDICATES THAT ALCOHOL BLENDED FUELS CALLED GASOHOL OR USING ETHANOLORMETHANOL CANATTRACTMOISTUREWHICH LEA...

Страница 27: ...ng 7 Faulty ignition switch 7 Check replace ignition switch 8 Faulty solenoid or starter 8 Check replace solenoid or starter 9 Faulty operator presence switch es 9 Contact an authorized service center...

Страница 28: ...ed 9 Reinstall blades sharp edge down 10 Improper blades used 10 Replace with blades listed in parts manual 11 Cloggedmowerdeckventholesfrombuildup of grass leaves trash around mandrels 11 Clean aroun...

Страница 29: ...never across the face Do not mow slopes greater than 15 degrees Make turns gradually to prevent tipping or loss of control Exercise extreme caution when changing direction on slopes 1 Fold this page a...

Страница 30: ...s used for rental or commercial purposes is limited to 90 days from the date of original purchase 5 This Warranty applies only to products which have been properly assembled adjusted operated and main...

Отзывы: