background image

13

MOWING TIPS

•  Tire chains cannot be used when the mower hous ing 

is attached to tractor.

•  Mower should be properly leveled for best mowing 

performance.  See “TO LEVEL MOWER HOUSING” in 

the Service and Adjustments section of this manual.

• 

The left hand side of mower should be used for trim ming.

•  Drive so that clippings are discharged onto the area 

that has been cut.  Have the cut area to the right of 

the tractor.  This will result in a more even dis tri bu tion 

of clippings and more uniform cutting.

• 

When mowing large areas, start by turning to the right 

so that clippings will discharge away from shrubs, 

fences, driveways, etc.  After one or two rounds, mow 

in the opposite direction making left hand turns until 

finished (See Fig. 13).

Fig. 13

•  If grass is extremely tall, it should be mowed twice to 

reduce load and possible fire hazard from dried clip -

pings.  Make first cut relatively high; the second to the 

desired height.

•  Do not mow grass when it is wet.  Wet grass will plug 

mower and leave undesirable clumps.  Allow grass to 

dry before mowing.

• 

Always operate engine at full throttle when mow-

ing to

 assure better mowing performance and proper 

dis charge of material.  Regulate ground speed by 

se lect ing a low enough gear to give the mower cut ting 

per for mance as well as the quality of cut desired.

•  When operating attachments, select a ground speed 

that will suit the terrain and give best performance of 

the at tach ment being used.

OPERATION

Содержание D2548YT

Страница 1: ...Operator s Manual D2548YT 532 44 03 58 11 01 10 BAD Printed in the U S A ...

Страница 2: ...op engine and remove keys before dismounting Disengage blades when not mowing Shut off engine and wait for all parts to come to a complete stop before cleaning the machine removing the grass catcher or unclogging the discharge chute Operate machine only in daylight or good artificial light Do not operate the machine while under the influence of alcohol or drugs Watch for traffic when operating nea...

Страница 3: ...ch towed equipment except at the hitch point Follow the manufacturer s recommendation for weight limits for towed equipment and towing on slopes Never allow children or others in or on towed equipment On slopes the weight of the towed equipment may cause loss of traction and loss of control Travel slowly and allow extra distance to stop V SERVICE SAFE HANDLING OF GASOLINE To avoid personal injury ...

Страница 4: ...d the proper tools to service or repair this tractor Please read and retain this manual The instructions will enable you to assemble and maintain your tractor properly Always observe the SAFETY RULES CUSTOMER RESPONSIBILITIES Read and observe the safety rules Follow a regular schedule in maintaining caring for and using your tractor Follow the instructions under Maintenance and Stor age sections o...

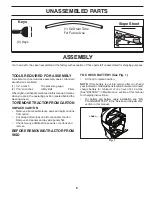
Страница 5: ...Y Your new tractor has been assembled at the factory with exception of those parts left unassembled for shipping purposes TOOLS REQUIRED FOR ASSEMBLY A socket wrench set will make assembly easier Standard wrench sizes are listed 1 1 2 wrench Tire pressure gauge 2 7 16 wrenches Utility knife Pliers Whenrightorlefthandismentionedinthismanual itmeans when you are in the operating position seated behi...

Страница 6: ...emaining loose parts in carton Battery is properly prepared and charged Seat is adjusted comfortably and tightened securely All tires are properly inflated For shipping purposes the tires were overinflated at the factory Be sure mower deck is properly leveled side to side front to rear for best cutting results Tires must be properly inflated for leveling Check mower and drive belts Be sure they ar...

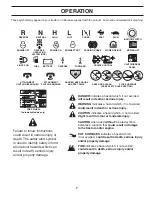
Страница 7: ...ety inform ation about hazards which can result in death serious injury and or property damage DANGER indicates a hazard which if not avoided will result in death or serious injury WARNING indicates a hazard which if not avoided could result in death or serious injury CAUTION indicates a hazard which if not avoided might result in minor or moderate injury CAUTION when used without the alert symbol...

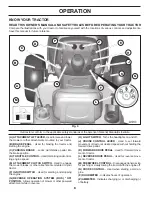
Страница 8: ...ctor F IGNITION SWITCH Used for starting and stopping the engine G REVERSE OPERATION SYSTEM ROS ON POSITION Allows operation of mower or other powered attachment while in reverse H LIGHT SWITCH Turns the headlights on and off J CRUISE CONTROL LEVER Used to set forward movement of tractor at desired speed without holding the forward drive pedal K FORWARD DRIVE PEDAL Used for forward move ment of tr...

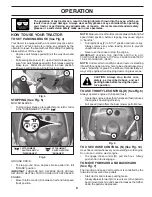
Страница 9: ...nd full speed fast position before stopping may cause engine to backfire Turnignitionkey F to STOP positionandremovekey Always remove key when leaving tractor to prevent unauthorized use Never use the choke to stop the engine IMPORTANT LEAVING THE IGNITION SWITCH IN ANY POSITION OTHER THAN STOP WILL CAUSE THE BATTERY TO BE DISCHARGED DEAD NOTE Under certain conditions when tractor is standing idle...

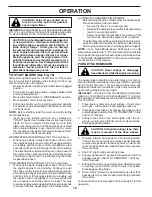
Страница 10: ...ctorshield S in place See Fig 10 TO STOP MOWER BLADES Disengage attachment clutch control Fig 10 J K L S TO USE CRUISE CONTROL J See Fig 20 Thecruisecontrolfeaturecanbeusedforforwardtravelonly SYSTEM CHARACTERISTICS The cruise control should only be used while mowing or transporting on relatively smooth straight surfaces Other conditions such as trimming at slow speeds may cause the cruise control...

Страница 11: ...hment clutch engaged will shut off the engine unless ignition key is placed in the ROS ON position WARNING Backing up with the attachment clutch en gaged while mowing is strongly discouraged Turning the ROS ON to allow reverse operation with the attachment clutch engaged should only be done when the operator decides it is necessary to reposition the machine with the attachment engaged Do not mow i...

Страница 12: ...y for normal operation OPERATION TO START ENGINE See Fig 16 When starting the engine for the first time or if the engine has run out of fuel it will take extra cranking time to move fuel from the tank to the engine Besurefreewheelcontrolisinthetransmissionengaged position Sit on seat in operating position depress brake pedal and set parking brake Move attachment clutch to DISENGAGED position Move ...

Страница 13: ...c After one or two rounds mow in the opposite direction making left hand turns until finished See Fig 13 Fig 13 If grass is extremely tall it should be mowed twice to reduce load and possible fire hazard from dried clip pings Make first cut relatively high the second to the desired height Do not mow grass when it is wet Wet grass will plug mower and leave undesirable clumps Allow grass to dry befo...

Страница 14: ...he warranty on this tractor does not cover items that have beensubjectedtooperatorabuseornegligence Toreceive full value from the warranty operator must maintain tractor as instructed in this manual Some adjustments will need to be made periodically to properly maintain your tractor At least once a season check to see if you should make any of the adjustments described in the Service and Adjustmen...

Страница 15: ...switch in the ROS ON position and the attachment clutch engaged any attempt by the operator to shift into reverse should NOT shut off the engine BLADE CARE Forbestresultsmowerbladesmustbekeptsharp Replace bent or damaged blades CAUTION Useonlyareplacementbladeap proved by the manufacturer of your tractor Using a blade not approved by the manu facturer of your tractor is hazardous could damageyourt...

Страница 16: ...emely dusty dirty conditions remove the blower housing and other cooling shrouds Clean the cooling fins and external surfaces as necessary Ensure the cooling shrouds are reinstalled NOTE Operating the engine with a blocked grass screen dirtyorpluggedcoolingfins and orcoolingshroudsremoved will cause engine damage due to overheating Fig 16 MAINTENANCE TEMPERATURE RANGE ANTICIPATED BEFORE NEXT OIL C...

Страница 17: ... the tractor to a dry area preferably a concrete or paved area Place the attachment clutch control in the ENGAGED position to remove excess water and to help dry before putting the tractor away WARNING A broken or missing washout fitting could expose you or others to thrownobjectsfromcontactwiththeblade Replace broken or missing washout fitting immediately prior to using mower again Pluganyholesin...

Страница 18: ...sengage belt tension rod K from lock bracket L CAUTION Belt tension rod is spring loaded Have a tight grip on rod and release slowly Remove mower belt from electric clutch pulley M Disconnect front link E from mower remove retainer spring and washer Gotoeithersideofmoweranddisconnectmowersuspen sion arm A from chassis and rear lift link C from rear mowerbracket D removeretainerspringsandwashers Go...

Страница 19: ...ll go and position mower on right side of tractor with deflector shield Q to the right 2 ASSEMBLEFRONTGAUGEWHEEL W TOFRONT OF MOWER See Fig 23 NOTE Depending on model bracket T may be differ ent than shown but hole for anti sway bar will be in same position location Fromrightsideofmower firstinsert90 endofanti sway bar S into hole in transaxle bracket T located near left rear tire in front of tran...

Страница 20: ...REAR LIFT LINKS C See Fig 30 Insert rod end of rear lift link C into hole U in tractor lift shaft suspension arm and pivot link down to mower Lift rear corner of mower and position slot in link as sembly over pin on rear mower bracket D and secure with large washer and large retainer spring Repeat on opposite side of tractor C REAR LIFT LINK S D RIGHT SIDE REAR MOWER BRACKET U HOLE D C U 9 INSTALL...

Страница 21: ...elsandentireupperdecksurface Remove belt from electric clutch pulley M both man drel pulleys R and all idler pulleys V Fig 34 V Q P M K L R P Q R R SERVICE AND ADJUSTMENTS MOWER DRIVE BELT INSTALLATION Install belt around all mandrel pulleys R and around idler pulleys V as shown Install belt onto electric clutch pulley M IMPORTANT Check belt for proper routing in all mower pulley grooves Reassembl...

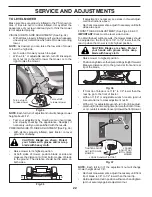
Страница 22: ...appearance Readjust if necessary until you are satisfied with the results A Turn nut left to lower mower Turn nut right to raise mower Fig 34 Fig 35 PRECISION SIDE TO SIDE ADJUSTMENT See Fig 35 With all tires properly inflated park tractor on level ground or driveway CAUTION Blades are sharp Protect your hands with gloves and or wrap blade with heavy cloth Raise mower to its highest position At bo...

Страница 23: ...stall mower See TO INSTALL MOWER section in this manual electric 02953 E A F B J G C H D Fig 38 TO CHECK BRAKE If tractor requires more than five 5 feet to stop at highest speed in highest gear on a level dry concrete or paved surface then brake must be serviced You may also check brake by 1 Park tractor on a level dry concrete or paved surface depress brake pedal all the way down and engage parki...

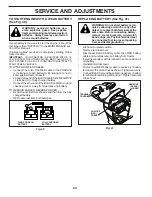
Страница 24: ...from fuel tank and battery TO REMOVE CABLES REVERSE ORDER BLACK cable first from chassis and then from the fully charged battery RED cable last from both batteries WEAK OR DEAD BATTERY FULLY CHARGED BATTERY Fig 40 REPLACING BATTERY See Fig 41 WARNING Do not short battery termi nals by allowing a wrench or any other object to contact both terminals at the same time Before connecting battery remove ...

Страница 25: ...ve procedure ENGINE TO ADJUST THROTTLE CONTROL CABLE The throttle control has been preset at the factory and adjustment should not be necessary If adjustment is nec essary see engine manual TO ADJUST CHOKE CONTROL The choke control has been preset at the factory and ad justment should not be necessary If adjustment is neces sary see engne manual TO ADJUST CARBURETOR Your carburetor is not adjustab...

Страница 26: ...FUELSYSTEMPARTSSUCH AS CARBURETOR FUEL FILTER FUEL HOSE OR TANK DURING STORAGE ALSO EXPERIENCE INDICATES THAT ALCOHOL BLENDED FUELS CALLED GASOHOL OR USING ETHANOLORMETHANOL CANATTRACTMOISTUREWHICH LEADSTOSEPARATIONANDFORMATIONOFACIDSDURING STORAGE ACIDIC GAS CAN DAMAGE THE FUEL SYSTEM OF AN ENGINE WHILE IN STORAGE Empty the fuel tank by starting the engine and let it run until the fuel lines and ...

Страница 27: ...ing 7 Faulty ignition switch 7 Check replace ignition switch 8 Faulty solenoid or starter 8 Check replace solenoid or starter 9 Faulty operator presence switch es 9 Contact an authorized service center department Engine clicks but will not start 1 Weak or dead battery 1 Recharge or replace battery 2 Corroded battery terminals 2 Clean battery terminals 3 Loose or damaged wiring 3 Check all wiring 4...

Страница 28: ...led 9 Reinstall blades sharp edge down 10 Improper blades used 10 Replace with blades listed in parts manual 11 Cloggedmowerdeckventholesfrombuildup of grass leaves trash around mandrels 11 Clean around mandrels to open vent holes Headlight s not working if so equipped 1 Switch is OFF 1 Turn switch ON 2 Bulb s or lamp s burned out 2 Replace bulb s or lamp s 3 Faulty light switch 3 Check replace li...

Страница 29: ... never across the face Do not mow slopes greater than 15 degrees Make turns gradually to prevent tipping or loss of control Exercise extreme caution when changing direction on slopes 1 Fold this page along dotted line indicated above 2 Hold page before you so that its left edge is vertically parallel to a tree trunk or other upright structure 3 Sight across the fold in the direction of hill slope ...

Страница 30: ...ts used for rental or commercial purposes is limited to 90 days from the date of original purchase 5 This Warranty applies only to products which have been properly assembled adjusted operated and maintained in accor dance with the instructions furnished This Warranty does not apply to any product which has been subjected to alteration misuse abuse improper assembly or installation delivery damage...

Отзывы: