Owners Manual
Rev 6/20
Vent System
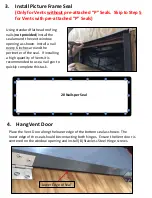
Страница 1: ...Owners Manual Rev 6 20 Vent System...
Страница 2: ...imited warranty is expressly in lieu of any and all representations and warranties expressed or implied including any implied warranty of merchantability or fitness for a particular purpose The remedy...
Страница 3: ...available in two sizes 44 x 12 and 44 x 6 Large Vent 44 x 12 Note framed opening can be smaller than listed dimensions but not larger than Small Vent 44 x 6 Note framed opening can be smaller than lis...
Страница 4: ...a nail every 6 inches around the perimeter of the seal If installing a high quantity of Vents it is recommended to use a nail gun to quickly complete this task 20 Nails per Seal 4 Hang Vent Door Place...
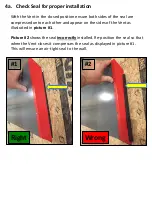
Страница 5: ...re compressed onto each other and appear on the sides of the Vent as illustrated in picture 1 Picture 2 shows the seal incorrectly installed Re position the seal so that when the Vent closes it compre...
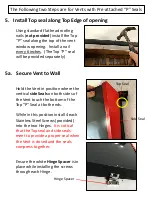
Страница 6: ...Hold the Vent in position where the vertical side Seals on both sides of the Vent touch the bottom of the Top P Seal at both ends While in this position install 4 each Stainless Steel Screws provided...
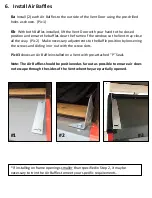
Страница 7: ...Pic 2 Make necessary adjustments to the Baffle position by loosening the screws and sliding in or out with the screw slots Pic 3 shows an Air Baffle installed on a Vent with pre attached P Seals Note...
Страница 8: ...7 Install Airflow Extender Install the Airflow Extender as shown using 4 each self tapping SS screws provided 4 each SS Screws Airflow Extender...
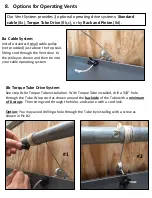
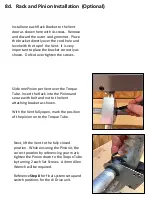
Страница 9: ...perating drive systems Standard cable 8a Torque Tube Drive 8b c or by Rack and Pinion 8d 8b Torque Tube Drive System See step 8c for Torque Tube installation With Torque Tube installed drill a 3 8 hol...
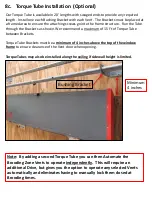
Страница 10: ...rque Tube between Brackets Torque Tube Brackets must be a minimum of 4 inches above the top of the window frame to ensure clearance of the Vent door when opening Torque Tubes may also be installed alo...
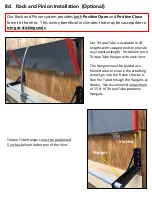
Страница 11: ...nsure the attaching screws go into the frame structure Run the Tube through the Hangers as shown We recommend a maximum of 15 Ft of Torque Tube between Hangers Our Rack and Pinion system provides both...
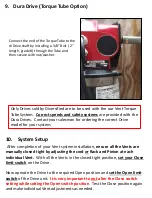
Страница 12: ...inion is the correct position by referencing your mark tighten the Pinion down to the Torque Tube by turning 2 each Set Screws A 4mm Allen Wrench will be required Reference Step 8 for final system set...
Страница 13: ...rect Drive model for your system 10 System Setup After completion of your Vent system installation ensure all the Vents are manually closed tight by adjusting the cord or Rack and Pinion at each indiv...