background image


17


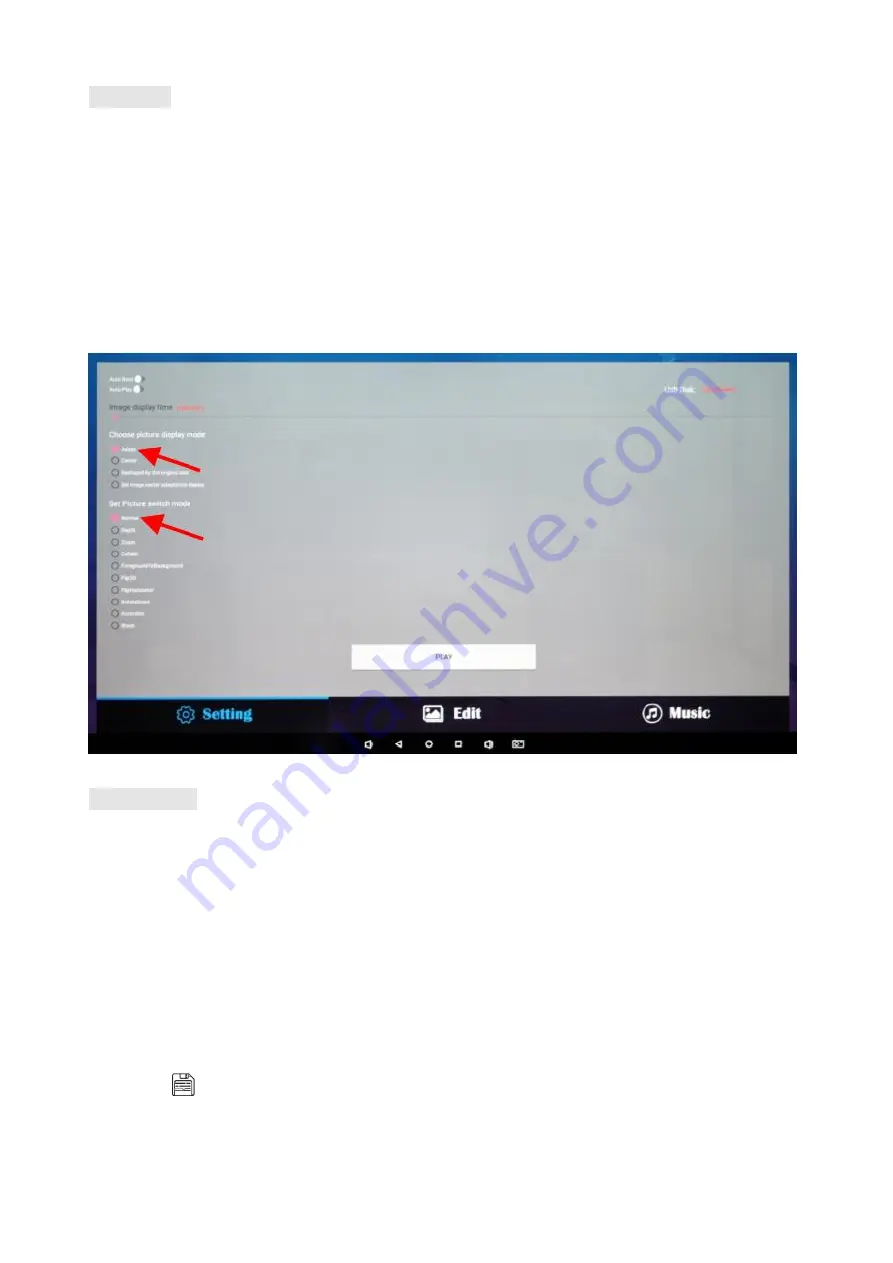
  Settings: 


1.


Set the time each picture is to be shown on the screen by dragging the bar to the desired time.


2.


Select how you would like the images to display. Select the desired transition effect between pictures:


Auto Boot


DiViEX APP will automatic open when the digital signage is turned on.


Auto Play


DiViEX APP will automatic play the slidshow when it is opened.


Choose Picture display mode


Check a fit option how you want the pictures to be displayed.


Set Picture switch mode


Choose an animation option to set the fade in and fade out effects.


  Edit picture: 


This function shows all pictures, you can edit all pictures, and remove it.


Crop


There are four corner handles and four border handles to crop the picture. Click and drag a handle to 
reshape the image to any size you need. 


Filter


You can browse and try different filters in the filter gallery below the image. The APP support the 
following filter: AUTO_FIX, BLACK_WHITE, BRIGHTNESS, CONTRAST, CROSS_PROCESS, DOCUMENTARY, 
DUE_TONE, FILL_LIGHT, FISH_EYE, FLIP_HORIZONTAL, FILP_VERTICAL, GRAIN, GRAY_SCALE, LOMISH, 
NEGATIVE, PSTERIZE, ROTATE, SATURATE, SEPIA, SHARPEN, TEMPERATURE, TINT, VIGNETTE.


Reset


Click “Reset” to remove all the editing you applied to the image.


Save “        ”


Click the icon to save the edited image as a new image. 


Содержание DGLEDCBD32

Страница 1: ...properly please call our Customer Service Department at 1 844 221 3393 FCC ID 2ASCB DGLEDCBD32 This device complies with Part 15 of the FCC Rules Operation is subject to the following two conditions 1...

Страница 2: ...12 Power on Standby 12 About Launch Desktop 12 Description of Wallpaper Switch 13 File Manager 13 Local Settings 14 Status of Menu bar 15 DiViEx APP Introduction 15 System requirements 15 How to uploa...

Страница 3: ...lays2go We have considered the factors to ensure personal safety in product design and have tested rigorously at the factory However improper installation and use may result in electric shock and fire...

Страница 4: ...the cord to remove the plug Do not connect too many plugs to one outlet in parallel or else it may cause fire due to excessive power consumption Do not approach the Digital Signage with open flame e g...

Страница 5: ...s in resulting in machine failure If the unit displays the same screen for a long time or the moving picture has fixed text or icon it will leave ghosting on the screen and won t disappear when the un...

Страница 6: ...ower cord 1 Remote Control for LCD Screen 1 Remote Control for LED Writing Board 1 Wall mounting bracket A On the backside of product 2 Wall mounting bracket B On the wall 2 M6x16 Pan Head Screw 8 M6x...

Страница 7: ...ssembling or disassembling the unit 1 LCD Screen 2 IR indicator 3 LED Chalk Board 4 Mounting Holes 5 Heat Dissipation Holes 6 Heat Dissipation Holes 7 Mounting Holes 8 USB port 9 USB port 10 HDMI port...

Страница 8: ...he bracket level Secure the bracket B onto the wall with enclosed M6x50 wall anchors NOTE 1 The vertical center distance is 1033mm 2 The included hardware can ONLY be used on concrete wall Step 3 Care...

Страница 9: ...Multicolor Brightness Dimmable Speed variable Control Remote control Cleaning Wet Cloth Product Features You can use liquid chalk marker to create content on the chalkboard and wipe off by using damp...

Страница 10: ...tion below if the remote control doesn t work properly Make sure the battery is inserted properly and the unit is powered on Issue Solution The remote control is not working Step 1 Use a tiny pin that...

Страница 11: ...of remote control will be shortened if the battery voltage is insufficient in this case please replace with new batteries if the remote control won t be used for a long time or the batteries are run o...

Страница 12: ...age has the switch button I turn it on In power on state press the button on the remote control and the Digital Signage enters standby state Interface and Home Screen After power on the machine will l...

Страница 13: ...lay setting menu click Wallpaper then choose a folder 4 Then select an image you would like to set up as background 5 Confirm the selection by clicking Set wallpaper File Manager 1 Click the Main Apps...

Страница 14: ...nter Settings menu Fig 2 3 Click Wi Fi and choose options then set up the WIFI connection Fig 3 Description of Settings Interface shown on the right Icon Function WIFI switch Bluetooth Data usage Disp...

Страница 15: ...your device meets or exceeds the following system requirements CPU RK3288 Operating system Android 7 1 How to upload media files Step 2 Plug in your USB drive to the computer Open the drive in Windows...

Страница 16: ...MP PNG Video AVI MPEG4 WMV MKV FLV MP4 MOV Music MP3 Step 3 Plug the USB drive into the device and click the DiViEx APP Step 4 When the screen shows Copy finished after Usb Disk the media files are re...

Страница 17: ...d fade out effects Edit picture This function shows all pictures you can edit all pictures and remove it Crop There are four corner handles and four border handles to crop the picture Click and drag a...

Страница 18: ...18 Image deletion Click to delete unwanted pictures...

Страница 19: ...arrow music title will show in the Playlist Music on the right To remove the added music file from the playlist click the left arrow in the playlist Factory Reset 1 Get into Settings then click Backu...

Страница 20: ...o Settings then click Language input Fig 1 2 Click Languages then click Add a language Fig 2 3 You can add the required system language Fig 3 4 Drag the system language you just added up to the front...

Страница 21: ...age 100V 240V 50 60Hz Power Consumption 67W Maximum operating time hrs day 18 hours Environment Operating temperature 32 122 F 0 50 C Storage temperature 4 140 F 20 60 C Storage humidity 5 90 RH Non c...

Страница 22: ...es MP3 RTC real time clock Yes Schedule power on off Yes System update USB compatible App installation Support download and installation I O interfaces Ethernet RJ45 1 HDMI 1 VGA N A Headset N A USB2...

Страница 23: ...nit is connected to Wi Fi go to YouTube and play video that has sound Unplug unit wait 20 seconds plug unit back into outlet and try again Try playing the content on a different device smart phone com...

Страница 24: ...g No charge for replacements Parts lost or damaged by the customer There is charge for replacements Contact a customer service representative Having problems with installing software or getting conten...

Страница 25: ...ked and the issue is not resolved contact a customer service representative If Keypad doesn t work Batteries need to be replaced Batteries incorrectly inserted Replace batteries Check if batteries are...

Страница 26: ...he machine contains harmful substances inside The data is provided by material suppliers and verified by the company according to the material type Some materials contain harmful substances that can t...

Страница 27: ...interference will not occur in a particular installation If this equipment does cause harmful interference to radio or television reception which can be determined by turning the equipment off and on...

Отзывы: