background image


Displays2go


Rev. 10/15/19


Remote Control


  Installing batteries for the remote control: 


Remove the battery cover and insert two AAA batteries (1.5V). Ensure that the battery polarity matches the 
“+”/“-” marks in the battery compartment of the remote control.


  Precautions for using the remote control: 


Aim the remote control at the receiver window. Do not place any object between the remote control and the 
receiver window to avoid interference with the normal operation.


Keep the remote control away from violent vibration. In addition, do not set or place the remote control in 
direct sunlight, or else the remote control may be deformed by heat.


The remote control may be invalid when the receiver window of the unit is in direct sunlight or strong lighting; 
in this case, please adjust the angle of the lighting or the unit or approach the receiver window to use it.


The  distance  of  remote  control  will  be  shortened if  the  battery  voltage  is  insufficient;  in  this  case,  please 
replace with new batteries; if the remote control won’t be used for a long time or the batteries are run out, 
please take out the batteries to avoid corrosion due to battery leakage, which will damage the remote control.


Do not use batteries of different types or mix new batteries with old ones. Always replace the batteries in 
pairs.


Do not put the batteries in fire, or charge or disassemble them, or charge, short circuit, disassemble, heat or 
burn used batteries. Please dispose of waste batteries in accordance with local environmental regulations. Do 
not expose the batteries in overheated environments such as sunlight and fire.


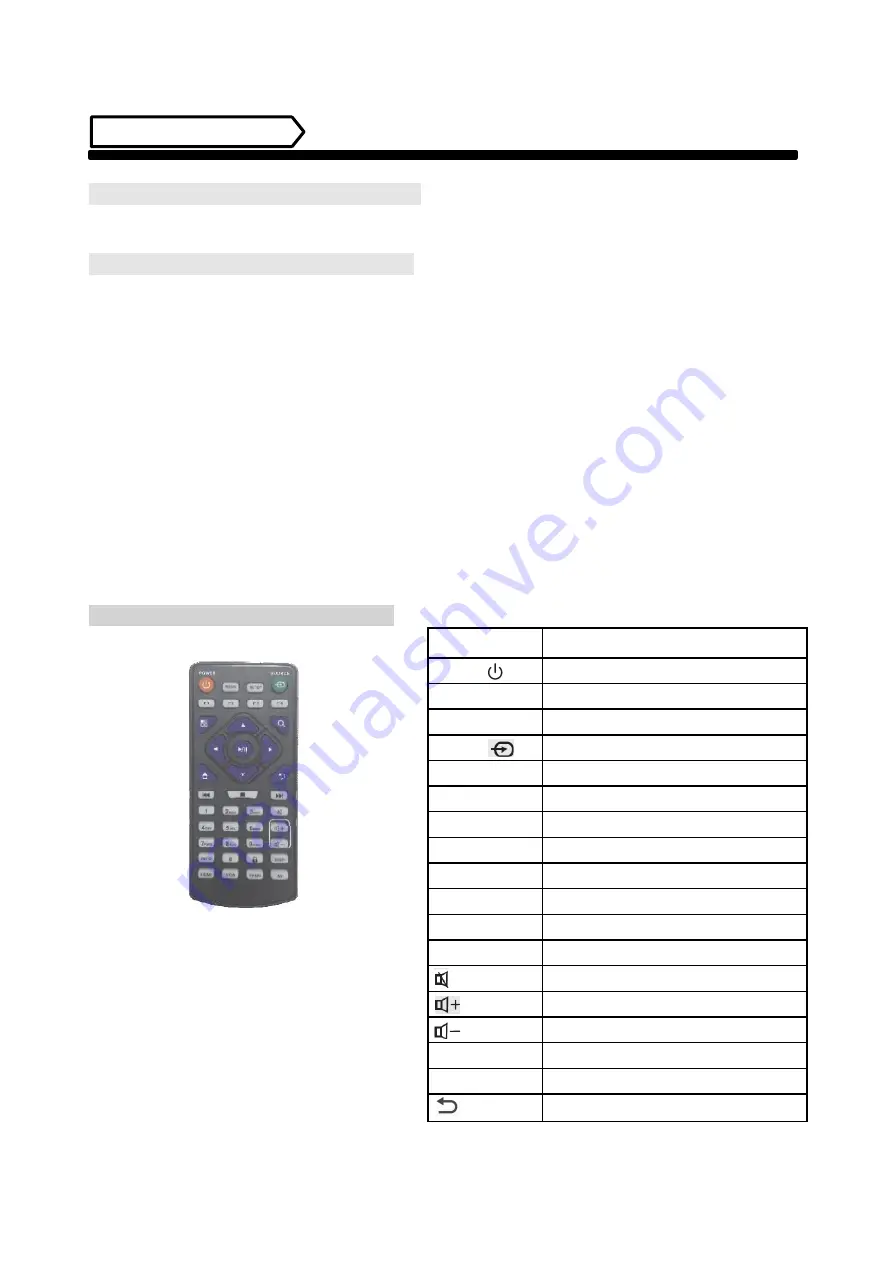
  Description of remote control buttons: 


Note: Press the SETUP button in the main interface to 

call  out  the  OSD  menu.  After  exiting  the  playback 

mode by pressing the STOP button, the playback will 

start according to the schedule next time.


Please Note: The real appearance of the remote 
control may be different from the picture, please 
refer to the actual product.


Button


Function


POWER (      )


Power switch


MENU


To show the main menu


SETUP


To set up OSD menu


SOURCE 


To show the Source menu


/


Play programs; confirm selection


To move the cursor up


To move the cursor down


To move the cursor left


To move the cursor right


Previous program


Next program


Stop playing and return to the main interface


Mute


Turn up the volume


Turn down the volume


HDMI


Select HDMI device as the source


VGA


Select VGA device as the source


Back


Содержание DGFSTCH55

Страница 1: ...does not work properly please call our Customer Service Department at 1 844 221 3393 FCC ID 2ASCB DGFS55IN This device complies with Part 15 of the FCC Rules Operation is subject to the following two...

Страница 2: ...Power on Standby 9 About Launch Desktop 9 Description of Wallpaper Switch 10 File Manager 10 Local Settings 11 Status of Menu bar 12 Slide Show APP Introduction 12 How to Upload Media Files 12 How to...

Страница 3: ...age from Displays2go We have considered the factors to ensure personal safety in product design and have tested rigorously at the factory However improper installation and use may result in electric s...

Страница 4: ...Do not pull the cord to remove the plug Do not connect too many plugs to one outlet in parallel or else it may cause fire due to excessive power consumption Do not approach the Digital Signage with op...

Страница 5: ...red by the warranty The power of the Digital Signage can be cut off by pulling out the plug If the LCD screen ruptures and the liquid splashes on the skin please rinse for 15 minutes with clean water...

Страница 6: ...for Assembly 1 Open the top cover as shown in Fig 2 2 Remove EPE on both sides of the box as shown in Fig 3 3 Take out the base from the package as shown in Fig 4 4 Carefully lift out the unit as sho...

Страница 7: ...as a mobile unit install 4 casters to the metal base by threading them into the holes on the bottom of the base Tighten all casters with a 14mm wrench 2 Connect the base and the digital poster with pr...

Страница 8: ...ies to avoid corrosion due to battery leakage which will damage the remote control Do not use batteries of different types or mix new batteries with old ones Always replace the batteries in pairs Do n...

Страница 9: ...tton I turn it on if you press the switch button O the Digital Signage enters standby state In power on state enter System Assistant and press the button on the remote control and the Digital Signage...

Страница 10: ...t the Display setting menu click Gallery or Wallpaper 4 Then select an image you would like to set up as background 5 Confirm the selection by clicking Set wallpaper File Manager 1 Click the Main Apps...

Страница 11: ...n the Wi Fi menu and set up different options Fig 1 Fig 2 Fig 3 Description of Settings Interface shown on the right Icon Function WIFI switch Data usage Bluetooth USB Sound notification Battery saver...

Страница 12: ...tting 2 At the setting menu click the display menu 3 At the display setting menu unselect the display navigation check box Fig 1 Fig 2 Fig 3 Slide Show APP Introduction How to Upload Media Files Step...

Страница 13: ...the USB storage menu click the USB storage button Step 3 At the USB storage menu select Multi and then highlight the media files which you want to copy to the media folder Click the Editor button the...

Страница 14: ...14 Displays2go Rev 10 15 19 Step 4 Click HOME button and go to the NAND FLASH menu Select MediaFolder and then open the Images Folder...

Страница 15: ...ick the edit button at the top of the screen the pop menu will show Then click the Paste command button The files will be copied to the images folder Step 6 Exit the Explorer app and go to the launche...

Страница 16: ...you would like each picture to be on the screen for by dragging the bar to the desired time Select how you would like the images to display Select the desired transition effect between pictures Step 8...

Страница 17: ...ays2go Rev 10 15 19 How to Delete the Media Files Step 1 Open the Android launcher screen and click the explorer app Step 2 Click home button and go to the NAND FLASH menu you will see the MediaFolder...

Страница 18: ...Step 3 At the Image or Video folder select the media files which you want to delete Then click the edit button at the top of the screen the pop menu will show Then click the Delete command button and...

Страница 19: ...hen click RESET DEVICE to get the unit to Factory Reset Fig 3 Fig 1 Fig 2 Fig 3 Screen Rotate 1 Click the Main Apps button in the Home page to enter the APPS menu interface Fig 1 2 Click System aide i...

Страница 20: ...20 Displays2go Rev 10 15 19 Choose System Language 1 Get into Settings then click Language input Fig 1 2 Click Language then you can choose the system language accordingly Fig 2 Fig 1 Fig 2 Fig 3...

Страница 21: ...Viewable area 1209 6 H mm 680 4 V mm Chromaticness 16 7M Power supply Voltage 100V 240V 50 60Hz Power Consumption 100W Environment Operating temperature C 0 40 C Storage temperature C 10 60 C Storage...

Страница 22: ...Schedule power on off Yes System update USB compatible App installation Support download and installation I O interfaces TF N A Ethernet RJ45 1 HDMI 1 VGA N A Headset N A USB2 0 2 SIM N A Structure N...

Страница 23: ...G4 WMV MKV flv MP3 MP4 MOV If unit is connected to Wi Fi go to YouTube and play video that has sound Unplug unit wait 20 seconds plug unit back into outlet and try again Try playing the content on a d...

Страница 24: ...manufacturing No charge for replacements Parts lost or damaged by the customer There is charge for replacements Contact a customer service representative Having problems with installing software or ge...

Страница 25: ...o Loop video While the video is playing click on the video and there should be 3 dots in the top right corner Click on the 3 dots play check desired Loop option If all of the above have been checked a...

Страница 26: ...ed in GB T 26572 2011 standard The table shows that the machine contains harmful substances inside The data is provided by material suppliers and verified by the company according to the material type...

Отзывы: