background image

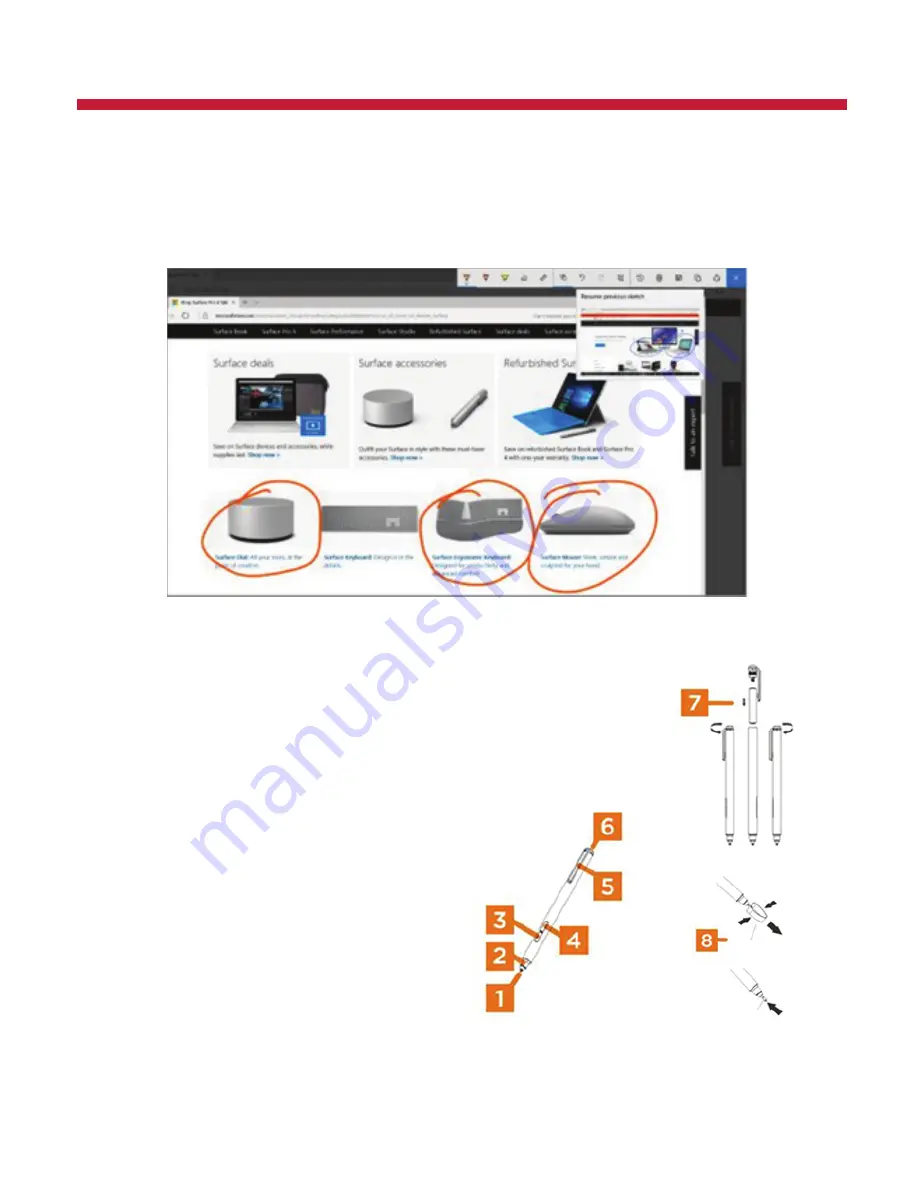
Use Screen Sketch to draw on whatever you’re doing on your PC at the moment, or to sketch

on a previous screen sketch capture. Screen Sketch puts all of the Sketchpad tools at your

disposal when drawing on screenshots.

5.3 SCREEN SKETCH

Press the "Eraser" or "Alt" button to wake up the smart stylus. 

RECOMMENDED: Keep the unused tips

in the foam portion of the package.

6.0 USING THE SMART STYLUS

1. Tip

2.  Smart Stylus Hood

3.  Eraser Button

4.  Alt Button (Mouse Right + Click)

5. Clip

6.  Battery Compartment

7.  AAAA Battery

8.  Use Stylus Replacement Tool

  to remove/replace Tip

6.1 PARTS OF THE SMART STYLUS

Windows Ink (Cont’d) 

Smart Stylus

14

Содержание DTTAB2in1-116-1

Страница 1: ...11 6 Tablet with Docking Keyboard Review this manual before operating your Direkt Tek tablet and keep it for future reference USER GUIDE 11 6 Tablet with Docking Keyboard Review this manual before operating your Direkt Tek tablet ...

Страница 2: ......

Страница 3: ...wn 3 2 Recovery 3 3 Bluetooth 3 4 Security Management 4 0 How To Set Up Fingerprint Windows Hello 4 1 Remove Fingerprint 5 0 Using Windows Ink 5 1 Sticky Notes 5 2 Sketchpad 5 3 Screen Sketch 6 0 Using The Smart Stylus 6 1 Parts Of The Smart Stylus 6 2 Replacing The Tip 6 3 Package Contents 6 4 Install The Battery 7 0 Specifications TABLE OF CONTENTS Page 2 2 3 4 4 4 6 6 6 7 8 9 11 12 12 13 14 14 ...

Страница 4: ...NOT attempt to disassemble the device Please do not drop or bang the device Avoid using this product in the following environments Extremely hot or cold places high humidity dusty areas direct sunlight or long term exposure to the sun The product may be cleaned with a damp cotton cloth the use of any chemical cleaning fluid is prohibited Please keep the product away from water at all times If you ...

Страница 5: ...ns TOP TOP BOTTOM KEYBOARD SCREEN 5 6 7 8 10 11 13 14 4 2 12 1 3 6 8 7 9 10 12 13 14 11 1 3 2 Speaker SD Card Reader Earphone Power Volume Front Camera Microphone Screen 5 4 Pin Speaker DC In Micro HDMI USB Rear Camera Keyboard Touchpad 15 16 16 15 9 ...

Страница 6: ...the screen Click on any of the icons to open You must log on to your Microsoft account before the start up application can run 2 3 INTRODUCTION TO APP INTERFACE If you want to pin more application programs on the Start interface press and hold the application program for about one second and release the magnet until the pop up option appears and select Pin to Start to fix to the start screen or ju...

Страница 7: ... and hold the application program magnet for about one second and click You can also click to check more menu options such as resizing the magnet you want Screen 2 Slide it to the left from the right side of the screen to start Action Center to check the laptop status Rotation lock Bluetooth Brightness etc Screen 1 Screen 2 ...

Страница 8: ...op freezes you can press and hold the Power button for 8 12 seconds then the laptop will shutdown Follow the steps below Click the button in the lower left corner of screen and select Settings then select Update Security click on Recovery The program will walk you through simple steps necessary to recover your system ...

Страница 9: ...o search other devices you can pair with your device Send or Receive Files via Bluetooth Send or Receive Files via Bluetooth b Send a File Before sending files you should open the window Select where to send your files Click the icon at lower right corner of desktop Send a File c Receive a File Before receiving the files you should open the window Waiting for a connection Click the icon at lower r...

Страница 10: ...utton in the lower left corner of screen and select Settings Select Accounts on the right and click Create local account in Your account on the right side After creating a user name and a password for Windows Live ID Account input username password confirm password and password prompt ...

Страница 11: ...recognizes you and greets you by name granting you secure access with a fingerprint reader illuminated infrared and other specialized biometric sensors 1 Open Accounts Settings Settings Accounts 3 After setting your password set up a PIN code to gain access to Windows Hello 2 Select Sign in options and set a password to gain access to additional security features ...

Страница 12: ...dows Hello set up 10 Windows Hello Cont d 5 Follow the Windows Hello setup instructions to scan and register your fingerprint NOTE Windows Hello will use 8 10 scans We recommend you place the same finger in different positions for thorough fingerprint registration 6 Scan Fingerprint ...

Страница 13: ...ting up fingerprints for different accounts NOTE We recommend adding at least two fingerprints per account This ensures consistent accessibility without compromising your security Return to Windows Hello settings and select Remove Settings Accounts Sign in options Tip To remove identification data go to Settings Accounts Sign in options Under Windows Hello select Remove 4 1 TO REMOVE FINGERPRINT ...

Страница 14: ... features Sticky Notes Sketchpad and Screen Sketch Create a Sticky Note by selecting Add Note Notes can be dragged around the screen Select More to set change the note s size Color and other features Use Sticky Note to set reminders with Cortana doodle or write down your next big idea NOTE If you don t have a Windows Ink pen you may also draw using a mouse or finger 5 1 STICKY NOTES 5 0 USING WIND...

Страница 15: ...iccups with a variety of sized erasers Save copy and share your finished products 5 2 SKETCHPAD Cortana makes Sticky Note even more useful With Insights add reminders to your Sticky Note for Cortana to store and track Whether you re checking a flight or need to call mom Cortana will track your itinerary and keeps addresses phone numbers and other information on hand NOTE If text does not turn blue...

Страница 16: ...shots 5 3 SCREEN SKETCH Press the Eraser or Alt button to wake up the smart stylus RECOMMENDED Keep the unused tips in the foam portion of the package 6 0 USING THE SMART STYLUS 1 Tip 2 Smart Stylus Hood 3 Eraser Button 4 Alt Button Mouse Right Click 5 Clip 6 Battery Compartment 7 AAAA Battery 8 Use Stylus Replacement Tool to remove replace Tip 6 1 PARTS OF THE SMART STYLUS Windows Ink Cont d Smar...

Страница 17: ...e Tip Replacement Tool in one hand and the stylus in another bring the Tool over the tip of the stylus 2 Pinch the tool closed around the Tip and slowly pull the Tip out of the body of the stylus 3 To place a new tip use the Tip Replacement Tool to remove a tip from the packaging With the pointed end of the Tip pinched in the Tool slide the new Tip into the stylus until the neck of the Tip is not ...

Страница 18: ...city Camera Front 2MP Rear 2MP Speaker Built in Built in stereo speakers 6R 0 8W 2 G Sensor Built in G sensor 3 axis System Hardware Configuration Network Connections System Standard Configuration WIFI WIFI Module RTL8723BS 802 11b g n Bluetooth BT Module Bluetooth 4 0 Ethernet Network External Dongle N A Memory Card Slot External Memory 1x Micro SD card up to 64GB DC Jack DC Output Support 1 USB ...

Страница 19: ......

Страница 20: ......

Отзывы: