


18
© 1999 Directed Electronics, Inc. Vista, CA
N430 9/99
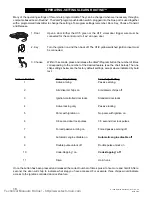
OPERATING-SETTINGS LEARN ROUTINE™
Many of the operating settings of this unit are programmable. They can be changed whenever necessary through a
computer-based Learn Routine
™
. The Valet
®
/program push-button switch, plugged into the blue port is used together
with a programmed transmitter to change the settings. To program settings remember: Door, Key, Choose, Transmit
and Release.
1. Door
Open a door. Either the H1/5 green or the H1/7 violet door trigger wire must be
connected for the control unit to “see” an open door.
2. Key
Turn the ignition on and then back off. The H1/9 yellow switched ignition input must
be connected.
3. Choose
Within 15 seconds, press and release the Valet
®
/Program button the number of times
corresponding to the number of the desired feature (see the chart below). The one
chirp settings below are the factory default settings, except where indicated by bold
text.
Feature Number
One-chirp Setting
Two-chirp Setting
1
Active arming
Passive arming
2
Arm/disarm chirps on
Arm/disarm chirps off
3
Ignition-controlled door locks
Standard door locks
4
Active locking only
Passive locking
5
Panic with ignition on
No panic with ignition on
6
0.8 second door lock pulses
3.5 second door lock pulses
7
Forced passive arming on
Forced passive arming off
8
Automatic engine disable on
Automatic engine disable off
9
Double pulse unlock off
Double pulse unlock on
10
Code-Hopping
™
on
Code-Hopping
™
off
11
Siren
Horn honk
Once the button has been pressed and released the correct number of times press it once more and hold it. After a
second, the siren will chirp to indicate what step you have accessed. For example, three chirps would indicate
access to the ignition controlled door lock feature.
Technical Manuals Online! - http://www.tech-man.com