background image

6

© 2003 Directed Electronics, Inc 

INSTALLATION GUIDELINES

1. Please read this owner’s manual

carefully before installing this ampli-
fier.

2. Disconnect the battery ground

terminal prior to making  any elec-
trical connections.

3. Check for any hazards or obstruc-

tions such as gas tanks, fuel or
brake lines, and wiring harnesses
before mounting the amplifier.

4. Pick a mounting location that will

provide adequate access and venti-
lation and protect the amplifier
from heat, moisture, and dirt.

5. Avoid sharp metal areas when

routing cables to the amplifier, and
run RCA cables away from the
power cables and other potentially
noisy car harnesses.

6. The amplifier should be grounded

with a short, heavy gauge wire
connected directly to the car at a
bare metal surface, preferably
scraped body sheet metal. Do not
use factory ground locations, seat
bolts, or brackets that are spot
welded.

7. Always fuse your power connection

within 8 to 10 inches of the battery

terminal. Use a fuse or circuit
breaker rated slightly more than the
on-board fuse(s) of the
amplifier(s). The gauge of power
wire used should take into account
the total current draw of the
system, and the length of wire
used. IASCA and other auto sound
competition organizations have
charts available for this; you can
also find a chart in the MECP study
guide. Minimum wire gauge recom-
mendations for the individual ampli-
fiers are listed on the specification
page. Always use the same gauge
wire for the amplifier ground that
you use for the power wire. Be sure
to examine the battery ground
cable of the vehicle, and if neces-
sary, upgrade it by adding an addi-
tional ground wire that is the same
gauge as the amplifier’s power
wire. Remember, the amplifier can
only deliver its rated output when it
is not current limited by the power
and ground supply wires.

8. This amplifier is designed to drive a

speaker load that measures from 2
to 8 ohms. Keep in mind that heat
is the long-term enemy of automo-
tive electronics and the lower your

Содержание 6

Страница 1: ...model 700 6 ...

Страница 2: ...2 2003 Directed Electronics Inc ...

Страница 3: ...nthusiast with years of high quality audio reproduction Directed Audio power amplifiers come with a two year limited warranty if installed by an authorized Directed dealer If not installed by an authorized dealer Directed Audio power amplifiers are covered by a one year parts and labor limited warranty Be sure to retain your original sales receipt and refer to the warranty section of this guide fo...

Страница 4: ... accident or unreasonable use neglect improper service or other causes not arising out of defects in materials or construction ALL WARRANTIES INCLUDING BUT NOT LIMITED TO EXPRESS WARRANTY IMPLIED WARRANTY WARRANTY OF MERCHANTABILITY FITNESS FOR PARTICULAR PURPOSE AND WARRANTY OF NON INFRINGEMENT OF INTELLECTUAL PROPERTY ARE EXPRESSLY EXCLUDED TO THE MAXIMUM EXTENT ALLOWED BY LAW AND DIRECTED NEITH...

Страница 5: ...ary bipolar outputs Thermal DC offset reverse polarity and short circuit protection Top mounted controls easily accessed for system tuning Dual continuously variable 12 dB octave two way active crossovers ch 1 6 RCA output Switchable 8 dB bass EQ function and optional remote subwoofer level control ch 5 6 Two four and six channel input allows full access to source or processor output functions Sum...

Страница 6: ...our power connection within 8 to 10 inches of the battery terminal Use a fuse or circuit breaker rated slightly more than the on board fuse s of the amplifier s The gauge of power wire used should take into account the total current draw of the system and the length of wire used IASCA and other auto sound competition organizations have charts available for this you can also find a chart in the MEC...

Страница 7: ...urface area is what counts soldering the terminals after crimping is also recom mended 10 Due to the high frequency MOSFET switching power supply filtering the power cable is not generally required remember that the amp can t deliver full output if the power supply is restricted Proper grounding of the signal source is mandatory for the amplifier to reach its performance peak If the RCA inputs are...

Страница 8: ...s five and six is set to the low pass LPF position If connecting to a source with a dedicated subwoofer output and volume control using the Remote Sub Level Control would be redun dant and is not recommended N NO OT TE E If the Remote Sub Level Control is used with a signal processor or head unit that has a subwoofer output crossover but no volume control set the amplifiers channels five and six c...

Страница 9: ...e by installing a fuse or circuit breaker of the appropriate size within 12 inches of the battery terminal connection 4 R Re em mo ot te e T Tu ur rn n O On n This terminal turns on the amplifier when 12 volt is applied to it Connect it to the remote turn on lead of the head unit or signal source If a 12 volt remote turn on lead is not available the Remote Power Adapter P N 55000 can be used to su...

Страница 10: ...and is used for mid range speakers and tweeters LPF attenuates high frequencies and is typically used for subwoofers 3 C Cr ro os ss so ov ve er r F Fr re eq qu ue en nc cy y A Ad djju us st tm me en nt t Adjusts the crossover point for the on board active crossovers 4 B Ba as ss s E EQ Q S Sw wiit tc ch h Adds 8 db of addi tional boost to channels five and six output when active 5 IIn np pu ut t ...

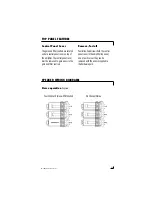
Страница 11: ...ier The control panel cover must be removed to gain access to the gain and filter controls Remove Install Four Allen head screws hold the control panel cover to the amplifier top panel one at each corner They can be removed with the wrench supplied in the hardware pack TOP PANEL FEATURES Stereo operation top view Four Channel Stereo with Mono Sub Six Channel Stereo ...

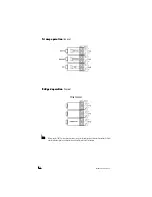
Страница 12: ...Bridged operation top view Three Channel N NO OT TE E When wiring the 700 6 for three channel operation connect the left audio signal to both channels one and two RCA jacks and the right audio signal to both channels three and four RCA jacks using RCA Y adapters ...

Страница 13: ... adjustment on the amplifier in the middle of its rotation bring up the volume on your head unit to the 3 4 volume setting or until you start to hear distortion or clipping If you hear distortion before you reach the 3 4 volume setting of your head unit reduce the gain setting on the amplifier and start to raise the head unit volume again When you can listen to the music at or slightly above 3 4 o...

Страница 14: ... than 0 1 Total Harmonic Distortion 14 4 VDC Channel 5 6 bridged into 4 ohms from 20 250 Hz with less than 0 1 THD 14 4 VDC Dynamic power rating IHF 202 Standard at minimum load Directed model 700 6 Ch 1 4 Ch 5 6 50 75 watts watts 75 125 watts watts 150x2 250 watts watts Signal to Noise Ratio Greater than 95 dB Frequency Response 20 20 000 Hz 0 5 dB Damping Factor 4 ohm Greater than 100 Crossovers...

Страница 15: ...d electronic technology Directed is ISO 9001 registered Directed is committed to delivering world class quality products and services that excite and delight our customers Directed Electronics Inc Vista California 92081 www directed com Directed is a proud member of Quality Directed products are sold and serviced throughout North America and around the world Call 800 274 0200 for more information ...

Отзывы: