Notes to the Installer
Test Mode
When the heater is connected via a pilot wire system, the
test mode allows the installer to check whether the heater
is responding correctly to the incoming pilot wire signal.
Before switching the heater on at the mains, place the
thermostat slider in the ‘MAX’ position, then press and hold
the ‘
’ button whilst switching on the mains.
The unit will now enter a test state for 4 mins. During this
test state the ‘
’ neon will indicate the pilot wire status:
NEON
PILOT WIRE
CONTROLLER MODE
Neon on -
ON
Neon off -
OFF
Neon flashing fast approx every 0.1sec -
FROST
Neon flashing slow approx every 0.5 sec -
SETBACK
Accessory Modules
Optional accessory modules are available for use with this
range of heaters - see separate User Instructions for details
on the operation of each accessory module.
Before fitting a control module switch the heater off at the
mains supply.
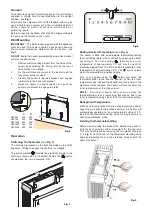
To insert a module, the plug-in protective cover on the right
hand side of the thermostat unit at the back of the heater
must first be removed.
Insert a flat-head screwdriver into the side of the cover and
prise away from the heater - see
Fig. 6
.
Lift the cover away from the heater to reveal the slide in
compartment.
Insert the accessory module into the slot ensuring it is
positively located in position - see
Fig. 6
.
Switch the heater on at the mains supply.
Fig. 6
Safety - Overheat protection
For your safety this appliance is fitted with a thermal cut-out.
In the event that the product overheats for some reason, the
cut-out prevents excessive temperatures on the product by
cutting the power to the heater. Once the heater has cooled
down, it will reset automatically, it will continue to cycle on
and off automatically until the reason for overheating is
removed.
Cleaning
WARNING – ALWAYS DISCONNECT FROM THE POWER
SUPPLY BEFORE CLEANING THE HEATER.
Before commencing cleaning, unplug the heater and allow it
to cool. Disconnect the electricity supply to the appliance.
The outside can be cleaned by wiping it over with a soft damp
cloth and then dried. Do not use abrasive cleaning powders
or furniture polish, as this can damage the surface finish.
To release heater from the wall bracket for cleaning or
redecoration, depress latch on both brackets (see
Fig. 2
)
and hinge forward.
Recycling
For electrical products sold within the European Community.
At the end of the electrical products useful life it
should not be disposed of with household waste.
Please recycle where facilities exist. Check with
your Local Authority or retailer for recycling advice
in your country.
After Sales Service
Your product is guaranteed for two years from the date of
purchase.
Within this period, we undertake to repair or exchange this
product free of charge provided it has been installed and
operated in accordance with these instructions.
Your rights under this guarantee are additional to your statutory
rights, which in turn are not affected by this guarantee.
Should you require after sales service you should contact
our customer services help desk on 0845 600 5111. It would
assist us if you can quote the model number, series, date of
purchase, and nature of the fault at the time of your call. The
customer services help desk will also be able to advise you
should you need to purchase any spares.
Please do not return a faulty product to us in the first instance
as this may result in loss or damage and delay in providing
you with a satisfactory service.
Please retain your receipt as proof of purchase.


