


5
Fireplace Installation
Site Selection and Preparation
!
NOTE:
A 15 Amp, 120 Volt circuit is required. A
dedicated circuit is preferred but not essential in
all cases. A dedicated circuit will be required if,
after installation, the circuit breaker trips or the
fuse blows on a regular basis when the heater is
operating. Additional appliances on the same circuit
may exceed the current rating of the circuit breaker.
CAUTION:
When the heater is in use, this product
draws a high, continuous electrical current. Not all
electric receptacles are designed to work with high,
continuous currents. If you plan on using this unit in
an old, worn, or loose receptacle, or are unsure if
the receptacle is suitable, please have it inspected
by a qualified electrician prior to using this product.
WARNINg:
Ensure the power cord is not installed
so that it is pinched or against a sharp edge and
ensure that the power cord is stored or secured to
avoid tripping or snagging to reduce the risk of
fire, electric shock or injury to persons.
Construction and electrical outlet wiring must
comply with local building codes and other
applicable regulations to reduce the risk of
fire, electric shock and injury to persons.
Do not attempt to wire your own new outlets or
circuits. To reduce the risk of fire, electric shock or
injury to persons, always use a licensed electrician.
WARNINg:
The supplied mounting bracket is
designed for use with Dimplex wall mounted
fireplaces only. Improper use, or use for purposes
other than intended, may cause damage or injury.
Installation
WARNINg:
Failure to install the Sahara fireplace
as instructed below may result in damage to the
equipment and or may expose the user to the risk
of fire, serious injury, illness or death.
WARNINg:
The Sahara fireplace requires the
wall mounting bracket screws to be installed into a
minimum of two wall studs (Figure 1).
Tools Required
#2 Phillips screwdriver
•
Pencil
•
Slot screwdriver
•
Bubble level (supplied)
•
Drill, and drill bits as required
•
Approximate time:
30 minutes for installation
①
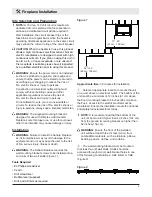
Select an appropriate location to mount the unit
on a wall, above an electrical outlet. The bottom of the
unit must be a minimum of 12 inches (31 cm) above
the floor (mounting bracket 34 inches (86 cm) above
the floor). Access to the electrical outlet must be
maintained. Ensure the installation meets the national
and state/provincial electrical codes.
!
NOTE:
It is recommended that the bottom of the
unit not be mounted higher than 40 inches (102 cm)
from the ground (mounting bracket no higher than
62 inches (158 cm).
WARNINg:
Ensure the front of the installed
unit will be at least three (3) feet (0.9 m) from
combustible materials, such as furniture, pillows,
bedding, papers, clothes, and curtains.
②
The wall-mounting bracket must be mounted
to at least two (2) wall studs. Studs should be
accessed through two (2) wall-bracket holes in one
of the following combinations: A&F, B&D, or C&E
(Figure 2).
Figure 1
12” - 40”
(31 cm - 102 cm)
34” - 62”
(86 cm - 158 cm)
Figure 2


