


8
www.dimplex.com
Fireplace Installation
shock or injury to persons,
always use a licensed
electrician.
WARNING:
The supplied
mounting components are
designed for use with Dimplex
fireplaces only. Improper use,
or use for purposes other than
intended, may cause damage
or injury.
Wall Mounting Instructions
WARNING:
Failure to install
the fireplace as instructed
below may result in damage
to the equipment and or may
expose the user to the risk of
fire, serious injury, illness or
death.
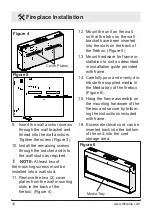
WARNING:
The fireplace
requires the wall mounting
bracket screws to be installed
into a minimum of two wall
studs (Figure 1).
Tools Required
• #2 Phillips screwdriver
• Pencil
• Slot screwdriver
• Bubble level (supplied)
• Drill, and drill bits as required
Approximate time:
30 minutes
for installation
1. Select an appropriate location
to mount the unit on a wall,
above an electrical outlet.
Access to the electrical outlet
must be maintained. Ensure
the installation meets the
national and state/provincial
electrical codes.
!
NOTE:
It is recommended
that the bottom of the unit
not be mounted higher than
1020mm (40") from the
Fireplace Installation ground
to maintain an optimized
viewing angle of the flame.
Figure 1
Figure 2
610 mm (24")
MINIMUM
1020 mm (40")
RECOMMENDED


