
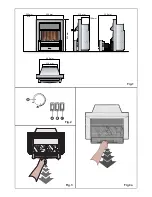


Filling the water tank.
When the water tank is empty, the fl ame and smoke effect shuts off and you will hear 2 audible
‘beeps,, follow these steps.
1. Press Switch ‘A’ to
(0)
(See Fig.2)
2. Gently pull out the drawer as far as possible by the tab. (See Fig.3)
3. Remove the water tank by lifting upwards and outwards.
4. Place the water tank in sink and remove cap, Anti-clockwise to open. (See Fig.6)
5. Fill tank with
fi ltered tap water only
.
This is necessary to prolong the life of the fl ame and
smoke producing unit.
The water should be fi ltered through a conventional domestic water fi lter unit and the fi lter
should be replaced regularly.
6. Screw the cap back on,
do not overtighten
.
7. Return the tank to the sump, with the tank cap facing down and the fl at side of the tank facing
outward.
8. Gently push the drawer back in as far as it will go.
9. Press Switch ‘A’ to ‘ON’ (
I
) position (See Fig.2)
Cleaning.
WARNING – ALWAYS DISCONNECT FROM THE POWER SUPPLY BEFORE CLEANING
THE HEATER
.
We Recommend cleaning the following components once every 2 weeks, particularly in hard
water areas:-
Water Tank, Sump and Seal, Sump lid, Tank cap and seal, Air fi lter.
For general cleaning use a soft clean duster – never use abrasive cleaners. To remove any
accumulation of dust or fl uff the soft brush attachment of a vacuum cleaner should occasionally
be used to clean the outlet grille of the fan heater.
Water tank
1. Remove water tank, as described earlier, put into sink and empty water.
2. Using the supplied brush gently rub the inside surfaces of the cap paying particular attention
to the rubber ring in the outer groove and the centre rubber seal.
3. Put a small quantity of washing up liquid into the tank, refi t the cap and shake well, rinse out
until all traces of washing up liquid are gone.
4. Refi ll with fi ltered tap water only, replace the cap, do not overtighten.
Sump
1. Press Switch ‘A’ to the ‘OFF’
(0)
position
2. Gently pull the drawer out as far as possible. (See Fig.3)
3. Remove the water tank by lifting upwards.
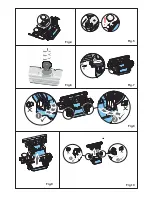
4. Disconnect the electrical connector, located on the left side of the sump, by fi rst loosening the
two retaining screws and gently withdrawing the connector. (See Fig.8) .
5. Release the lower sump locking tabs by turning 90º, this allows the sump to be lifted
completely from its location. (See Fig.8)
6. Gently lift up the sump assembly, taking care to keep level so as not to spill any water. Sit the
assembly in the sink. (See Fig.9)
7. Release the two upper sump locking tabs by turning 90º, then lift off the sump lid. (See
Fig.10)
8. Carefully tilt, as shown, so that the liquid drains out of the sump. (See Fig.11)
9. Put a small amount of washing up liquid into the sump, and using the supplied brush, gently
clean all surfaces including the metal discs and the rubber seal located in the top grooved
surface.
Do not remove the rubber seals
. (See Fig.13 and 14)
10. When cleaned, thoroughly rinse the sump with clean water.
11. Clean the outlet surface of the sump lid with the brush and fl ush out thoroughly with water.
(See Fig.14 & 15)
12. Reverse the above steps to reassemble.
Air fi lter.
1. Press Switch ‘A’ to the ‘OFF’
(0)
position (See Fig.2)
2. Gently pull the drawer out as far as possible. (See Fig.3)
3. Remove the tank and place in a sink with the cap facing upwards.
4. Gently slide upwards the air fi lter plastic holder. (See Fig.16)
5. Remove the fi lter combination from the plastic holder.
6. Gently rinse with water in the sink and dry with fabric towel before returning.
7. Replace the fi lter combination making sure that the course black fi lter is in contact with the
plastic holder. (See Fig.17)
8. Replace the tank.
9. Close the drawer fully.
10. Press Switch ‘A’ to the ‘ON’ (
I
) position (See Fig.2)
Recycling.
For electrical products sold within the European Community. At the end of the electrical
products useful life it should not be disposed of with household waste. Please recycle
where facilities exist. Check with your Local Authority or retailer for recycling advice
in your country.
After Sales Service.
Your product is guaranteed for one year from the date of purchase. Within this period, we
undertake to repair or exchange this product free of charge (excluding lamps & subject to
availability) provided it has been installed and operated in accordance with these instructions.
Your rights under this guarantee are additional to your statutory rights, which in turn are not
affected by this guarantee.
Should you require after sales information or assistance with this product please go to
www.dimplex.co.uk
where you will fi nd our self help guide by clicking on “After Sales” or ring
our help desk on 0845 600 5111 (UK) or 01 842 4833 (R. O. I.). Spare parts are also available
on the web site.
Please retain your receipt as proof of purchase.
Troubleshooting
Symptom
Cause
Corrective Action
The fl ame eff ect will not start.
Mains plug is not plugged in.
Low water level.
Low voltage connector not connected properly. (See Fig.7)
Check plug is connected to wall socket correctly.
Check that the water tank is full and there is water in the sump.
Check that the connector is inserted correctly. (See Fig.7)
The fl ame eff ect is too low.
Flame eff ect control knob is set too low.
(See Fig.2)
The water in the sump may be too high due to the drawer being opened and
closed a number of times, water tank removed a number of times, or the fi re
has been moved.
Metal Disc at the base of Sump might be dirty (See Fig.12)
Increase level of fl ame by turning Control knob ‘D’ clockwise slowly. (See Fig.2)
If water level in the sump is more than 40mm, the sump should be removed and
emptied in the sink.
Clean Metal Discs with soft brush supplied. (See Fig.12) See ‘Maintenance.’ for a
step by step procedure.
Unpleasant smell when unit is used.
Dirty or stale water.
Using unfi ltered tap water.
Clean the unit as described under maintenance.
Use only fi ltered tap water.
The fl ame eff ect has too much smoke.
Flame eff ect setting is too high.
Turn the fl ame eff ect Control knob C anticlockwise to minimum and slowly
turn clockwise, about ¼ a turn, at a time. Give the fl ame generator some time to
adjust before increasing. (See Fig.2)
Main lamps are not working and there
are no fl ames or smoke.
There is no water in the water tank
Follow instructions under
Maintenance
, ‘Filling the water tank’.
Check the plug is connected to wall socket correctly.
Switch ‘A’ Fig. 2 is in the ‘ON’ (
I
) position.


