Dimplex BLF5051-INT Скачать руководство пользователя страница 2


Table of Contents

Always use a qualified technician 

or service agency to repair 

this fireplace.

!

 NOTE: 

 Procedures and 

techniques that are considered 

important enough to 

emphasize.

 CAUTION:

  Procedures 

and techniques which, if not 

carefully followed, will result in 

damage to the equipment.


WARNING:

  Procedures 

and techniques which, if not 

carefully followed, will expose 

the user to the risk of fire, 

serious injury, or death.


Welcome & Congratulations . . . . . . . . . . . . . . . . .

3

  IMPORTANT SAFETY INSTRUCTIONS

 . . . . . . .

4


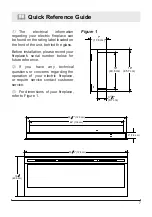
Quick Reference Guide  . . . . . . . . . . . . . . . . . . . .

7

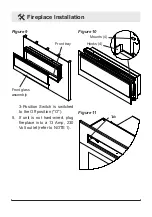
  Fireplace Installation  . . . . . . . . . . . . . . . . . . . . . .

8

Site Selection  . . . . . . . . . . . . . . . . . . . . . . . . . . . . . . . . . .

8

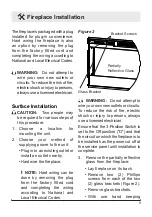
Surface Installation . . . . . . . . . . . . . . . . . . . . . . . . . . . . . .

9

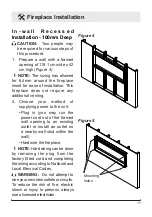
In-wall Recessed Installation - 100mm Deep . . . . . . . . . .

11

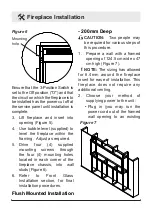
Flush Mounted Installation - 200mm Deep . . . . . . . . . . .

12

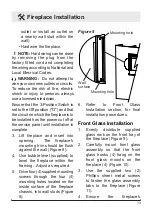
Front Glass Installation . . . . . . . . . . . . . . . . . . . . . . . . . .

13

  Operation

 . . . . . . . . . . . . . . . . . . . . . . . . . . . . . .

15

  Maintenance  . . . . . . . . . . . . . . . . . . . . . . . . . . .

18

“A sudden change in temperature 

(for example, moving the unit from 

frost to a warm room) can cause 

condensation of moisture inside the 

device and disrupt its operability 

when turned on.

The device, after transporting or 

storing at a negative temperature of 

outside air, must be kept in a warm 

room for at least 3 hours, after 
which it can be put into operation.”

Содержание BLF5051-INT

Страница 1: ...MPORTANT SAFETY INFORMATION Always read this manual first before attempting to install or use this fireplace For your safety always comply with all warnings and safety instructions contained in this m...

Страница 2: ...tulations 3 IMPORTANT SAFETY INSTRUCTIONS 4 Quick Reference Guide 7 Fireplace Installation 8 Site Selection 8 Surface Installation 9 In wall Recessed Installation 100mm Deep 11 Flush Mounted Installat...

Страница 3: ...se instructions may result in a possible electric shock fire hazard and will void the warranty Please record your model and serial numbers below for future reference model and serial numbers can be fo...

Страница 4: ...ons with reduced physical sensory or mental capabilities or lack of experience and knowledge if they have been given supervision or instruction concerning use of the appliance in a safe way and unders...

Страница 5: ...aving the room on their own unless constant supervision is provided 9 Ensure that furniture curtains or other combustible material are positioned no closer than 1 metre from the appliance 10 In the ev...

Страница 6: ...for instance by curtains or furniture as this could cause overheating and a fire risk WARNING In order to avoid a hazard due to inadvertent resetting of the thermal cut out this appliance must not be...

Страница 7: ...stallation please record your fireplace s serial number below for future reference If you have any technical questions or concerns regarding the operation of your electric fireplace or require service...

Страница 8: ...ersons 1 Select a location that is not susceptible to moisture and is away from drapes furniture and high traffic 2 For ease of electrical hook up Fireplace Installation you may wish to locate the fir...

Страница 9: ...install an outlet nearby Hard wire the fireplace NOTE Hard wiring can be done by removing the plug from the factory fitted cord and completing the wiring according to National and Local Elecrical Cod...

Страница 10: ...which align with a wall stud 11 Carefully replace and install partially reflective glass and glass brackets using screws from step 1 12 Refer to Front Glass Installation section for final installation...

Страница 11: ...g 2 Choose your method of supplying power to the unit Plug in you may run the power cord out of the framed wall opening to an existing outlet or install an outlet on a nearby wall stud within the wall...

Страница 12: ...d in each corner of the fireplace chassis into wall studs Figure 6 6 Refer to Front Glass Installation section for final installation procedures Flush Mounted Installation 200mm Deep CAUTION Two peopl...

Страница 13: ...g The fireplace s mounting trim should be flush against the wall Figure 8 4 Use bubble level supplied to level the fireplace within the framing Adjust as required 5 Drive four 4 supplied mounting scre...

Страница 14: ...3 Position Switch is switched to the Off position O 5 If unit is not hard wired plug fireplace into a 13 Amp 230 Volt outlet refer to NOTE 1 Figure 9 Front tray Front glass assembly Figure 10 Hooks 4...

Страница 15: ...ressing the Standby button on the remote or the unit The unit will turn on with the same functions that it was set to when it was turned Off and the intake temperature will be indicated on the On Scre...

Страница 16: ...mperature The default temperature setting is 72 F 22 C Adjusted by pressing the to decrease the setpoint and the to increase the setpoint on the unit or the remote The On Screen Display will indicate...

Страница 17: ...ote or the unit repeatedly until the desired time is displayed The On Screen Display will display the different times as it is adjusted Once the timer has begun pressing the button will display the ti...

Страница 18: ...n be removed by dusting lightly with a clean dry cloth To remove fingerprints or other marks the partially reflective glass can be cleaned with a damp cloth The partially reflective glass should be co...

Страница 19: ...19 BLF5051 INT 8 53809 0 RU RU EN FR ES...

Страница 20: ...21 22 25 26 26 27 100 29 200 30 31 33 36 3...

Страница 21: ...21 Dimplex...

Страница 22: ...1 2 3 4 5 8 6 3 3 8 3 8...

Страница 23: ...23 7 8 9 1 10 11 12 13 14 15...

Страница 24: ......

Страница 25: ...25 1 1 3 7 6 cm 50 5 16 128 cm 19 1 2 49 5 cm 46 116 cm 48 1 2 123 cm 7 17 8 cm 3 13 16 9 7 cm 18 45 7 cm 16 40 6 cm...

Страница 26: ...128 cm x 49 5 2 1 2 1 13 230 3 4...

Страница 27: ...27 3 O 1 2 2 3 O 3...

Страница 28: ...3 4 4 8 3 8 6 5 5 6 4 7 2 8 8 1 9 2 Phillips 2 2 1 3 2 4 3...

Страница 29: ...29 100 1 118 1 42 4 6 4 2 3 5 4...

Страница 30: ...O 1 5 2 3 4 4 6 4 200 1 124 5 47 7 6 4 2 6 7...

Страница 31: ...31 3 O 3 8 4 5 4 4 8 6 1 9 2 4 4 10 3 2 Phillips 11 4 3 O 5 13 230 1 8...

Страница 32: ...9 10 4 4 11...

Страница 33: ...33 Operation Figure 18 18 19 Floating DisplayTM A B Figure 19 A D B C E G H F A C D E F Floating DisplayTM...

Страница 34: ...Operation C 2 5 60 D E 72 F 22 C C F...

Страница 35: ...35 Operation 2 F U F G Floating Display H L H 30 8...

Страница 36: ...5 1 888 346 7539 1 2 3 CR2032 CR2025 3...

Страница 37: ...37...

Страница 38: ...URIT IMPORTANTES Lire d abord ce manuel avant d essayer d installer ou d utiliser ce foyer Pour votre s curit toujours respecter les avertissements et les consignes de s curit indiqu s dans ce manuel...

Страница 39: ...T IMPORTANTES 41 Guide de r f rence rapide 44 Installation du foyer 45 Choix de l emplacement 45 Installation en surface 46 Montage mural encastr profondeur 100 mm 48 Montage en affleurement profondeu...

Страница 40: ...ntie Merci de noter ci dessous les num ros de mod le et de s rie de votre appareil pour pouvoir les retrouver ult rieurement les num ros de mod le et de s rie se trouvent sur l tiquette du num ro de m...

Страница 41: ...ental ouunmanqued exp rience ou de connaissances si elle est supervis e ou a re u les instructions appropri es pour utiliser l appareil en toute s curit et en comprenant les risques possibles Les enfa...

Страница 42: ...en sortir par elles m mes sauf si elles sont surveill es en permanence 9 S assurer que les meubles rideaux et autres objets combustibles sont plac s plus d un m tre de l appareil 10 D brancher l appa...

Страница 43: ...avec des rideaux ou des meubles par exemple car ceci est susceptible de causer une surchauffe et un risque d incendie AVERTISSEMENT Pour viter les risques li s la r initialisation accidentelle du disj...

Страница 44: ...num ro de s rie de votre foyer indiqu en bas pour future r f rence Si vous avez des questions ou des probl mes techniques concernant le fonctionnement de votre foyer le ctrique ou qu il a besoin d tr...

Страница 45: ...doivent tre conformes aux codes locaux du b timent et toutes autres Installation du foyer r glementations applicables 1 Choisir un emplacement non expos l humidit et loign de rideaux meubles et circul...

Страница 46: ...endroit o monter l appareil 2 Choisir la m thode d alimentation lectrique de l appareil Brancher une prise existante ou installer une prise proximit C bler le foyer REMARQUE Il est galement possible d...

Страница 47: ...rer les quatre 4 vis de montage sur le ch ssis du foyer 7 Visser les deux 2 vis t te carr e 8 fournies travers les deux orifices de montage permanent align s sur un montant mural 8 Replacer et install...

Страница 48: ...un mur avec une ouverture de 118 1 cm de large x 42 cm de haut Figure 4 REMARQUE ces dimensions laissent un espace suppl mentaire de 6 4 mm tout autour du foyer encastrable afin d en faciliter l insta...

Страница 49: ...tre install soit coup partir du panneau lectrique et ce jusqu ce que l installation soit termin e 1 Soulever le foyer et l ins rer dans l ouverture Figure 5 2 Utiliser le niveau bulle fourni afin de m...

Страница 50: ...rancher vous m me vos nouvelles prises ou circuits Pour r duire le risque d incendie de choc lectrique ou de blessures aux personnes toujours faire appel un lectricien agr Veiller ce que le commutateu...

Страница 51: ...suspendus sur les montants de la vitre frontale du foyer 4 Figure 10 3 Utiliser les deux 2 vis t le cruciformes fournies pour fixer les pattes de montage de la vitre au foyer Figure 11 4 S assurer que...

Страница 52: ...arche et arr te la effets de flamme Activ en appuyant sur la touche de la t l com mande C Interrupteur de chaleur Les cycles de mani re s quen tielle de l unit travers les 2 param tres forte chaleur e...

Страница 53: ...produire par la suite D E Touches de commande du thermostat R gle la temp rature en fonction de vos besoins individuels Une fois la temp rature souhait e atteinte la fonction de chauffage s arr tera C...

Страница 54: ...chiffre sur le Floating Display chan ger de montrer H lev e et L faible Utilisation H Minuterie d arr t automatique La minuterie d arr t automatique peut tre r gl e pour arr ter automatiquement le foy...

Страница 55: ...sur la t l commande 2 Installer correctement une pile de 3 volts CR2032 plus la vie ou CR2025 dans le compartiment pile 3 Refermer le compartiment pile La batterie doit tre recy cl s ou limin s de fa...

Страница 56: ...eter la vitre l aide d un chiffon propre et sec Pour enlever les traces de doigts ou d autres marques nettoyer la vitre partiellement r fl chissante avec un chiffon humide Pour pr venir les taches d e...

Страница 57: ...TE SOBRE SEGURIDAD Lea este manual antes de tratar de instalar o utilizar esta chimenea Por su seguridad cumpla siempre todas las advertencias e instrucciones sobre seguridad contenidas en este manual...

Страница 58: ...aci n 64 Instalaci n en superficie 65 Instalaci n en nicho en la pared 100 mm de profundidad 67 Empotrada Instalaci n 200 mm de profundidad 68 Instalaci n del cristal delantero 69 Funcionamiento 71 Ma...

Страница 59: ...gro de incendio adem sdejar sin validez la garant a Registre a continuaci n el n mero de modelo y de serie para consultarlos en el futuro encontrar los n meros de modelo y de serie en la Etiqueta de m...

Страница 60: ...nas cuyas capacidades f sicas sensoriales o mentales est n disminuidas o que carezcan de la experiencia y conocimientos suficientes para manejarlo siempre que cuenten con las instrucciones o la superv...

Страница 61: ...apaces de salir de la habitaci n por sus propios medios salvo que exista supervisi n constante 9 Aseg rese de que no haya muebles cortinas u otros materiales combustibles a menos de un metro del apara...

Страница 62: ...or cortinas o muebles ya que esto podr a provocar sobrecalentamiento y riesgo de incendio ADVERTENCIA Para evitar peligros debido al reinicio involuntario del desconectador t rmico este aparato no deb...

Страница 63: ...debajo el n mero de serie de la chimenea para posibles consultas en el futuro Si tiene alguna pregunta t cnica en relaci n con el funcionamiento de su chimenea el ctrica o precisa servicio t cnico p n...

Страница 64: ...ble de recibir humedad y apartada de cortinas muebles y elevada circulaci n de personas Instalaci n de la chimenea 2 Para facilitar la conexi n el ctrica posiblemente desee situar la chimenea cerca de...

Страница 65: ...aci n el ctrica de la unidad Conecte la unidad a una toma existente o instale una toma nueva cerca de la unidad Cableado permanente NOTA Tambi n es posible realizar cableado fijo quitando el enchufe d...

Страница 66: ...priete los dos 2 tornillos de cabeza cuadrada n 8 suministrados por dos de los orificios de montaje permanente alineados con un taco de pared 8 Con cuidado vuelva a colocar parcialmente el cristal ref...

Страница 67: ...e ancho x 42 cm de alto Figura 4 NOTA Las dimensiones incluyen 6 4 mm alrededor del encastre de la chimenea para facilitar la instalaci n La chimenea no precisa ventilaci n adicional 2 Escoja el m tod...

Страница 68: ...nte la chimenea e introd zcala en la abertura Figura 5 2 Utilice el nivel de burbuja suministrado para nivelar la chimenea en el marco Haga los ajustes necesarios 3 Coloque cuatro 4 tornillos de monta...

Страница 69: ...al Aseg rese de que el interruptor de tres posiciones est en posici n de desconectado O y de que el circuito en el que se va a instalar la chimenea tenga la alimentaci n cortada en el panel de servici...

Страница 70: ...Utilice los dos 2 tornillos Phillips para l mina de metal suministrados para ajustar las leng etas del conjunto del cristal sobre la chimenea Figura 11 4 Compruebe que el interruptor de tres posicione...

Страница 71: ...B Efectos de llama Enciende y apaga la efectos de llama Se activa al presionar el bot n de modo de espera en el control remoto C Calor encendido apagado Figura 18 ADVERTENCIA Debe instalar la c mara...

Страница 72: ...a normal y es provocado por el calenta miento inicial de las piezas internas del calentador pero no suceder de nuevo D E Controles del termostato Ajusta la temperatura establecida a sus necesidades es...

Страница 73: ...indicado por una U Descongelar o una F congela G Brillo Cambie el brillo de las luces en la Funcionamiento unidad Se ajusta al presionar repeti damente el bot n correspondi ente en el control remoto...

Страница 74: ...minutos antes de enchufar la unidad interactivo Reemplazo de la bater a del control remoto Para remplazar la bater a 1 Deslice y abra la cubierta del compartimiento de la pila en el transmisor de mano...

Страница 75: ...con suavidad un pa o seco y limpio Para eliminar huellas de dedos y otras marcas el cristal parcialmente reflectante puede limpiarse con un pa o seco y limpio El cristal parcialmente reflectante deber...

Страница 76: ...115432 18 5 7...

Отзывы: