


Fuel Bed Media
Acrylic Ice Crystals and White Pebbles are supplied with
your fire. Allowing you the option of which to place on
your fire. To Fit the Acrylic Ice Crystals, place the small
Crystals on the fuel bed tray, then place the larger
crystals on top of the small pieces. Arrange the larger
pieces to your liking. A suggestion is to place one large
crystal centrally on the fuel bed and the other four
positioned symmetrically around this piece.
The White pebbles are placed on the fuel bed tray until
the try is completely covered by pebbles to your liking.
Fitting the Front Glass-
See Fig. 5
Your new fire is supplied with the front glass not secured
to the engine, this is to keep the glass safe in transit. To
fit the glass to your fire, simply insert the four hangers on
the back of the glass through the slots provided on the
chassis. The hangers go in through the slots and then
move down to hold the glass in place. The glass can
then be secured in place by inserting the small black
screw provided through the hole in any one of the
hangers into the side of the unit.
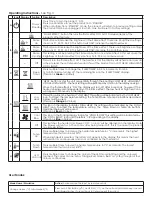
Thermal Safety Cut-out
The built-in overheat cut-out switches the appliance off
automatically in the event of a fault. If this occurs switch
off the appliance or disconnect the mains plug from the
socket. After a short cooling down phase, the appliance
is ready for use again. If the fault should occur again, see
your local dealer.
Maintenance
WARNING:
ALWAYS DISCONNECT FROM THE POWER
SUPPLY BEFORE ATTEMPTING ANY MAINTENANCE.
Light Emitting Diode
This fire is fitted with LED (Light Emitting Diode) bulbs in
place of traditional incandescent bulbs. These generate
the same light levels as traditional bulbs, but use a fraction
of the energy consumed.These bulbs cannot be replaced.
Cleaning
WARNING:
ALWAYS DISCONNECT FROM THE POWER
SUPPLY BEFORE CLEANING THE HEATER.
For general cleaning use a soft clean duster – never use
abrasive cleaners. The glass viewing screen should be
cleaned carefully with a soft cloth.
DO NOT use proprietary glass cleaners.
To remove any accumulation of dust or fluff the soft brush
attachment of a vacuum cleaner should occasionally be
used to clean the outlet grille of the fan heater.
WARNING: do not operate the product without the grille
and outer glass in position as this may effect the operation
of the heater.
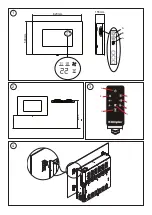
Remote Control -
See Fig. 3
maximum range of use is ~ 5metres.
NOTE: It takes time for the receiver to respond to the transmitter.
NOTE: The reciever for the remote control is located in the
display, aim the remote control in this direction when inputting
commands.
Do not press the buttons more than once within two seconds
for correct operation.
Battery Information -
See Fig. 3
1. To activate the remote control remove the clear battery
isolation strip at the base of the remote control, which is used
to ensure your remote control reaches you fully charged.
2. To replace the remote control battery, turn over the remote
control, and follow the diagram embossed on the remote
control
3. Only use CR2025 or CR2032 size of batteries.
Installation
WARNING: FALLING OR TIPPING APPLIANCES CAN CAUSE
INJURY OR DEATH OF YOUNG CHILDREN, PLEASE ENSURE
CHILDREN DO NOT CLIMB, HANG OR STAND ON THIS PRODUCT.
WARNING: THE APPLIANCE IS PROVIDED WITH A WALL FIXING
KIT, THIS KIT IS DESIGNED TO HOLD THE PRODUCTS WEIGHT, IT
IS NOT A SUBSTITUTE FOR PROPER ADULT SUPERVISION. DO NOT
ALLOW CHILDREN TO CLIMB OR HANG ON THIS PRODUCT.
Safety Message - Sufficient expertise is required for installing
this product. If unsure we recommend that you use an installer
and pay special attention to safety during the installation.
Wall Installation-
See Fig. 2
Do not connect appliance until properly fixed to the wall and
the Instruction leaflet is fully read. In particular, the minimum
distances must be observed.
The wall plugs supplied with this product are for use with Block/
Brick built walls only.
This model is designed to be permanently fixed to a wall at
a minimum height of 300mm. The wall bracket must be fitted
horizontally and the cable routed to the bottom right of the
appliance.
A height of 600 to 725mm from bottom of the appliance to
floor is recommended for optimum viewing of fuel bed.
For optimum viewing, mark the top three screw fixing positions
on the wall in accordance with the recommended fixing
dimensions - see Fig. 2. Drill holes with a 6mm drill bit.
Fix the wall bracket using the plugs and screws provided.
Carefully lift the appliance up ensuring that the appliance
engages with the wall bracket correctly.
A bottom fixing bracket is supplied with the unit and is fixed
to the base of the appliance. Remove the screw and the
bracket, turn the bracket through 180 degrees so it is now
facing downward and re fit using the screw just removed. With
the bracket in place mark the location of the hole on the wall.
Remove the appliance, drill the wall, fit the wall plug and re-fit
the appliance ensuring that you secure it in place by screwing
the bottom fixing bracket to the wall.
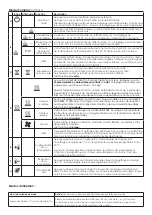
Содержание 82077191
Страница 2: ...1 2 4 3 600mm 940mm A B C D E F G 820mm 540mm 155mm A B G...
Страница 43: ......


