


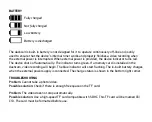


When connecting to a PC, the mode selection menu will appear on the screen: Camera, Storage.
• Camera: in this mode the dashcam operates as web camera.
• Storage: in this mode, you can manage the files on the SD card inserted in the dashcam using a PC:
copying, transferring, deleting.
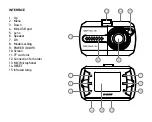
6. ОК button
Button for confirming a menu selection. Start/Stop recording in Video mode. Take a photo in Photo mode.
7. Mode button
Dashcam mode switching button. When the button is briefly pressed, the dashcam will switch to one
of the following operation modes: Video -> Photo -> Playback. When this button is briefly pressed in
video recording mode, the current file will be protected from being overwritten: when the button is
pressed, the closed lock icon will appear on the screen. File protection can be disabled later in the
playback menu (Playback Mode).
8. Power button
When external power is available on connector 5, the dashcam will switch on automatically and, if an
SD card is inserted, will begin video recording. However, the dashcam can be switched on/off manually
using the Power button. Briefly press the Power button to switch the dashcam on. Press and hold the
Power button to switch the dashcam off. During video recording, briefly press the button to switch on
infrared lighting. When the button is pressed again, the infrared lighting switches off.
9. MicroSD card slot
Slot for a microSD card. Please make sure you insert the card into the slot the right way up. If the card
is inserted the wrong way, it may damage the device and card. When a card is inserted into device, it will
be defined as the main data storage device: all previously recorded information on the card could be lost.
Please use high speed cards with recording class 6 or higher.
Содержание FreeDrive 105
Страница 1: ...USER MANUAL BEDIENUNGSANLEITUNG Dashcam Autokamera FreeDrive 105...
Страница 2: ......
Страница 23: ...ZUS TZLICHE FUNKTIONEN DER TASTEN...
Страница 26: ...RUS DIGMA...
Страница 27: ...1 2 3 TF TF 4 TF 5 6 60 10 7 8 TF 32...
Страница 29: ...1 2 3 4 Mini USB 5 6 7 8 Mode 9 POWER 10 11 TF 12 13 MIC 14 RESET 15...
Страница 30: ...1 UP 2 3 MENU MENU 1920 1088 30 1280 720 30 640 480 30 1 3 5...
Страница 32: ...1 3 50 60 3 5 10 microSD...
Страница 33: ...4 Down 5 miniUSB SD SD 6 7 Mode 8 Power 5 SD...
Страница 34: ...Power Power Power 9 microSD microSD 6 10 Reset Reset...
Страница 35: ......
Страница 36: ...TF TF SDHC TF 6 10...
Страница 37: ...AV HDMI AV HDMI 5 40 85 24 30...
Страница 38: ...DIGMA DIGMA www digma ru support help Digma 12 1 Digma Digma Digma www digma ru Digma www digma ru support help...
Страница 39: ...IMEI...
Страница 40: ...ISO 13406 2 Digma...
Страница 41: ...Digma...
Страница 42: ...Digma Digma 2300 1 7 02 1992 24 30...
Страница 45: ......
Страница 46: ...2 6 2016...
Страница 47: ......