background image


18 


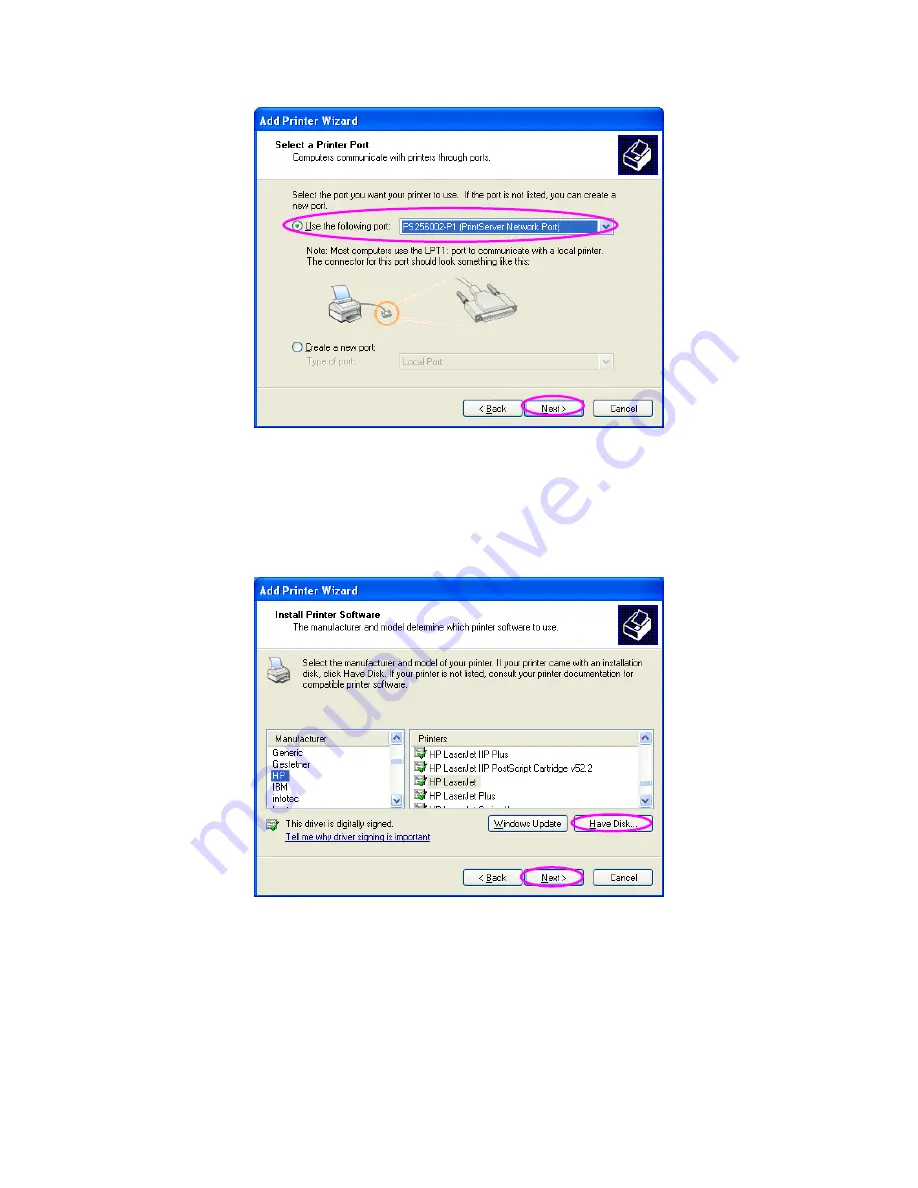
Step6.    Select a suitable printer manufacturer and the printer 

model and click “Next”. If your printer is not in the list, click 
“Have Disk…” to install the driver of the printer. After 
installation, the printer model will be added to the list.


Step7.    Name your printer and setup the default printer, click 

“Next”.


Содержание DN-13014

Страница 1: ...1 USB PRINTER WIRELESS LAN PRINT SERVER DN 13014 PARALLEL PRINTER WIRELESS LAN PRINT SERVER DN 13016 Quick Installation Guide ...

Страница 2: ...ork printing solutions for various common network operating systems such as Windows Peer to Peer Printing Windows 95 98SE Me NT 2000 XP 2003 Vista Microsoft Windows NT 2000 2003 Vista Server Based Printing Novell NetWare 3 x 4 x 5 x Unix Linux MAC OS With the help of Installation Wizard you can easily and instantly complete the settings for the printing environment and start enjoying the fantastic...

Страница 3: ...OM Including all the software utilities drivers and User s Manual 1 3 Hardware Installation Procedure 1 Unpack the print server package and verify that all the items listed in the previous section are provided 2 Connect the print server to the printer you want to share on the network 3 Connect the print server to your network by attached the network cable to the UTP port of the print server 4 Conn...

Страница 4: ...lient utilities Prompt to setup the print server including the print server name and network protocols Add the network port of the print server to your PC After the installation perform the standard Add Printer procedure and choose the print server s Network Port in the Available Ports list Then you can test printing function from the Administrator PC The Administrator Installation can be performe...

Страница 5: ...Autorun exe program should be executed automatically If not run Autorun exe manually from CD ROM drive s root directory 2 The Installation Manager will be displayed on the screen as following Click Administrator Installation 3 The Utilities Setup window will be displayed Click Next ...

Страница 6: ...n the default folder or click Browse to specify the destination folder where you would like to install the utilities 5 Select the components you want to install It is highly recommended to install all provided components Click Next to continue ...

Страница 7: ...7 6 Specify the program folder where the program icons will be added to click Next 7 The system will start to install the utilities automatically ...

Страница 8: ...vers within the network Select the Print Server you would like to configure and click Next NOTE 1 If this is the first time you configure the Print Server the Print Server Name is the last 6 digit of MAC ID with prefix PS Please check the MAC ID on the print server NOTE 2 The list can only display the devices from the same manufacturer ...

Страница 9: ...9 9 Specify a recognizable name for the Print Server and click Next 10 Specify the IP Address for the Print Server manually or click Next to keep default IP Address ...

Страница 10: ...played in the window Now you have completed the Print Server Setup Click Finish and your system will add network port of the Print Server to your PC automatically 12 The Administrator Installation procedure is totally completed Click Finish ...

Страница 11: ...ince both the print server side and client side support multi protocols the configuration process of the client side is fully automatic After the installation perform the standard Add Printer procedure and choose the print server s Network Port in the Available Ports list You can test printing from the PC to the print server as your local printer The Client Installation can be performed on Windows...

Страница 12: ... The Autorun exe program should be executed automatically If not run Autorun exe manually from CD ROM drive s root directory 2 The Installation Manager will be displayed on the screen as follows Click Client Installation 3 The Utilities Setup window will be displayed Click Next ...

Страница 13: ...install the utilities in the default folder or click Browse to specify the destination folder where you would like to install the utilities 5 Specify the program folder where the program icons will be added to click Next ...

Страница 14: ...14 6 The system will start to install the utilities automatically 7 Now the installation procedure is completed you are ready to set up the client s computer All network ...

Страница 15: ...15 ports of the Print Servers detected on the network will be added to your PC automatically click Continue 8 The Client Installation procedure is completed Click Finish ...

Страница 16: ...Program you can follow the procedure described below to add printer to the Windows Note that following Add Printer steps are running in Windows XP the steps in other Operating Systems are similar Step1 Click Start choose Settings and select Printers and Faxes Step2 Click Add a Printer Step3 The Add Printer Wizard is displayed Click Next ...

Страница 17: ...r and make sure that Automatically detect and install my Plug and Play printer is not selected Click Next Step5 Choose the suitable Print Server Network Port which was created by the Administrator Installation or Client Installation process and click Next ...

Страница 18: ...nd the printer model and click Next If your printer is not in the list click Have Disk to install the driver of the printer After installation the printer model will be added to the list Step7 Name your printer and setup the default printer click Next ...

Страница 19: ...oose to print the test page or not It is recommended to print a test page Click Next Step9 You have added the printer to the PC successfully The information of the printer is displayed in the windows Click Finish ...

Страница 20: ...20 Now you can start to print from your PC to the print server ...

Отзывы: