5
FUNCTIONS
Autoranging/
Manual
• The meter’s default setting is autoranging. This
automatically selects the best range for the selected
test/measurement.
• To set the meter to manual, press the RANGE button.
The ‘AUTO’ icon on the screen will turn off.
• Press the RANGE button to move through the available
ranges until you see the range you want.
• To exit the manual mode and return to autoranging,
press and hold the RANGE button for 2 seconds.
• Manual ranging cannot be selected for capacitance and
frequency measurements.
Mode
• The MODE button helps you to move through various
operations with various icons displayed on screen.
• It works in conjunction with the function switch to
measure things like resistance, diode, continuity and
capacitance.
• It also allows you to select between AC or DC current
measurements.
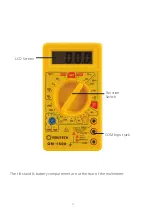
Function Switch
• Select a measurement range by turning the switch to
the preferred option.
LCD Screen
• Readings and measurements taken by the multimeter
will display in this area.
Hold & Backlight
• Press the HOLD button to lock readings as displayed on
the screen. Press again to unlock.
• Press the HOLD button longer to turn the backlight on.
Press the button longer again to turn the backlight off.
Relative Button
• Press the REL button to store a reading for referencing
at a later date. Then reference any new inputs against
the stored measurement.
• Press the REL button again to cancel the relative
measurement function.
• Not to be used for Hz/duty, diode and continuity
measurements.


