DigiTech iPB-10 Скачать руководство пользователя страница 43

43

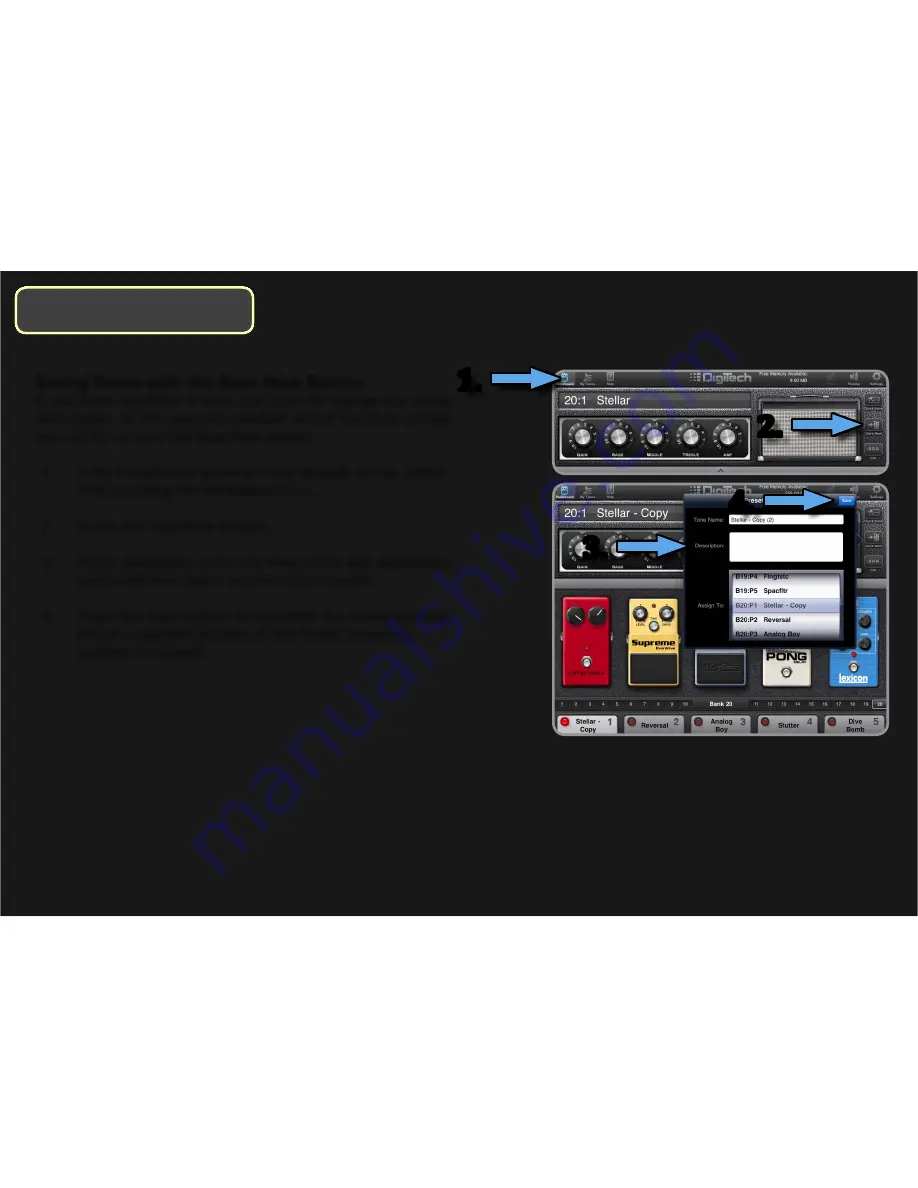
Saving Tones with the Save New Button

If you have modified a tone and want to change the name, 

description, or the memory location where the tone resides, 

you can do so with the Save New button.

1.  If the Pedalboard window is not already active, select 

it by touching the Pedalboard icon. 

2.  Touch the Save New button. 

3.  When prompted, enter the tone name and description 

(optional) then select desired tone location.  

4.  Touch the Save button to complete the saving process 

(touch anywhere outside of the Preset Summary 

window to cancel). 

3.

4.

1.

2.

Saving  & Assigning Tones

Saving  & Assigning Tones

Содержание iPB-10

Страница 1: ...OWNER S MANUAL...

Страница 2: ...er Switch 21 XLR Ground Lift Switch 21 1 4 Line Outputs 21 XLR Mixer Outputs 21 Output Level 21 USB Port 22 Connection Diagrams 23 Amp with Stomp Loop 23 Amp Loop Stomp Loop 24 Mixer 25 Loading Tones...

Страница 3: ...from your options are virtually unlimited Simply swipe your finger across the iPad to rearrange your pedals turn them on and off or to adjust their knobs Multi Effects Flexibility Traditional multi ef...

Страница 4: ...ternal amplifiers or preamps Audio Streaming to and from the iPad USB Port for recording straight to a computer Balanced Stereo XLR Outputs w Ground Lift Switch and Amplifier Emulation Stereo 1 4 Outp...

Страница 5: ...d2 Mac Requirements Mac computer with an Intel PowerPC G5 or G4 processor Mac OS X v10 5 8 or later QuickTime 7 6 or later Safari 4 0 3 or later Windows Requirements PC with a 1GHz Intel or AMD proces...

Страница 6: ...o General Sounds 3 Slide the volume level to the lowest setting 4 Set all switches to OFF Disable iPad Notifications Alerts Ensure notifications and alerts from other applications do not disruptyourpl...

Страница 7: ...itch to OFF 4 Return to the iPB Nexus application Disable Auto Brightness It may be desirable to disable the iPad s Auto Brightness feature for use with the iPB Nexus application Disable Auto Brightne...

Страница 8: ...tings Icon Help Icon iPB Nexus Icons iPB Nexus Icons Pedalboard Icon Opens the help file within the iPB Nexus app This is the home screen where most programming and operation is performed Set all of t...

Страница 9: ...New Button Quick Save Button Touching this button saves the currently loaded tone Use this option for quickly overwriting a tone after making edits Edit Button TouchingthisbuttontogglesbetweenEditmode...

Страница 10: ...taining 5 custom tones providing 100 tones in all LoadedTone This display shows the currently loaded tone along with the bank and footswitch it is assigned to Tone Buttons These buttons display the to...

Страница 11: ...ly selected amplifier and allows you to edit the amp s controls Cabinet This section displays the currently selected cabinet Hint Tap once on either the amp or cabinet image to select from over 50 amp...

Страница 12: ...n Bar Touching this bar expands the view displaying all effect pedals in the signal chain Hint Double tapping on a pedal will zoom in on the controls to make editing quick and easy Tap the footswitch...

Страница 13: ...splays all factory tones Trash Can Icon Touchthisicontodeleteaselected user tone from My Library Tone Info Assignments This window displays each tone s information such as tone name where the tone is...

Страница 14: ...rrentlyactivepreset sfootswitch The iPB 10 will enter Bypass mode briefly then enter the Tuner To exit the Tuner press any footswitch Tuner Tap the Tuner icon to enable the built in tuner Simply play...

Страница 15: ...15 Volume Window Volume Window ToneVolume Tap the Volume icon and use the slider to increase or decrease the level for the current tone Volume can be saved with each tone individually...

Страница 16: ...DAW the range is 12 dB 24 dB XLR Mix When recording to the iPad or via USB to a computer DAW and monitoring the mix from the iPB 10 XLR outputs this option allows you to set the mix between the track...

Страница 17: ...k in the iPB 10 Pedalboard 1 20 Bank UP DOWN Footswitches Use these footswitches to select a tone bank 1 5 Footswitches Once a bank is selected use these footswitches to select one of 5 different tone...

Страница 18: ...ession Pedal This pedal provides real time control of Volume Wah or any other assigned effect parameter Rock the pedal forward and press firmly to toggle between controlling the Wah and the other assi...

Страница 19: ...ith headphones having an impedance of 50 Ohms or greater Power Switch Used to turn the iPB 10 power on and off Power Input Connect the included power adapter here Input Thisinputisahighimpedance1 4 in...

Страница 20: ...ternal stompbox effect pedal or chain of effects into the iPB 10 signal path Amp Loop Ground Lift Switch This switch can be enabled to help prevent unwanted hum or buzz caused by ground loops between...

Страница 21: ...itar amp or directly into the inputs of a mixer XLR Ground Lift Switch This switch lifts pin 1 of the XLR mixer outputs from all ground references This may be necessary to help solve troublesome groun...

Страница 22: ...22 USB Port The USB port connects the iPB 10 to a computer for recording to your favorite DAW software This port streams four channels of audio 2 up 2 back iPB 10 Rear Panel iPB 10 Rear Panel...

Страница 23: ...iagrams Connect your guitar to the iPB 10 Input Connect the iPB 10 Left mono Line Output to the amp Input Connect the stompbox Output to the iPB 10 Stomp Loop Return Connect the iPB 10 Stomp Loop Send...

Страница 24: ...e Amp Mixer switch to AMP Connect the stompbox Output to the iPB 10 Stomp Loop Return Connect the iPB 10 Stomp Loop Send to the stompbox Input Connect the iPB 10 Left Mono Line Out to the amp Loop Ret...

Страница 25: ...Diagrams Connect your guitar to the iPB 10 Input Connect either the iPB 10 Line Outputs or XLR Outputs to the inputs of the mixer To retain the stereo image make sure to pan the mixer channels accord...

Страница 26: ...eed to perform this step if the desired bank has already been selected 3 Tap on pads 1 5 to select the desired Tone LoadingTones LoadingTones LoadingTones from the iPB 10 1 Use the BANK UP or BANK DOW...

Страница 27: ...appear providing instant feedback as the setting is changed Once the desired value is reached lift your finger from the window The setting will remain changed at this point Hint Tapping twice on any e...

Страница 28: ...dals 3 Touch the effect pedal you would like to swap out for another pedal 4 A window will appear showing all available pedals for the selected effect type Simply touch the effect pedal you would like...

Страница 29: ...reen 3 Touch the effect pedal you would like to swap out for another pedal 4 A window will appear showing all available pedals for the selected effect type Simply touch the effect pedal you would like...

Страница 30: ...e icon in the empty pedal slot 4 A window will appear displaying all available effect types i e Delay Mod Chorus etc Select the desired effect type then select the desired pedal from the list 5 Once t...

Страница 31: ...onal 3 Touch the effect pedal you would like to delete 4 A window will appear Simply touch the Delete button to delete the effect pedal from the signal effects chain 5 Once all edits have been made to...

Страница 32: ...it screen 3 Place your finger on the effect pedal you would like to move and drag it to the position in the signal chain you would like to move it to 4 Repeat step 3 for any other pedals you would lik...

Страница 33: ...all the available internal amps 4 Select the desired amplifier from the list The matching cabinet will be loaded with the amp 5 Touch the Done button 6 To position where the amp is located in the sig...

Страница 34: ...t the desired amplifier from the list The matching cabinet will be loaded with the amp 4 Touch the Done button 5 If you want to change the location of the amplifier in the signal chain touch the Edit...

Страница 35: ...select it by touching the Pedalboard icon 2 From either Performance mode or Edit mode touch the Cabinet 3 A window will appear displaying all available cabinets Select the desired cabinet from the li...

Страница 36: ...gnal Path 1 If the Pedalboard window is not already active select it by touching the Pedalboard icon 2 Touch the amp 3 A window will appear Touch the Delete button to delete the amplifier 1 2 3 Workin...

Страница 37: ...as appeared over the pedal indicating which footswitch the pedal is assigned to 4 Once all pedal assignments have been made touch the Performance button to get back to Performance mode 5 From Performa...

Страница 38: ...6 To position where the amp is located in the signal path touch the Amp icon and drag it to the desired position this will also set the signal path location of the Amp Loop 7 Once complete touch the P...

Страница 39: ...omp Loop is located in the signal path touch the Stomp Loop icon and drag it to the desired position 8 Once complete touch the Performance button to get back to Performance mode 9 Press the STOMP LOOP...

Страница 40: ...e your desired selection 7 Once your selection is made touch the Expression Assignments button 8 Set the Min and Max values for the Expression Pedal This allows you to set the permissible range for th...

Страница 41: ...ents button 8 Set the Min and Max values for the parameter controlled via the LFO This allows you to set the permissible range for the assigned parameter s value the minimum parameter value allowed wh...

Страница 42: ...he Quick Save button Quick Save is a fast method for storing your edits back to the My Tones library without prompting you to to edit the name description or selecting a new memory location Quick Save...

Страница 43: ...tton 1 If the Pedalboard window is not already active select it by touching the Pedalboard icon 2 Touch the Save New button 3 When prompted enter the tone name and description optional then select des...

Страница 44: ...gn 4 Touch the icon 5 Select the bank that you would like to assign the tone to 6 Select the footswitch that you would like to assign the tone to 7 If you receive a prompt ensure that you want to over...

Страница 45: ...he Amp Loop and Stomp Loop are still active So you can use bypass to kill all the effects in the iPB 10 without bypassing any externally connected effects or an externally connected amplifier or pream...

Страница 46: ...fects the overall sound The iPB Nexus app allows you to quickly reorder the pedals so you have complete control over shaping your sound Each amp and pedal within the iPB 10 can be programmed to suit y...

Страница 47: ...all JCM900 Incorporating a diode clipping stage this amp gives you more gain than you can shake a stick at 2000 JCM Modeled after 01 Marshall JCM2000 Solo Channel The TSL100 is a superb tone with tons...

Страница 48: ...than most Great for jazz surf country clean rock and metal DigiTech Brown Modeled after hot rodded 80 s stack tone The Brownsound is a hot rodded Marshall tone of the early 80s made famous by a wild f...

Страница 49: ...h funk or any tone that needs some spanking DigiTech Stone Rock The Stone Rock amp produces tones made famous by So Cal and dessert bands The Stone Rock s huge flubby low end and warm high end make yo...

Страница 50: ...blues rock amp in the ranks with the Deluxes but with a personality all its own LuxVerb Modeled after 65 Fender Blackface Deluxe Reverb The single speaker version of its bigger brother this amp is eq...

Страница 51: ...Modeled after 88 Soldano SLO 100 Considered one of the first boutique amp companies the SLO 100 is a pure gain head s dream Smooth distortion with incredible sustain this amp is amazing Super Group Mo...

Страница 52: ...power handling speakers give you the classic Marshall bite and chunk It takes a lot of power to break these up DigiTech 2101 Speaker Filter This speaker compensation is from the GSP2101 which has bec...

Страница 53: ...er Classic tones from the late 60s Rectified 4x12 Modeled after 4x12 07 Mesa Boogie Rectifier w CelestionVintage 30 s The ultimate 4x12 for the heaviest tone Massive bottom end and punchy midrange Twi...

Страница 54: ...ustain without degrading the quality of the original sound DigiTech Compressor TheDigiTechCompressorcompresseshigh inputsignalswhileboosting low inputsignals givingyousmoothandlongsustainwithoutdegrad...

Страница 55: ...spans The intensity controls how much of the effect is used DigiTech Dual Chorus A warm dual voice chorus that allows you to adjust the speed depth level and wave form DigiTech Glisten Chorus A more s...

Страница 56: ...tone to modern guitar sounds due to their warm qualities DigiTech Digital Delay A digital delay can be called a perfect representation of your guitar s signal Desired for their brilliant qualities dig...

Страница 57: ...ngthefrequencies around 600Hz amps can be driven harder and take on more of a metal tone A mean sound is not only determined by how much gain you put in front of your amp but also by how hard you driv...

Страница 58: ...produces a thick wall of edgy distortion and a very full low end Perfect for creating 60s or modern stonerrock tones Heavy Metal Modeled after Boss MT 2 Metal Zone The Metal Zone will produce nearly a...

Страница 59: ...Overdrive Modeled after Boss SD 1 Overdrive With a little more gain than the OD 1 the SD 1 will drive any amp into another realm If you re just looking for a good classic rock tone this is it Who Do D...

Страница 60: ...i parametric EQ which helps shape your tone with Low Mid and High controls 3 Band Semi Parametric EQ This EQ provides Low Mid and high tone shaping with adjustable frequency and filter width Use this...

Страница 61: ...DigiTech s own flanger model This pedal gives you the flanger effect and allows you to control the standard Speed Depth Regeneration and Level of the flanger effect DigiTechTriggered Flanger By setti...

Страница 62: ...ially attenuated and the gate is closed The available noise gate pedals are DigiTech Auto Swell Gate This noise gate will also let you set the threshold of the noise floor but instead of a strict feel...

Страница 63: ...DigiTech Phaser This phaser will give you the standard phaser tone and options for controlling it via the Speed Depth Regeneration and Level settings DigiTechTriggered Phaser Like the Triggered Chorus...

Страница 64: ...ount parameter A Harmony Pitch Shifter sharpens or flattens the shifted pitch in order to keep the specified interval within the selected key and scale creating a true harmony DigiTech Pitch Shift A p...

Страница 65: ...d from side to side The speed controls how fast the panning occurs and the depth controls how much of the signal is panned DigiTech ScatterTremolo The Scatter Tremolo combines two tremolos that are ou...

Страница 66: ...in experimental and alternative music it creates an electronic or robotic type sound Best used with distortion in front of the effect DigiTech Step Filter The Step Filter changes frequency in related...

Страница 67: ...plate to the other side where the delayed tone was received The frequency response and dynamics of the signal would change when traveling through the plate creating a reverb effect Lexicon Ambience T...

Страница 68: ...vailable vibrato rotary effect pedals are DigiTech Rotary Rotary is an effect that simulates the Doppler effect and volume fluctuations of a rotary speaker The sound is lush and full DigiTechVibrato V...

Страница 69: ...h pedal was the original and was designed to try to emulate the sound of a muted trumpet Clyde McCoy was a trumpet player that had asked Vox for a device that could make an instrument sound like his m...

Страница 70: ...39 Fuzz King 40 Jump Panel 41 Blues 42 Stevie Ray 43 Blues 44 Big n Blue 45 Blues 46 Hair Day 47 Ballad 48 Rock Stack 49 Big Strum 50 Greaser Solo 51 Hot Rod 52 Cool Clean 53 Hot Rhythm 54 Undone 55...

Страница 71: ...10 keep Footswitch A held down until you see Fr in the LED display then release 3 Press and hold Footswitch A again until the display reads rS then release 4 After a few moments Td will appear in the...

Страница 72: ...evel 14 dBu Stompbox Loop Output Impedance 600 Ohms unbalanced 1 2K Ohms balanced Maximum Output Level 8 dBu Amp Loop Output Impedance 600 Ohms unbalanced 1 2K Ohms balanced Maximum Output Level 8 dBu...

Страница 73: ...801 568 7583 ELECTROMAGNETIC COMPATIBILITY This device complies with part 15 of the FCC Rules and the Product Specifications noted on the Declaration of Conformity Operation is subject to the followin...

Страница 74: ...drive Hiwatt Ibanez Tube Screamer Jensen Blue Backs Laney Supergroup Maestro EP 2 Marshall Marshall JTM 45 Marshall JumpPanel Marshall Master Volume Marshall SuperLead Matchless Matchless Chieftain Me...

Отзывы: