

1.
Follow the startup wizard’s instructions to setup the DVR’s basic settings, including
language, date/time and network.
You may not need to change any default settings to
properly set up your system.
At any time, you can skip steps, go back, or exit the wizard
and setup the DVR manually.
2.
Set the DVR’s network settings to match your network’s requirements. It is
recommended to set the network type to DHCP and
let the DVR auto-detect the network’s settings by
selecting the IP detect button. Then, change the type
to Static. Please contact your Network Administrator
for additional information. Press Apply to Save and
Next to move to the next step. Adjust the DDNS
settings as needed, or refer to the Pathfinder™ option
instead after initial setup. See STEP 6 - REMOTE
MONITORING.
3.
If this is your first time powering up the DVR, You are
encouraged to use the setup wizard. If you prefer to
manually go through the DVR’s settings to your preference, you can exit the setup
wizard at any time.
To add a UTC or PTZ camera:
1.
Right-click anywhere on the screen
and go to MENU >DEVICE > PTZ
2.
Camera type will be auto detected and displayed
under the camera tab. Protocol should match the
camera type detected.
- HD-A(C) -> legacy AHD signal type camera.
- HD-A/HD-TVI -> AHD signal type camera.
- HD-TVI--> TVI signal type camera
(DW default signal type).
3.
To control the camera’s menu and settings, press the
PROGRAM button under the CONTROL. See user
manual for more information.
1.
NAVIGATION – use the included USB mouse to navigate around the DVR’s monitoring and
Setup pages.
a.
To access the MENU BAR – move the mouse’s
cursor to the bottom of the display area to show
the menu bar. You can also display it constantly
by pressing the pin icon on the right side.
b.
To access the QUICK MENU OPTIONS – Right-
click anywhere on the screen. This will take you to the quick
menu options, which include:
• Display Mode Options
• Digital zoom, PTZ control and freeze image (on supported
cameras)
• Bookmark video
• Instant Playback and Search
• Recording status and analysis system monitoring
• Access to the Health Check and open the Main Menu
2.
HELP – For your convenience, the HELP button located at
the bottom left of setup screens includes basic
information and explanation of the features and settings
in that page, for on-the-go information.
Quick Start Guide
Copyright © Digital Watchdog. All rights reserved.
Specifications and pricing are subject to change without notice.
STEP 3 – STARTUP WIZARD
STEP 4 – UTC AND PTZ CAMERA CONTROL
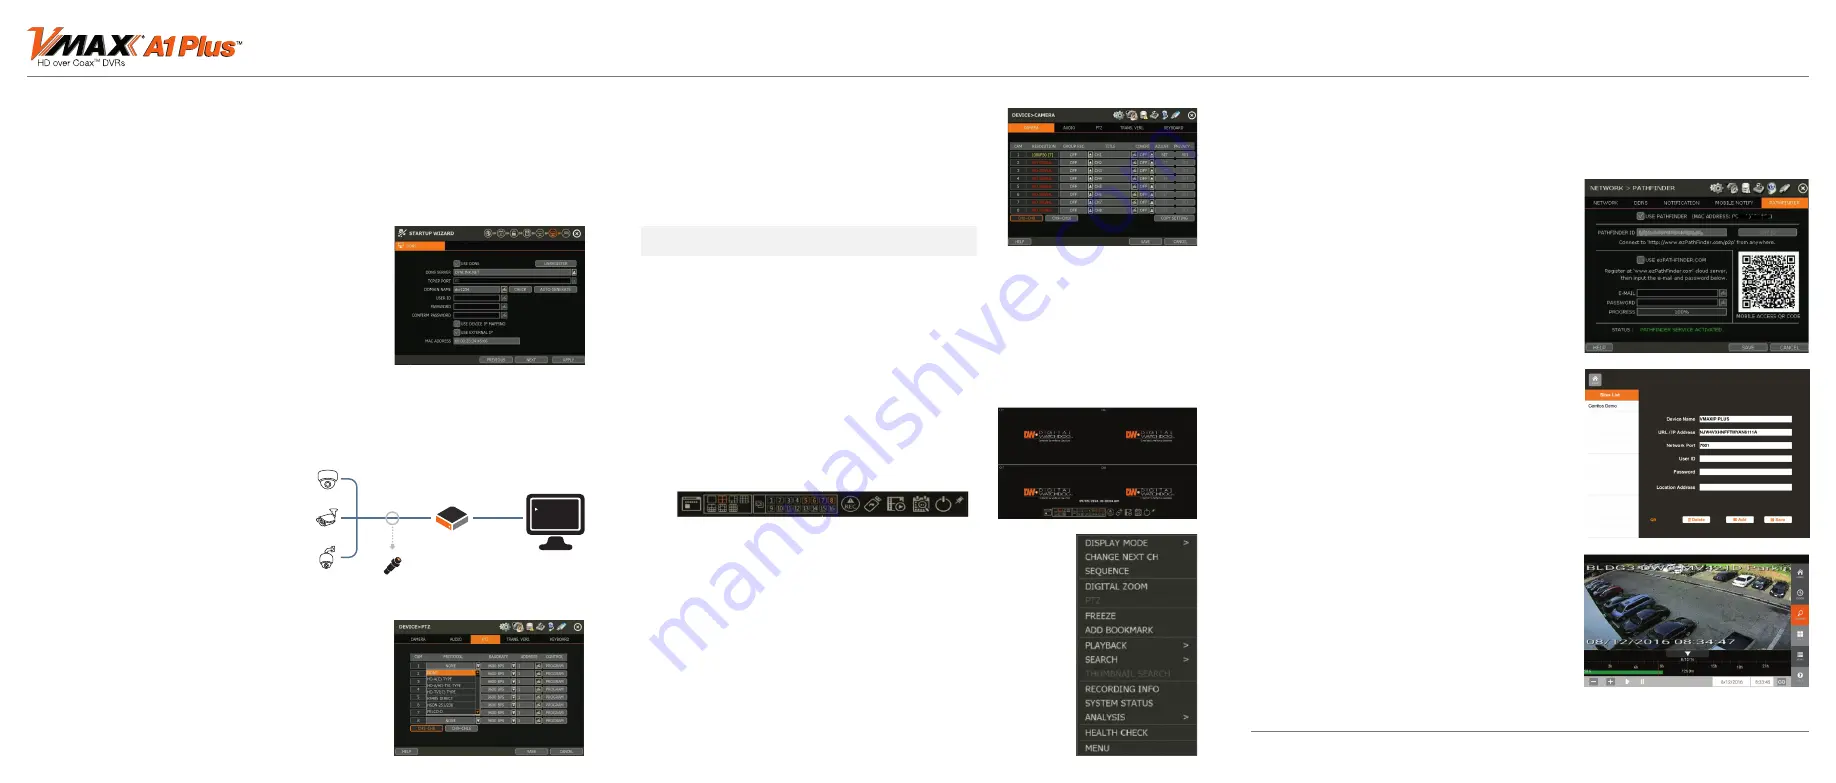
STEP 6 – MOBILE APP REMOTE MONITORING
You can monitor your system from DW’s mobile app with no need for complicated port
forwarding! To enable the QR code on your DVR:
1.
Right-click anywhere on the DVR’s screen and
go to MENU > NETWORK > PATHFINDER
2.
Check the box next to ‘USE PATHFINDER’.
Click Save.
3.
A mobile access QR code will appear on the
right side of the screen. Status at the bottom of
the screen should say “PATHFINDER SERVICE
ACTIVATED”.
To view the DVR on your mobile app:
1.
Go to the Google Play Store or Apple App
store and download the latest DW Mobile app.
2.
To add a new VMAX A1 Plus device- Launch the
DW Mobile™ or DW Mobile Pro™ application on
your Android
®
or Apple
®
smart-phone or tablet.
3.
Go to the Site menu to register a new site with
the QR code Scan.
4.
Press QR icon at bottom of screen.
5.
Move the camera angle to QR code on
DVR. The camera will capture the QR code
automatically once all four corners of the code
are registered in the camera’s frame properly.
6.
Once the camera registers the QR code from
the DVR, the IP address field will show the
DVR’s MAC address information.
7.
Complete the new device’s registration
information by adding the device name, port
number, user-name and password. Select
‘Save’ to complete the registration.
8.
The new site will appear in your sites list.page,
for on-the-go information.
Rev Date: 01/19
STEP 5 – MONITOR YOUR SYSTEM
EXISTING COAX CABLE
COAX CABLE
CAMERA
CAMERA
CAMERA
DVR
OSD
CAMERA SETTINGS
EXPOSURE
COLOR
DAY/NIGHT
MOTION
The DVR supports complete camera
control via the coaxial connection (UTC).
There is no need for an additional RS485
connection between the camera and the
DVR in order to control the camera. This
feature must also be supported on the
camera’s side.
NOTE:
If you are connecting a camera via UTC protocol,
baudrate and address settings will be disabled.


