6
1
System
c
apability information.
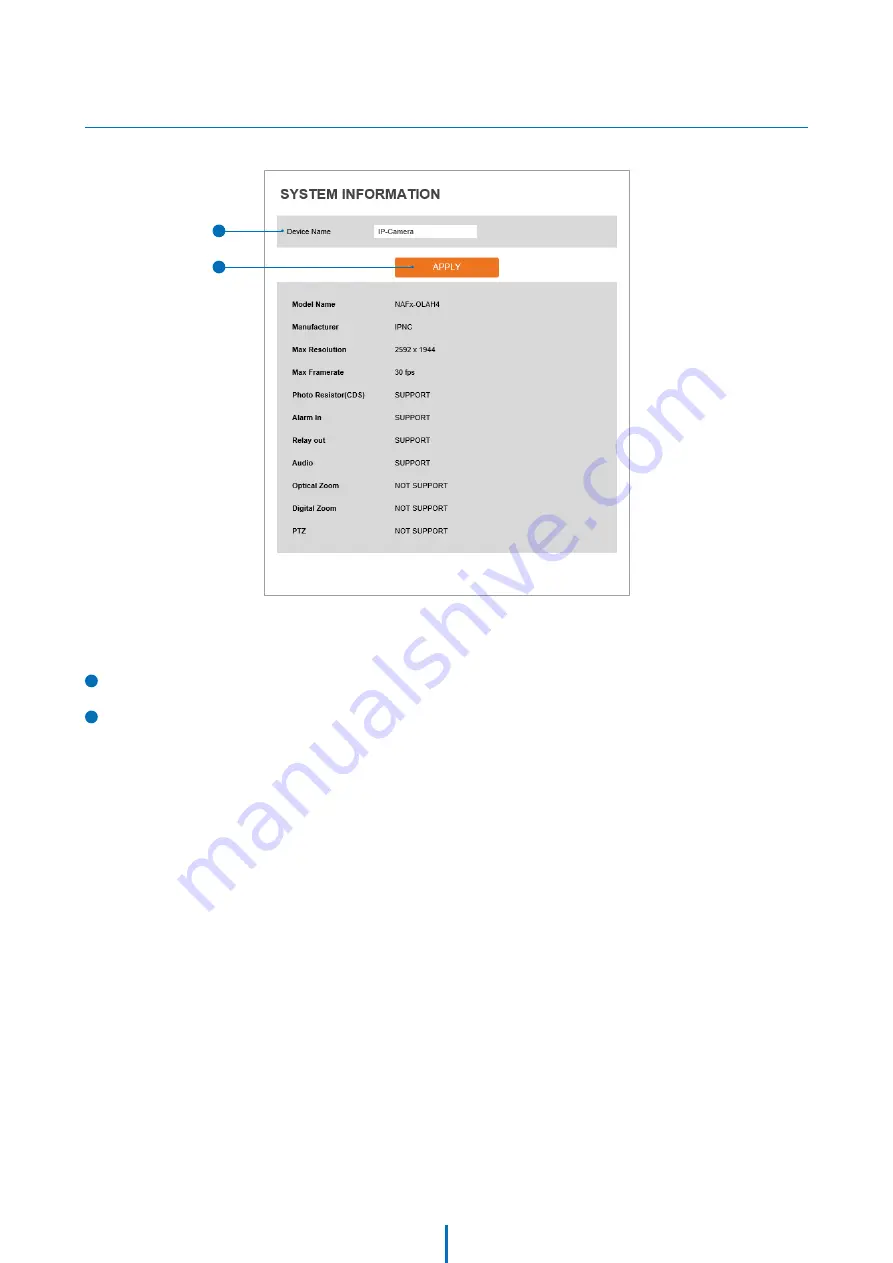
Device
n
ame -
Enter your device's name.
2
Click ‘Apply’ to make above setting effective.
Setup - System setup
System information
Страница 1: ...ead this manual carefully Be sure to keep it handy for future reference MEGApix 5MP bullet IP camera DWC MB45WiAT IVA pre loaded gray housing DWC MB45WiATW IVA pre loaded white housing DWC MPB45WiAT I...
Страница 2: ...era Doing so may cause personal injury due to fire electric shock or falling objects Do not install the unit in humid dusty or sooty locations Doing so may cause fire or electric shock If any unusual...
Страница 3: ...undry tub in a wet basement near a swimming pool etc 6 Clean only with dry cloth Unplug this product from the wall outlet before cleaning Do not use liquid cleaners 7 Do not block any ventilation open...
Страница 4: ...s 26 Settings Camera setup Image enhancement settings 27 Settings Camera setup Video enhancement 28 Settings Network setup 29 Settings Trigger action setup 39 Settings Event setup 43 Settings Record s...
Страница 5: ...ories Please check if all the camera and accessories are included in the package Camera Screws and plastic anchors 4pcs Test video cable Mounting template Hex Allen torque wrench Waterproof cap and ga...
Страница 6: ...Alarm in out RJ 45 connector Waterproof cap Audio in out DC power jack Part Name Introduction Bracket Pan and tilt stopper screw Control board Con cap Sunshield Lens Sunshield adjusting screws 6...
Страница 7: ...surface using the screws and anchors provided Loosen the pan and tilt stopper screw a slightly before xing the camera Use the test video cable to locally check the camera s image and adjust the zoom...
Страница 8: ...itch is not used use a power adaptor for power transmission and non PoE switch for data transmission Follow the illustrations below to connect the camera without a PoE enabled Switch 1 Using a PoE Ena...
Страница 9: ...45 Alarm output It connects to the alarm lights siren or lamps and the sensor types are normal open and normal close Cable of the alarm output device should connect to DO1 N O and DO1 COM of the cable...
Страница 10: ...tted on the rst use 2 Removing an SD card Gently press down on the exposed end of the memory card as shown in the diagram to eject the memory card from the slot Pressing too hard on the SD card can ca...
Страница 11: ...for all supported cameras and display the results in the tabel Allow up to 5 seconds for the IP Installer to find the camera on the network 4 You can press the Refresh List to search the network agai...
Страница 12: ...the password with the CHANGE PASSWORD button 3 After changing the default password you must log in again by pressing the RE LOGIN button Password Hint Page Internet Explorer Login fail after three fa...
Страница 13: ...time 4 Channel Select button Select a stream produced from the camera between Stream 1 3 to display it in the live view screen Refer setup Video Audio Video to setup the Video Stream 5 Below menu opti...
Страница 14: ...NVIF UPNP DDNS FTP SMTP SNMP RTSP INFORMATION Trigger Action ACTION RULES IMAGE TRANSFER RELAY OUT Events EVENT RULES MOTION TEMPERATURE ALARM Record MANAGEMENT RECORD LIST STORAGE Security IP ADDRESS...
Страница 15: ...ts are allowed Including space For the description English alphabets numbers and special characters _ can be used 4 Resolution Select the video resolution Available resolution differs according to the...
Страница 16: ...ber of P frames bigger additional video compression H 264 Main High H 265 HEVC Main 8 Smart bitrate control Main An intermediate pro le with a medium compression ratio The main pro le supports I frame...
Страница 17: ...etting effective O Extension option is disabled SVC T On The H 264 H 265 HEVC SVC Scalable Video Coding is a video compression algorithm that enables e ective and e cient transmission of video les ove...
Страница 18: ...18 1 Date Time Display the current time 2 User Text Output the TEXT entered by the user Support a maximum of 30 characters 3 Click Apply to make above setting effective 1 2 3...
Страница 19: ...at the same bandwidth 1 Stream Select the stream Currently it supports only H 264 H 265 HEVC The function is not supported in MJPEG codec 2 Activation The region of interest can be enabled or disabled...
Страница 20: ...io codec Currently it supports only codec G 711 2 Volume Select the audio volume from 0 to 10 3 Sample Rate Select the audio sample rate Currently it supports only 8000 Hz 4 Click Save to make above s...
Страница 21: ...on can be enabled or disabled 2 Area Select the Area1 Area16 and Set the privacy area Using your mouse draw on the camera s preview the size and position of the privacy mask 3 Click Save to save the c...
Страница 22: ...he image s contrast to meet your preference See the results on the camera s preview 4 Saturation Adjust the image s saturation to meet your preference See the results on the camera s preview 5 Hue Adj...
Страница 23: ...is faster the moving object can be photographed without the ghost effect However picture can be dark if there is insufficient lighting 5 Slow shutter level Slow shutter level lets you adjust the amou...
Страница 24: ...and white Schedule In this mode Day Night mode is converted accordance with the scheduled time 2 Color level The level of light when the camera switches from night mode to day mode when the day night...
Страница 25: ...amic Range The WDR function can be enabled or disabled If enabled the camera will automatically adjust the view to show both over exposed and under exposed areas clearly in the same frame 2 Click Save...
Страница 26: ...White Balance mode depending on the lighting conditions 3 RGB gain The R G B gain can be set only when the White Balance mode is set to manual 4 Click Save to save the current settings Click Cancel t...
Страница 27: ...good video quality in low light conditions 2 Mirror Reverse the video from side to side 3 Flip Reverse the video from up to down 4 Click Save to save the current settings Click Cancel to return to the...
Страница 28: ...flicker function to enhance the camera s image in case where flickering is seen 2 Click Save to save the current settings Click Cancel to return to the previous setting Click Default to settings to t...
Страница 29: ...29 This menu will show a summary of the camera s network settings and information Settings cannot be changed from this screen...
Страница 30: ...nter the DNS server s IP address Format is the same as the IP address 6 Alternate DNS server Enter the secondary DNS server s IP address if needed Format is same as the IP address 7 HTTP port The HTTP...
Страница 31: ...31 1 General setting Enable or disable auto IP settings 2 Auto IP settings information Displays the unique id or auto IP address for the camera 3 Click Apply to make above setting effective 1 3 2...
Страница 32: ...to the camera with WS User token of ONVIF authentication WS Usertoken Digest Allows access to the camera with WS User token and Digest of ONVIF authentication 2 Discovery Mode Enable or disable the ca...
Страница 33: ...UPNP function can be enabled or disabled 2 Friendly name Define the friendly name Support a maximum of 30 characters and special character can not be used _ can be used 3 Click Apply to make above set...
Страница 34: ...If you setup DDNS properly the IP address of your camera will be updated automatically whenever IP address is changed or system is rebooted If IP updating to DDNS site is failed the camera will keep...
Страница 35: ...r the path in the FTP server where the video from the camera will be stored For the path name English alphabets numbers and special characters _ can be used 4 FTP port Enter the FTP server s port If t...
Страница 36: ...ity mode of SMTP from plain or SSL TLS After checking account setup of your SMTP server you may select one 9 Title De ne the title of the e mail when the camera sends an e mail The title of the e mail...
Страница 37: ...e 4 Activation Selected modes can be enabled or disabled 5 Read write name De ne Read name and write name 6 Security level Select one of no auth no priv auth no priv auth priv 7 Authentication algorit...
Страница 38: ...P multicast on o To activate RTP multicast 1 Click On button 2 Enter accessible RTP multicast IP port for video stream control RTP packet TTL 3 Click Apply button It is possible to set each RTP multic...
Страница 39: ...s the custom action rule information added to action rules list 2 Click Add to add custom action rules Click Modify to modify selected item from the action rules list Click Delete to delete selected i...
Страница 40: ...name of action rules Input text cannot exceed the limit 3 15 2 Action1 Action5 Select the action to take If the event occurs 3 Click Save to save the current settings Click Cancel to return to the pre...
Страница 41: ...duration 2 Click Apply to make above setting e ective Setup Trigger action setup Image transfer configuration Number of images Pre alarm duration Post alarm duration Descriptions De ne Number of imag...
Страница 42: ...camera model 2 Mode Select the monostable bistable for relay mode 3 Idle state Select whether the contact is normally opened or is closed 4 Duration Relay out is operated during the setting time If b...
Страница 43: ...tes the custom event rule information added to event rules list 2 Click Add to add custom event rules Click Modify to modify selected item from the event rules list Click Delete to delete selected ite...
Страница 44: ...save the current settings Click Cancel to return to the previous setting 3 4 1 2 2 Event Select an event type from motion detection network disconnection illegal login detected temperature critical o...
Страница 45: ...e mouse click and drag to mark the size and position of the motion detection zone You can setup 4 separate zones 3 Activation Enable or disable motion detection function 4 Sensitivity De ne the sensit...
Страница 46: ...ature in Fahrenheit or Celsius 2 Threshold Set the temperature at which the event trigger occurs 3 Temperature Indicates the current temperature of the IP camera 4 Click Apply to make above setting e...
Страница 47: ...evice setup Select input device type from OFF N O N C 2 Click Apply to make above setting e ective OFF NO NC Operation Ignore this input sensor The contact is normally open and closed when activated T...
Страница 48: ...ct a channel you want to record video 2 Click Save to save the current settings 3 Recording list Display the information about the recording settings 4 Click Modify to modify the selected item in the...
Страница 49: ...torage type SD Card Disabled selection is not allowed 5 Continous If continuous recording mode is enabled the camera will start recording without any other settings necessary 6 Pre duration Define dur...
Страница 50: ...y to view the selected item in list of recorded video Click remove to delete a selected item on the list Click download to download a selected item on the list When you click download the following wi...
Страница 51: ...y the recorded video 2 Recording video information Display the information about the recorded video 3 Click replay to view the recorded video again Click back to return to the previous menu Setup Reco...
Страница 52: ...52 Display the SD card information mounted from device When you select the item in storage list You can set the functions related to the SD card Setup Record setup Storage configuration...
Страница 53: ...write If it is set ON and remaining space on the SD card is less than 8MB old data will start to be overwritten by the new recorded data However if it is set OFF and remaining space on the SD card is...
Страница 54: ...IP addresses 2 IP filter type Select the IP filter type 3 Click Apply to make above setting e ective 4 Filter IP address Display the filtered IP address 5 IP address Define the IP address you want to...
Страница 55: ...55 1 RTSP authentication RTSP authentication can be enabled or disabled 2 Click Apply to make above setting effective 1 2...
Страница 56: ...te on the client side TLS It relies on client side and server side certificates to perform authentication 3 EAPOL version Select the EAPOL Version 4 ID Type the ID to identify the client in the IEEE 8...
Страница 57: ...ertificate If you can not select a certi cate please install the certi cate from the security certi cates menu 2 HTTPS connection policy Select one of HTTP HTTPS HTTP and HTTPS depending on the connec...
Страница 58: ...te certificate signing request This is the encoded data that contains the necessary information for issuing the certificate They must be lled in when creating the CSR Certi cate Signing Request 6 Inst...
Страница 59: ...a unique name to identify certi cate 4 Select file Choose certi cation le 5 OK Request installing certi cate 6 Cancel Cancel install certi cate and then back to certi cates con guration Detail for ins...
Страница 60: ...60 Setup Security setup Service con guration 1 SSH The SSH function can be enabled or disabled 2 Click Apply to make above setting e ective 1 2...
Страница 61: ...61 System capability information 1 Device name Enter your device s name 2 Click Apply to make above setting e ective 1 2...
Страница 62: ...Shows SD card NAND EEPROM audio chip and important file system Warning If the camera is abnormally terminated a download button will appear on the diagnostics page to download a file that allows you t...
Страница 63: ...ss bar will be displayed If you assign the wrong le name an error message will be shown Warning 1 Do not turn o the power of camera during the firmware update The system can become unstable Once updat...
Страница 64: ...P Server 8 FTP upload Path Define a path in the FTP server where the firmware file is located English alphabets numbers and special characters _ can be used 9 Click Save to make above setting effectiv...
Страница 65: ...e setting in the Camera 4 Synchronize with my computer Set the date time using the time settings on the computer currently connected to the camera 5 Setup manually Set the date time manually 6 Synchro...
Страница 66: ...months and back again in the fall in order to make better use of natural daylight 1 General setting DST function can be enabled or disabled 2 Date and time settings Set the start time and end time wh...
Страница 67: ...fy the information of the user accounts registered For the Admin account only the password can be modi ed 4 Delete Delete the selected user account Admin account cannot be deleted ID Password Retype p...
Страница 68: ...a date time sort or type of log to lter the log 2 Click the refresh button to refresh the log list Click filter to view the ltered log 3 System log list The ltered log is displayed Setup System setup...
Страница 69: ...Return the setup to the factory default 2 Click Apply to make above setting e ective All Reset all Settings to the factory defaults Except network settings and user settings Reset the camera to it de...
Страница 70: ...70 Setup System setup Restart If you click the RESTART menu a message box will be shown to con rm Click the OK button to restart...
Страница 71: ...71 This menu shows all system open source licenses in the camera The data shows the open source s name version and license incformation Setup System setup System open source license...
Страница 72: ...deo 8 The IP setting can be set to STATIC at IP Installer or web viewer followed by Setup Network Network Settings 9 If the IP Camera is connected to a network which utilizes a router you must have Po...
Страница 73: ...er on our DDNS website before you con gure setup or install the IP Camera Even though your IP is not dynamic you will get bene t if you register to DDNS In this case just remember hostname dyndns com...
Страница 74: ...you are unsure contact your ISP 3 Con gure your IP Camera s TCP IP settings for network connectivity by selecting Setup from the main interface and selecting TCP IP located on the left of the Setup s...
Страница 75: ...e a unique IP and match your network read the FAQ i The IP address you assign must be a private IP For information on how to choose a private IP please read the FAQ i You must use the same subnet mask...
Страница 76: ...Type DYNAMIC 2 DDNS Server Use the DDNS server 3 Web Port 80 Camera Gateway or Router at ISP Public Line Internet i To connect the IP Camera directly to a modem power down and reset the modem Leave t...
Страница 77: ...has gone o and is now back on again ashing the IP Camera has rebooted After the system reboots completely remove the power supply from the unit and close Internet Explorer 3 Return your PC Laptop TCP...
Страница 78: ...pecifying the IP address and Web Port assigned to the IP Camera 6 Access your IP Camera via the Internet If you use Case B C 1 Open Internet Explorer 2 Type the IP of the IP Camera If you use Case A D...
Страница 79: ...nt IP address subnet mask default gateway and DNS servers 7 I can t connect In the case of a connection failure Modem Reboot Modem Reboot Finished Router Reboot Router Reboot Finished IP Camera Reboot...
Страница 80: ...Dimension Specifications Unit mm 92 4 96 7 122 6 102 247 2 78 4 2 80...
Страница 81: ...GC Auto Manual 1 15 1 32000 o 2X 3X 5X 6X 7 5X 10X Other Image Processing Con gurable Exposure White Balance Sharpness 0 08Lux 0Lux with IR F1 4 W WDR DOL TDN True Day Night 3D DNR 16 Programmable Zon...
Страница 82: ...M EST A purchase receipt or other proof of the date of the original purchase is required before warranty service is rendered This warranty only covers failures due to defects in materials and workmans...
Страница 83: ...do not allow the exclusion or limitation of incidental or consequential damages or limitations on how long an implied warranty lasts so the above exclusions or limitations may not apply to you This wa...
Страница 84: ...BNQB DW west coast office and warehouse MPPNGJFME WF FSSJUPT BMJGPSOJB 64 1 9 XXX JHJUBM 8BUDIEPH DPN UFDIOJDBMTVQQPSU EXDD UW 5FDIOJDBM 4VQQPSU 1 64 BOBEB OUFSOBUJPOBM SFODI BOBEJBO 5FDIOJDBM 4VQQPSU...