background image

-1-

• Be sure to confirm that the PL unit’s power cord is disconnected prior to install-

ing the FDD unit, in order to prevent electrical shock.

• Do not attempt to modify the FDD unit, due to the danger of fire or electrical

shock.

• Prior to installing the FDD unit, be sure to read section "2. Installation” com-

pletely to insure that this unit is correctly installed.

• The PL is not appropriate for use with aircraft control devices, aerospace equip-

ment, central trunk data transmission (communication) devices, nuclear power
control devices, or medical life support equipment, due to these devices inher-
ent requirements of extremely high levels of safety and reliability.

• When using the PL with transportation vehicles (trains, cars and ships), disas-

ter and crime prevention devices, various types of safety equipment, non-life
support related medical devices, etc. redundant and/or failsafe system de-
signs should be used to ensure the proper degree of reliability and safety.

The PL-FD510 is an internally mounted 3.5 inch floppy disc drive unit, designed
for use with Proface’s Panel Computer, PL-5910 Series Units, hereafter referred
to as the “PL.”
Corresponding Product : PL-5910 Series Units
All product names used in this document are the trademarks of their respective
manufacturers.
Pro-face : Digital Electronics Corporation

PL-FD510

Installation Guide

WARNINGS

To prevent this unit from malfunctioning :

• Since the FDD unit is a precision instrument, be sure that it is neither hit by nor

pressed strongly against another object.

• Be sure that water, liquids, or metal particles are not allowed to contact  or

enter this unit. Either of these may cause either a breakdown or an electrical
shock.

• Do not install or operate this unit in a location where there is direct sunlight,

excessive heat, dust or vibration.

• Do not store or operate this unit near chemicals, or where there are chemical

fumes.

• To prevent damage to file data, be sure to shut down the PL unit's OS before

turning OFF the main power.

Unit Disposal :

 When this product is disposed of, it should be done so according to your

country's regulations for similar types of industrial wastes.

Содержание PL-FD510

Страница 1: ...he PL FD510 is an internally mounted 3 5 inch floppy disc drive unit designed for use with Proface s Panel Computer PL 5910 Series Units hereafter referred to as the PL Corresponding Product PL 5910 Series Units All product names used in this document are the trademarks of their respective manufacturers Pro face Digital Electronics Corporation PL FD510 Installation Guide WARNINGS To prevent this u...

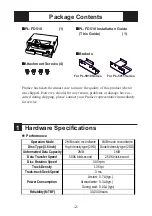
Страница 2: ...vice Attachment Screws 4 Performance 1 Hardware Specifications Operation Mode 2MB mode record write 1MB mode record write Disc Type 3 5 inch High density type 2HD Double density type 2DD Unformatted Data Capacity 2MB 1MB Data Transfer Speed 500K bits second 250K bits second Disc Rotation Speed Track Density Track track Seek Speed Atstart 0 7A typ Atread write 0 3A typ During wait 0 01A typ Reliabi...

Страница 3: ...e 20o C to 60o C Ambient Humidity 20 RH to 80 RH no condensation Shock Resistance During shipping 980 7m s2 Vibration Resistance During operation 9 8m s2 10Hz to 25Hz 2 Installation Be sure to use the following installation procedures to insure that the unit is correctly installed As for PL 5910T unit the attachment procedures are same as PL 5911T unit WARNING Shock Danger Be sure to disconnect th...

Страница 4: ...ller Panel 4 Attach the braket for PL 5911 Series that comes with the FDD unit to the FDD unit and secure it with the two 2 attachment screws The necessary torque is 0 5 to 0 6N m Do not use the brank panel removed in step 3 PL 5911T When using PL 5910 Series unit be sure to use the braket for PL 5910 Series ...

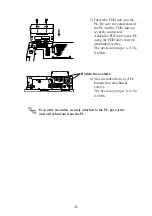
Страница 5: ...the FDD unit to the PL using the FDD unit s four 4 attachment screws The necessary torque is 0 5 to 0 6N m 6 This includes the two 2 PL bottom face attachment screws The necessary torque is 0 5 to 0 6N m Even after the unit is securely attached to the PL part of the unit will extend out from the PL Bottom face screws ...

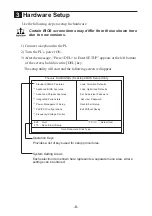
Страница 6: ...eys Provides a list of keys used for setup procedures System Setting Areas Each selection item shown here represents a separate menu area where settings can be entered 4 Standard CMOS Features 4 Advanced BIOS Features 4 Advanced Chipset Features 4 Integrated Peripherals 4 Power Management Setup 4 PnP PCI Configurations 4 Frequency Voltage Control ESC Quit Select Item F10 Save Exit Setup Time Date ...

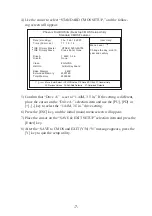
Страница 7: ...e setup utility 4 Use the cursor to select STANDARD CMOS SETUP and the follow ing screen will appear Date mm dd yy Thu Feb 15 2007 Time hh mm ss 11 15 14 4IDE Primary Master HTS541020G9AT00 4IDE Primary Slave Press Enter None Drive A 1 44M 3 5 in Drive B None Video EGA VGA Halt On All But Keyboard Base Memory 640K Externded Memory 259072K Total Memory 260096K Move Enter Select PU PD Value F10 Save...

Страница 8: ...r for any damages losses or third party claims arising from the uses of this product Inquiry Do you have any questions about difficulties with this product Please access our site anytime that you need help with a solution http www pro face com otasuke Copyright 2007 Digital Electronics Corporation ...

Отзывы: