M
ESSAGE
P
ROGRAMMING
Each section from
[101]
to
[249]
contains one message with a
maximum of 16 characters. The following are the programmed
defaults:
Section
[101]
to
[148]
= Zone 01 to Zone 48 respectively
Section
[149]
to
[244]
= Code 01 to Code 96 respectively
Section
[245]
= Paradox Family
Section
[246]
= First Area
Section
[247]
= Second Area
Section
[248]
= Third Area
Section
[249]
= Fourth Area
After entering the section corresponding to the desired message,
the message can be re-programmed to suit your installation needs
as detailed in Table 1. For example, section [101]
“ZONE 01”
can
be changed to
“FRONT DOOR”
.
Table 1: Message Programming
Key
Function
Details
[
STAY
]
Insert Space
Pressing the
[
STAY
]
key inserts a blank
space in the current cursor position.
[
FORCE
]
Delete
Pressing the
[
FORCE
]
key
will delete
the character or blank space found at
the current cursor position.
[
ARM
]
Delete Until the End
Pressing the
[
ARM
]
key will delete all
characters and spaces to the right of the
cursor and at the cursor's position.
[
DISARM
]
Numeric/Alphanumeric Every time the
[
DISARM
]
key is
pressed it will toggle numeric keys to
alphanumeric keys and vice versa.
Numeric: Keys
[0]
to
[9]
represent
numbers 0 to 9. Alphanumeric: refer
to Table 2.
[
BYP
]
Lower/Upper Case
Every time the
[
BYP
]
key is pressed it
will toggle the case setting from lower
to upper case and vice versa.
[
MEM
]
Special Characters
After pressing the
[
MEM
]
key, the
cursor will turn into a flashing black
square. Using Table 3, enter the
3-digit number that represents the
desired special character.
Table 2: Alphanumeric Keys
Key
Press Key Once
Press Key
Twice
Press Key
Three Times
[1]
A
B
C
[2]
D
E
F
[3]
G
H
I
[4]
J
K
L
[5]
M
N
O
[6]
P
Q
R
[7]
S
T
U
[8]
V
W
X
[9]
Y
Z
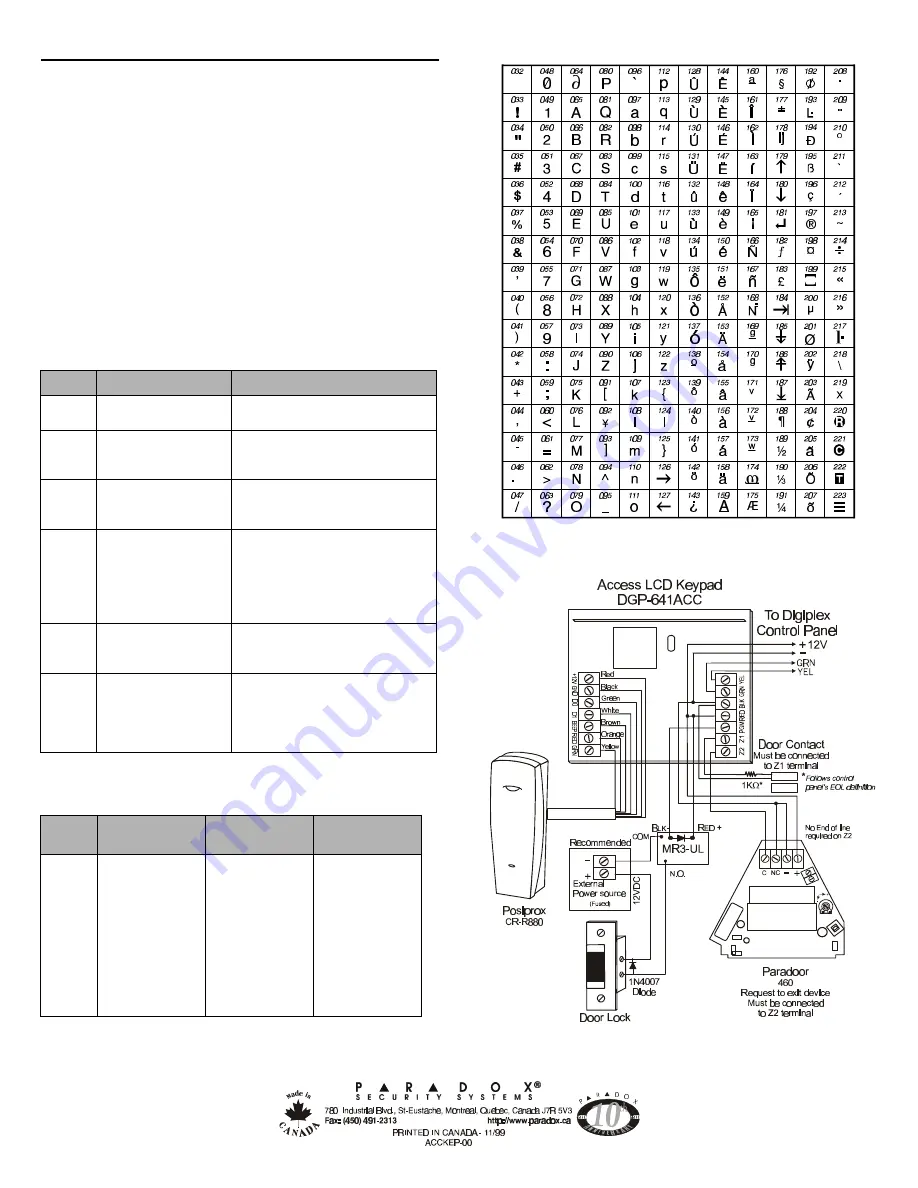
Table 3: Special Characters
Figure 1: DGP-641ACC LCD Keypad Installation drawing


