background image

33

Connections and Copying

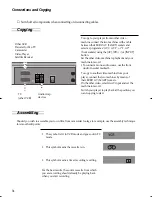
If you are using a SCART cable, select the AV input on the TV to see the picture from the player.

If you are not using a SCART cable, select the programme number on the TV reserved for video
input to see the picture from the player.

If you are not using a SCART cable, your player can transmit pictures and sound to the TV via the coax aerial
cable. Just tune the TV to the player's transmitting channel (factory set to UHF CH 52). Tune the TV carefully to
ensure the best pictures and sound.

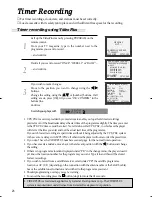
Once you have carried out the steps in "Connecting up the player" , switch
on your TV.
Press the [ENTER] button of the player’s remote control for longer than 5
seconds to call up the player´s test signal. 
Tune the TV to the test signal using the channel pre-set functions of your
TV as described in its manual.
When you have found the test signal, store it under the channel number
on your TV for player input.
Press the [ENTER] button of the player’s remote control again for longer
than 5 seconds to remove the test signal.

1

• If the quality of the test signal transmitted to the TV is poor due to

interference caused by a station transmitting on channel 52, you can tune
the player to a different transmitting channel. Find a free channel
between 21 and 69 on your TV. 

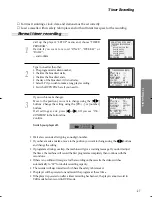
Call up the player’s "SETUP" menu, choose  "VCR SETUP" then "RF   
OUTPUT SET".

Type in the free channel. 

Store and exit.

2

• If the quality of the test signal transmitted to the TV is poor, fine-tuning on the TV may help

(refer to the TV manual).

• Without a scart cable, you will not get stereo sound from a TV capable of stereo sound. 

RF OUTPUT SET

0-9:SELECT (21-69)
OK:CONFIRM      SETUP:END

CH

52

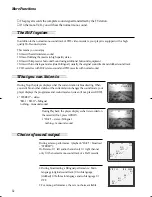
To the TV via antenna cable (if you are not using a SCART cable)

VCR

Operation

DC-B8E11P-DA  2005.9.22 9:42 AM  ˘

`

33

Содержание DVDVCR

Страница 1: ...untry region code for this DVD player is region 2 This player will only play discs that are labelled 2 or All The region code is indicated on the disc and disc packaging The symbol will appear on the...

Страница 2: ...Initial Installation 17 Setting time and date Auto clock 18 OSD ON OFF Output Select 19 DVD Playback 20 VCR Playback 21 Recording 22 VCR Operation Tuning in New Stations 24 Timer Recording 26 More Fu...

Страница 3: ...exposure To prevent direct exposure to the laser beam do not try to open the enclosure Visible laser radiation when open and interlocks defeated DO NOT STARE INTO THE BEAM DANGER Visible laser radiati...

Страница 4: ...penings in the case are provided for ventilation to ensure reliable operation of the unit and to protect it from overheating These openings must not be blocked or covered These openings must not be bl...

Страница 5: ...ered by the operating instructions Improper adjustment of other controls may result in damage and will often require work by a qualified technician to restore the unit to its normal operation E If the...

Страница 6: ...ast Forward Reverse playback Search of title chapter and time in DVD disc and search of time and track time in VCD Various TV aspect DVD 4 3 for Pan and Scan 4 3 for Letter Box and 16 9 for Wide Repea...

Страница 7: ...nstructions in using chemical cleaners Do not use any type of solvent such as gasoline or benzene as they may cause deterioration or paint to peel off Checking The video is a high precision device To...

Страница 8: ...device For more information see Operation Display Window in 7p SELECT button Use to change DVD mode to VCR mode and vice versa 1 STOP button Use to stop playing 2 REWIND button Use to rewind currently...

Страница 9: ...peat ALL VCD Repeat a defined period from A DVD VCD Repeat a defined period from A to B DVD VCD RECORDING MODE REPEAT MODE DVD playback Fast playback Fast reverse playback Slow playback Pause picture...

Страница 10: ...ase dispose of this equipment at your applicable collection point for the recycling of electrical electronic equipments waste In the European Union and Other European countries which there are separat...

Страница 11: ...A A Remote control battery installation Detach the battery cover on the rear of the remote control and insert two AAA batteries with the and ends aligned correctly Two AAA batteries supplied Product...

Страница 12: ...button VCR INPUT Selection button CLEAR button DVD VCR OSD DISPLAY button OK ENTER button Q DVD MENU button q DVD Chapter Title Time SEARCH button W DVD ZOOM button w FORWARD SEARCH button E STOP but...

Страница 13: ...n now be used as normal You will get better pictures and sound quality if you connect your player using a scart lead Before you start unplug all the equipment from the mains supply Television Aerial T...

Страница 14: ...equipment from the mains supply Television Aerial Back view of your player 200 240V 50 60 Hz You can use this connection if your player has two scart sockets This will improve sound and picture quali...

Страница 15: ...any audio amplifier if needed If your player does not have this connection see page 15 Player 200 240V 50 60 Hz You can also use a scart lead to improve picture and sound quality from your player Hi F...

Страница 16: ...you can use the other socket AV2 to connect other equipment To use this function see page 16 How to connect your player to a camcorder Before you start unplug all the equipment from the mains supply...

Страница 17: ...Digital please refer to About DVD in 54 56p Home Theatre Receiver with Dolby Digital decoding capability REAR PANEL OF DVD VIDEO CONNECTING CABLE Not supplied Manufactured under license from Dolby La...

Страница 18: ...her equipment the video PR PR buttons have no effect To return to normal video use the other equipment must be turned off Recording from other Equipment Simple recording can be performed ensure the eq...

Страница 19: ...me you switch on the TV and player 1 OK for AUTO SET AUTO SET tunes in all the stations you can receive in your country Clock is automatically set 2 If other stations are positioned on near the curren...

Страница 20: ...Auto Clock is only available for models with the VPS PDC function see page 26 Some broadcasting stations may send the time and date along with the VPS PDC data The video will automatically use this ti...

Страница 21: ...ion in PLAY REC and DVD mode Call up the player s SETUP menu 1 Choose VCR SETUP And press the OK button 2 Select OSD ON OFF If you want OSD OFF mode select it and press OK button to confirm Then OSD c...

Страница 22: ...l mode In the case of CD VCD1 1 and MP3 the disc plays 4 To stop it press button For pause press PLAY PAUSE button in playback mode If you press this button once more it starts playback again 5 Press...

Страница 23: ...ss PLAY PAUSE in Playback mode You can watch the desired scene in pause status If you want slow motion playback press button in Pause mode You can watch the desired scene in the slow forward cue playb...

Страница 24: ...of remote control to change to VCR mode Insert a recordable tape Insert a tape with recording tab With CHANNEL NUMBER and INPUT buttons select the desired broadcasting channel or external input unit...

Страница 25: ...If DVD disc is not copy protected then insert a blank tape 2 2 Press REC button during playing of DVD DVD plays and VCR starts recording 3 3 If you press STOP button in DVD mode DVD and VCR will stop...

Страница 26: ...n adjust When the programme is encoded and you have a decoder connected to socket EURO AV2 press the or to select ON or OFF Change or create the station name 4 Once you see the station you want store...

Страница 27: ...INE TUNING DECODER ON NAME O___ If the location numbers used for programmes stored in your TV and player are different you can change them on the player To do this move the stations to the right numbe...

Страница 28: ...e broadcaster delays the start time of the programme slightly The time you enter is the VPS PDC time so must be correct Not all stations offer VPS PDC in which case the player will start at the time y...

Страница 29: ...hange using the buttons and change the setting If programme timings overlap the machine will give a warning message If you don t adjust the times the machine will record the first programme completely...

Страница 30: ...nge using the buttons Change the settings using the PR or number buttons If all settings are ok press or until you see OK CONFIRM in the bottom line Confirm changes with OK Exit the menus 2 TIMER PROG...

Страница 31: ...ion to find out if there is sufficient space for a recording for example To ensure the remaining time shown is accurate select from the list given in the menu the cassette tape length currently being...

Страница 32: ...CR SETUP CLOCK SET RF OUTPUT SET 16 9 SET OSD ON OFF AUTO CLOCK PR SELECT OK CONFIRM SETUP END 16 9 SET AUTO OFF ON PR SELECT OK CONFIRM SETUP END If you watch a programme which is recorded in 16 9 wi...

Страница 33: ...e control Use only good quality tape cassettes with the VHS logo Keep cassettes away from excessive moisture or dust magnetic and electrical fields loud speakers and computer monitors for example Alwa...

Страница 34: ...nother station or the current station changes the sound mode your player displays the programme and sound mode on screen if not press AUDIO STEREO stereo BIL I BIL II bilingual nothing monaural sound...

Страница 35: ...pre set functions of your TV as described in its manual When you have found the test signal store it under the channel number on your TV for player input Press the ENTER button of the player s remote...

Страница 36: ...o machines by means of their EURO AV SCART sockets On the other video select its AV input and set the machine to record Switch your player to play back at the position you want copying to start TV oth...

Страница 37: ...unction and PBC ON is activated 1 Press the ENTER button or PLAY button after pressing the button to select the desired title For the case of VCD disc press the Number button The selected title now st...

Страница 38: ...k mode is resumed 3 CHAPTER Current chapter will play repeatedly TITLE Current title will play repeatedly TRACK Current track will play repeatedly ALL Current disc will play repeatedly Repeat one Curr...

Страница 39: ...rched using the NUMBER buttons After completing the enteries please press ENTER button PLAY starts from the selected position 3 If you want to search with a chapter number press SEARCH button twice It...

Страница 40: ...ime Please enter the new time to be searched using the NUMBER button 2 001 013 total track number current track number 01 03 20 current time Storing a MARKER in the DVD memory is similar to marking yo...

Страница 41: ...er completing the enteries press ENTER button To exit from Display mode press DISPLAY button again current title total title current chapter total chapter time elapsed subtitle selected current subtit...

Страница 42: ...ursor and enter the new settings with number or button After completing the enteries press ENTER button current track total track number time elapsed repeat playback mode PBC mode 001 003 00 01 03 OFF...

Страница 43: ...r sequentially Keep pressing SUBTITLE button till the user s preferred language appears in playback mode If a DVD disc includes subtitle information every time the user presses SUBTITLE button English...

Страница 44: ...arged is centralised and the area can be changed with the operation of the buttons If a disc includes multi angle information the user can watch a screen in multi angles The function is limited to a D...

Страница 45: ...n to or view by pressing button Press PLAY or ENTER to start playback The selected file will play Press to stop playback 4 MUSIC 000 000 0 00 00 0 00 00 PROGRAM LIST max 6 SKY winamp _ _ _ _ _ _ _ _ _...

Страница 46: ...the on screen display Caution Try to avoid the use of the CD RW Rewritable disc if possible because it can not be played back according to the recording format A CD R must be recorded with the standa...

Страница 47: ...turn left press To turn right press 3 Combination Play set Select Combination Play function Then press ENTER or PLAY to enter into the playback of total files A combination play will begin 4 12 134 90...

Страница 48: ...starts playback 3 MOVIE 0 00 0 00 00 0 00 00 LIST DESKTOP MOVIE TEMPORAR TRASH PREVIEW MOVIE 0 00 0 00 00 0 00 00 MOVIE 320 BAK001 MPG LIST __ 1 BAK001 2 BAK002 3 BAK003 4 BAK004 5 BAK005 6 BAK006 7 B...

Страница 49: ...different according to the discs If it is a VCD2 0 select PBC ON mode by pressing TITLE PBC button CD and VCD1 1 do not support the function 1 If it is a DVD disc move the cursor to the relevant item...

Страница 50: ...played back in the set language every time it is played OTHERS Another language can be selected You can input a 4 digit language code Refer to the language codes on next page Press CLEAR if an incorre...

Страница 51: ...6588 Aymara 7079 Faroese 7578 Kannada 8065 Panjabi 8472 Thai 6590 Azerbaijani 7082 French 7579 Korean 8076 Polish 8473 Tigrinya 6665 Bashkir 7089 Frisian 7583 Kashmiri 8083 Pashto Pushto 8475 Turkmen...

Страница 52: ...If a user selects 4 3 PS the user can watch only a centre of the original scene of 16 9 If a user selects 4 3 LB the user can watch the original scene of 16 9 but the top and bottom of the screen look...

Страница 53: ...the disc Full You can hear loud sounds softer and soft sounds louder 3 A user may select an audio menu according to the speaker set being used While in STOP or RESUME STOP mode press SETUP button 1 BI...

Страница 54: ...utton when the cursor is highlighting PARENTAL When INPUT PASSWORD appears on the screen input the password Change Parental Rating level Once you have entered the correct password you can change the P...

Страница 55: ...ANCEL OSD SCREEN SAVER DEFAULTS PARENTAL PASSWORD INPUT PASSWORD OSD SCREEN SAVER DEFAULTS PARENTAL PASSWORD CONFIRMPASSWORD OSD SCREEN SAVER DEFAULTS PARENTAL PASSWORD CHANGE OK Parental Lock activat...

Страница 56: ...MANAGEMENT INFORMATION This unit is designed and manufactured to respond to the Region Management information that is recorded on a DVD disc The region number of this player is 2 If the region number...

Страница 57: ...idely used in movie theatres around the world It enables the bit rate to be increased to provide good sound quality DTS and DTS Digital Out are trademarks of Digital Theatre Systems Inc Multi Angle So...

Страница 58: ...disc to direct sunlight or other forms of heating After using the disc please replace it in its case Before using the disc please wipe it from its centre outwards using a clean soft cloth Do not use...

Страница 59: ...reception for optimum reception picture CABLE Cable television Index Search A feature of this VCR that automatically records an index mark each time recording begins It helps you locate a particular...

Страница 60: ...tape and is operated automatically Please pull out the tape and put it in again If the product has not been used for a long time the cassette may not eject because the videotape has stretched In this...

Страница 61: ...info is right Please check that the record protect tab on the cassette is intact If the tab is missing cover the hole with a piece of scotch tape Was a cable data output code connected correctly Did...

Страница 62: ...ease check the plugs are connected properly Check all contacts and connections Please check the angle of operation of the remote control the distance and any obstacles that may be interrupting the sig...

Страница 63: ...input 8 8dBm RCA JACK VIDEO output common use of DVD and VCR VIDEO output terminal 1 0 Vp p unbalanced RCA JACK SCART JACK VIDEO output DVD only RGB output 75 In load R 0 7Vp p G 0 7Vp p B 0 7Vp p AU...

Страница 64: ...not be disposed of with your general household waste Only discard electrical electronic items in separate collection schemes which cater for the recovery and recycling of materials contained within Y...

Отзывы: