background image


IQOYA


TALK


Portable IP audio codec


41 


TV MODE 

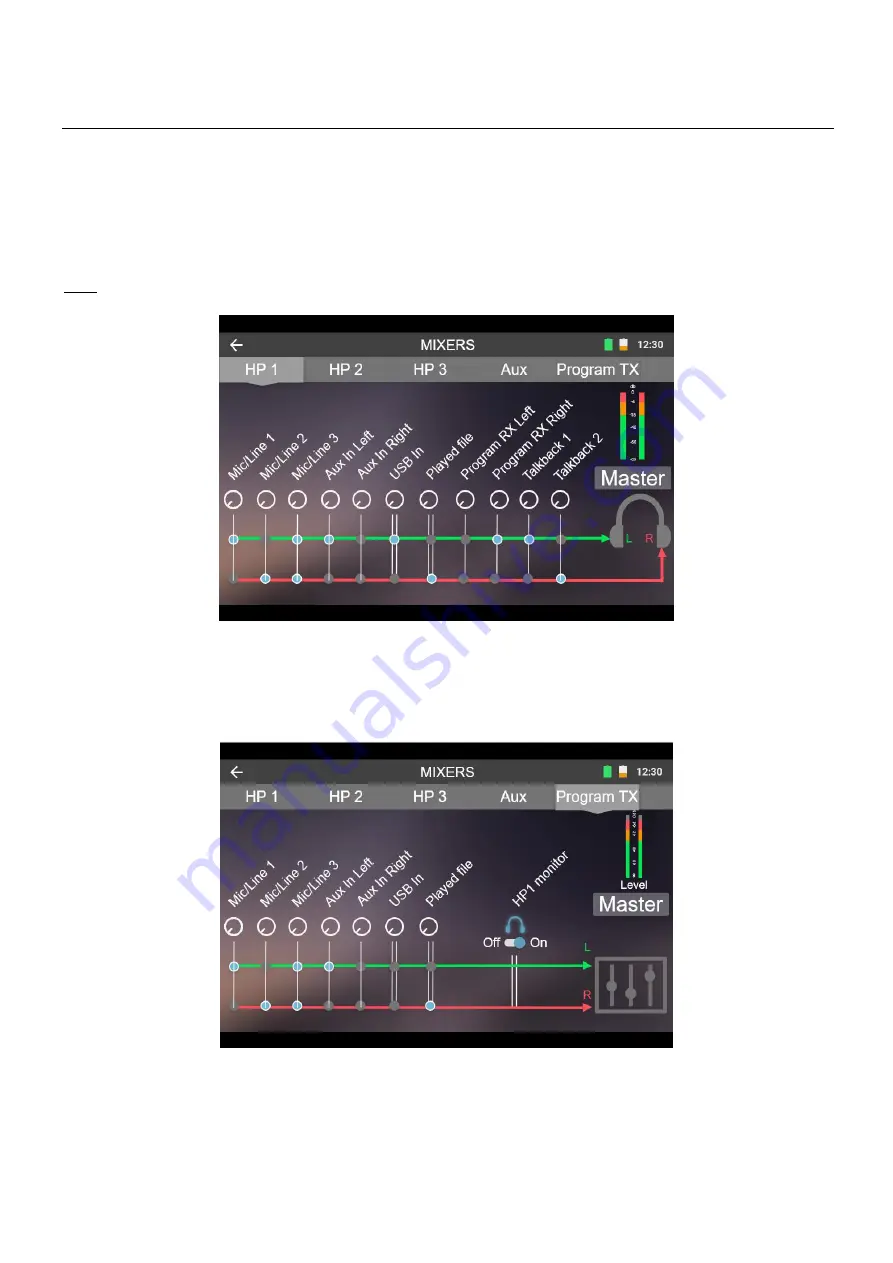
In TV mode, it is possible to make an independent mix for each of the five outputs (HP1, HP2 & HP3, AUX and TX 
Program), represented by five different tabs. 
 
Note: For output HP3 (“Guest” headphones), Talkback sources 1 & 2 are not accessible: 


In the TX Program tab, a button is used to monitor the PGM TX mix, which is streamed towards the studio, in the 
HP1 headphones.  
When the button is turned back to OFF,


then the HP1 headphones monitor their mix again. To prevent the user 

forgetting to reset the button to OFF, leaving the page will switch the button to OFF.  


RADIO MODE 

In Radio mode, the TX Program mix also becomes an input source that can be monitored in each of the headphones 
outputs.  

Содержание IQOYA TALK

Страница 1: ...IQOYA TALK User manual IQOYA TALK Portable IP audio codec Applies from firmware version 01 03d V 1 0 February 2020 ...

Страница 2: ...omer for the first time the battery is delivered in shipping mode To enter use mode the battery must first be placed in the external charger for a few minutes The equipment is supplied with replaceable batteries If used with an incompatible battery an explosion may occur CLEANING Clean only with a soft dry cloth If necessary after disconnecting the unit s cables wipe it with a soft cloth dampened ...

Страница 3: ... interference to radio communications However there is not guarantee that interference will not occur in particular installation If this equipment does cause harmful interference to radio and television reception which can be determined by turning the equipment off and on the user is encouraged to try correct the interference by one of the following measures Reorient or relocate the receiving ante...

Страница 4: ...urchase During the warranty period we will repair or at our option replace a product which turns out to be defective free of charge to Digigram provided that return authorization has been granted For return authorization contact the relevant Digigram unit see http www digigram com Contact This warranty does not apply if the product has been damaged by accident or misuse or as a result of service o...

Страница 5: ...R 19 TOP 19 HEADER SHORTCUTS 19 SYSTEM STATUS 20 FIRST STEPS 20 FIND NETWORK 21 SIGN IN TO IQOYA CONNECT optional 21 CONNECTION SETTINGS 21 AUDIO SETTINGS 22 GO TO LIVE SESSION 22 5 CONFIGURATION MENUS 23 CONNECTION 23 NETWORK 23 Parameters for the Eth1 and Eth2 interfaces 23 Parameters for the Wi Fi interface 25 Settings for the Cell1 and Cell2 interfaces 25 IQOYA CONNECT 26 Identification 27 Att...

Страница 6: ...SETTINGS 44 BRIGHTNESS 45 CLOCKS 45 SYSTEM PROPERTIES 45 LOGS 47 NTP SERVER 48 AUTOMATIC MODES 49 DEVICE AND TALENT NAMING 50 HEADPHONES 51 RETURN TO FACTORY SETTINGS 51 AUDIO FILES 52 6 OPERATING MENUS 53 LIVE 53 Live Contact and Profile 54 Contact 54 New Contact 55 Profile 56 New Profile 56 RECORD 59 7 SPECIFICATIONS 60 8 APPENDIX 61 APPENDIX A 61 Firmware update 61 Step 1 61 Step 2 61 Step 3 61...

Страница 7: ...3 Network impact on latency 63 Impact of additional features on latency 63 APPENDIX C 64 Available FEC 64 FEC requiring no additional stream 64 FEC requiring an additional stream 64 APPENDIX D 65 Redundant dual streaming 65 Spatial diversity 65 Time diversity 65 ...

Страница 8: ...t generates uses and can radiate radio frequency energy and if not installed and used in accordance with the instruction may cause harmful interference to radio communications However there is no guarantee that interference will not occur in a particular installation If this equipment does cause harmful interference to radio or television reception which can be determined by turning the equipment ...

Страница 9: ...Digigram One IP is a complete solution for an easy management of live remote broadcasting operations It is based around a secure SIP infrastructure IP audio codecs for journalists reporters and studios and web applications for centralized control and monitoring ...

Страница 10: ...t output ONE IP also comes with an intelligent infrastructure that enables interconnectivity between all IP codecs IQOYA CONNECT is both a SIP infrastructure allowing successful and secure SVP communications and a web application allowing radio engineers to Centralize contact list and call profile management and centralize the configuration of codecs Discover codecs automatically Send invitations ...

Страница 11: ...e package consists of the following components 1 x IQOYA TALK portable codec 1 x Lithium Ion battery 1 x external power supply with cable 4 x cellular antennas 1 x Wi Fi Bluetooth antenna 1 x USB C Cable 1 x external battery charger with cable 1 x extraction tool for SIM card drawer ...

Страница 12: ...cated on the right side of the device IQOYA TALK does not charge the battery to do so please use the external battery charger supplied Connect the battery charger to the mains and plug the battery following the picture below For the shipment of the product the battery is put into shipping mode by the manufacturer To enter use mode the battery must first be placed in the external charger for a few ...

Страница 13: ...The front panel allows connecting three microphones XLR and four headsets 6 35 mm jack socket The three zones provide independent management of the journalist TALENT 1 a partner TALENT 2 and two guests GUEST with a headset each and a shared microphone ...

Страница 14: ...c off Codec starts up regardless of the duration of the push and the state of the codec off or Standby If codec already powered on A short press launches a pop up window offering the choice between Power OFF or Reboot A long push 3 5 s turns off the equipment hard shut down You can exit the pop up window by clicking on the cross ...

Страница 15: ... types of action are available Rotation scan the clickable or input fields of the displayed menu Short press on one of the fields validation of the field ESC KEY Return to the previous page and validation ESC does not cancel the action that was performed on the page except for the pages that explicitly request the validation of a setting by clicking onto the green Apply button ...

Страница 16: ...ns a pop up window which allows to make adjustments depending on the mode activated in Advanced settings Headphones default mode Radio In Radio mode allows to adjust the balance between the TX Program bus Mix master of the sources selected in the Mixer Program TX screen and RX Program Mix of sources PGM RX Left Right TB1 TB2 In the case shown above for headphones 1 the user modifies the balance of...

Страница 17: ...e or active its dedicated Mic Line input Remember Check your Mixer tab to configure your Mic Line output path TX Program Headphones and AUX TB1 TB2 KEYS Work only on TALENT 1 and TALENT 2 zone In communication pressing the TB1 or TB2 pushbutton Mutes the corresponding Mic Line input on the AUX Program TX and REC outputs Routes this input to the selected TB output with a Push to talk behaviour If b...

Страница 18: ...ontal areas An upper zone intended for the technician This area lists the icons for the parameter setting of the codec by order of importance A lower zone intended for the journalist presenter This area includes the Live and Record icons These menus enable access to the operating functions ...

Страница 19: ...and quality if module activated otherwise no logo CELL 1 network status and quality if module activated otherwise no logo Wi Fi network status and quality if module activated otherwise no logo ETH 2 presence green Ethernet socket otherwise no logo ETH 1 presence green Ethernet socket otherwise no logo Connection status to the TB SIP infrastructure green or red depending on the registration status ...

Страница 20: ...p all the TALK menus in the right order By following the instructions the device will display what to carry out through all the configuration process step by step To use this menu Select Display this screen at startup to have this page at each system restart Scroll the header down at any moment and click on FIRST STEPS To enter in a menu and modify its set up click on To get information about a st...

Страница 21: ... IQOYA CONNECT connection process will be launched If the last used account was signed out and or is not marked as REMEMER ME then no IQOYA CONNECT connection will be launched If no IQOYA CONNECT account connection is established the IQOYA CONNECT identification must be done manually Go to HOME CONNECTIONS IQOYA CONNECT and follow the process CONNECTION SETTINGS This step look for a PROGRAM and TA...

Страница 22: ...ters are integrated when loading the configuration If a personal IQOYA CONNECT mixer is configured in its personal web zone then his parameters are loaded instead of the organization GO TO LIVE SESSION If all the previous steps are checked then the user can go to Live Session When an IQOYA CONNECT account is used then Contact list and Call Profile list are integrated when loading the configuration...

Страница 23: ...erfaces Parameter Meaning Physical address Displays the physical address automatically of the Ethernet module DHCP Allows enabling disabling DHCP Dynamic Host Configuration Protocol Click on the switch to disable DHCP When DHCP is activated it disables the following parameters Default value YES enabled IPv4 address DHCP Off Allows to type in a static IP address for this Ethernet interface DHCP On ...

Страница 24: ...ws to type in the IP address of a DNS server DHCP On Displays the IP address of the DNS server set through DHCP Secondary DNS DHCP Off Allows to type in the IP address of a secondary DNS server DHCP On Displays the IP address of the secondary DNS server set through DHCP Speed and duplex mode obtained Displays the current speed and mode of the Ethernet interface Speed and duplex mode asked Allows s...

Страница 25: ...Status Once a SIM card has been inserted into the SIM card tray the corresponding menu will become available This parameter allows enabling disabling the interface Default value disabled APN Access Pin Name Enter the parameter given by the network operator Pin CODE If needed enter the parameter given by the network operator Dial up number If needed enter the parameter given by the network operator...

Страница 26: ...oaded data are Contact list Call Profile list IP codec instances Audio I O settings Mixers settings If a personal mixer is configured then these parameters are loaded instead of the organization What is IQOYA CONNECT IQOYA CONNECT is a simple and powerful cloud based service designed to give broadcasters the ability to establish stable communications and secure connections between IP codecs throug...

Страница 27: ...d with the process to follow In Forgot PIN code ask for a new PIN code for an existing IQOYA TALK account Provide the email of the account where the password was forgotten An email will be sent to this same email address with a new PIN code Attach the codec to an organization Role CODEC FLEET MANAGER As a Codec Fleet Manager the ability to choose to which organization the TALK could be attached is...

Страница 28: ...le CONTRIBUTOR As contributor the device will look for organizations which have sent configuration authorisations to load its assigned parameters The screen displays depending on the use case A message indicating that no configuration was prepared from any organization If the IQOYA TALK is part of a fleet of codecs the organization to which it is attached is displayed Two actions are proposed Chec...

Страница 29: ...ion for this TALK and allowing to choose between these organizations to make a connection and then load the prepared configuration When an organization is chosen the synchronisation is launched That a connection is in progress if there are only one organization that had prepared a configuration for this TALK ...

Страница 30: ...that a connection authorization was found from an organization If the IQOYA TALK is part of a fleet of codecs the organization to which it is attached is displayed Two actions are proposed Reload a configuration and Sign out An IQOYA TALK can be attached to an organization X and had connections with another organizations A B C to launch there prepared configurations ...

Страница 31: ...signaling Use Auto if you do not have instructions from your IT team on this Listening Source audio port Number of the UDP port used by the IP codec instance to listen to the IP audio stream coming from the remote party Value range 1024 to 65535 FEC network interface The network interface used by the IP codec instance to listen to the FEC signaling Use Auto if you do not have instructions from you...

Страница 32: ...e buffer the more the IP codec instance is immune to the network jitter but the higher the latency Audio stream loss duration ms When the IP codec instance no longer receives the IP audio stream from the remote party for a duration equal to this parameter value a hang up is triggered as if the hang up button has been pressed The value is expressed in milliseconds and must be greater than 100ms ...

Страница 33: ...llow iqoyatalk XXXXX program iqoyatalk XXXXX talkback XXXXX being the 5 last digits of the product s serial number Account name Name that will be used to register with the SIP server also called SIP registrar Server domain Domain name OR the IP address of the SIP server providing the SIP account also called SIP registrar Authentication name Leave empty if you want to use the same name as Account n...

Страница 34: ...ue to avoid port conflicts Registration every seconds This is the refresh period of the SIP registration in seconds It is not recommended to enter a value below 30s The default value is 120 Proxy Proxy activation Enable disable the use of a SIP proxy Presence Presence activation Enable disable the SIP presence service Do not disable the SIP presence service if you use Digigram s SIP infrastructure...

Страница 35: ...om a third party codec requires a FEC stream without specifying any FEC scheme In this case the FEC scheme used by the third party codec needs to match this fallback FEC scheme Note that this field is only relevant with third party codecs through SIP and has no use for a communication between two Digigram codecs Click on APPLY before leaving the page to save the changes SIP CONFIGURATION To config...

Страница 36: ...c Line inputs 1 2 and 3 the Inputs menu allows to select the type of input Line or Microphone and to apply the gain Mic Line 1 2 and 3 Inputs Microphone Gain range 0 to 51 dB Line Gain range 20 to 31 dB In case of a microphone input it allows to Apply phantom power 48 V Pre configured high pass filter 80 Hz with a slope of 12 dB Octave ...

Страница 37: ...dBu Aux Inputs Line Gain range 76 to 15 dB AES EBU Gain range 76 to 15 dB OUTPUTS For HP 1 2 and 3 the Outputs menu give access to the volume adjustment for the headphone outputs This setting is also accessible from the small physical rotary knobs HP 1 2 and 3 Outputs Volume range 21 dB to 24 dB PHOTOOOOOOO The Aux output also allows defining whether it is a line or an AES EBU output AUX Outputs L...

Страница 38: ...38 ...

Страница 39: ...THE SOURCES INPUT LEVEL Add level at each of your inputs to make a mix that correspond to your needs and preferences The source level is adjusted by clicking on Sources Inputs Digital level range 76 dB to 15 dB Double clicking on the main rotary knob brings the fader level back to 0 dB SETTING THE MASTER MIX LEVEL Master Mix allows to set a level on the final mix Do not confuse levels with volumes...

Страница 40: ...o Distribution of signals for stereo inputs USB in Played File if the points are on L and R then the Left input signal is sent on Left and the Right input signal is sent on Right if the point is on Left then the input stereo signal is sent on L if the point is on Right then the input stereo signal is sent on R ...

Страница 41: ...ot accessible In the TX Program tab a button is used to monitor the PGM TX mix which is streamed towards the studio in the HP1 headphones When the button is turned back to OFF then the HP1 headphones monitor their mix again To prevent the user forgetting to reset the button to OFF leaving the page will switch the button to OFF RADIO MODE In Radio mode the TX Program mix also becomes an input sourc...

Страница 42: ...42 For HP1 and HP2 headsets in addition to the TX Program mix it is possible to monitor the sources coming back from the studio RX Program Talkback 1 and Talkback 2 ...

Страница 43: ...IQOYATALK Portable IP audio codec 43 Note For the HP3 output Guest headphones Talkback sources 1 2 are not accessible ...

Страница 44: ...44 ADVANCED SETTINGS The advanced settings menu allows to set the internal workings of IQOYA TALK ...

Страница 45: ...and keyboard CLOCKS This page allows defining the Iqoya Talk sampling clock source The clock source can be Internal on board clock 48 kHz or 44 1 kHz Extracted from an AES EBU input at 22 5 kHz SYSTEM PROPERTIES This screen displays the system properties of the IQOYA TALK unit This information will be required in case of product support ...

Страница 46: ...NAMING Host Name Logical name given to the device on the network By default iqoyatalk XXXXX XXXXX being the 5 last digit of the product s serial number Serial number Serial number of the unit This number is set in factory and cannot be changed Firmware version Version of the firmware running on the unit The firmware can be updated Platform ID Identifier of the unit This number is required for appl...

Страница 47: ...le gives information about the internal behaviour of the product and is useful for advanced diagnostics This log file is stored internally and restart at each power cycle Refresh allows to refresh the page content Reset clears all the traces Copy to device storage allows to download the log traces into the internal memory ...

Страница 48: ... the ON OFF switch to activate deactivate the NTP service Enter the IP address or domain name of the NTP server Up to 3 servers can be configured Once IQOYA Talk is synchronized on the NTP server the field Service status displays Running Depending on your location a NTP server can be used as follow World region NTP server domain Europe eu ntp iqoya com or ntp iqoya com USA us ntp iqoya com Austral...

Страница 49: ...ing Auto Reply When auto reply is activated an incoming call will be automatically accepted without confirmation Auto Redial When auto redial is activated on the caller s side only the caller can terminate the communication If the callee hangs up the communication is automatically re established by the caller device ...

Страница 50: ...ation The name of the owner of the equipment for example the name of the radio station Host Name Device Name Name given to the equipment For each one of the three microphone inputs it is possible to personalize the name By Default Headset 1 left is Talent 1 Headset 2 right is Talent 2 and Headset 3 middle is Guest ...

Страница 51: ... RETURN TO FACTORY SETTINGS This menu allows to do a factory reset it is a software restore to its original system state by erasing all of the information stored on the device in an attempt to restore the device to its original manufacturer settings Doing so will effectively erase all of the data and settings that were previously on the device ...

Страница 52: ...ernal storage It shows the name of the file its duration its size and the date the file was saved or the date of the file It is possible to rename or erase an audio file To change the file name To erase an audio file The audio track that is selected will be placed in the player on the LIVE menu ...

Страница 53: ...cord an audio file Select an audio file from a list and play it Adjust any of the three microphone input gain Schedule a timer To make a call press Then to hang up a call press At the start of a call the device will analyze the jitter buffer size The calibration is shown by this icon about 30 seconds When the calibration is finished the device will displays the status of the adaptive buffer size T...

Страница 54: ...elect the contact to receive In PROFILE select the audio quality profile that match with yours needs and the studio configuration Contact This page allows selecting a contact or creating a new one To modify a contact To erase a contact To create a new contact by an IP codec registration SIP or RTP press ...

Страница 55: ...splayed in the contact list SIP If YES Connection via SIP Server provides the most automated and comfortable way to establish a connection between codecs If NO The connection will be symmetric RTP SIP address The SIP address of the IP codec instance one per registration The address is sip_account_name sip_server_domain sip_server_port By Default SIP Server Port 5060 RTP address The address is remo...

Страница 56: ...This page allows selecting an audio profile or creating a new one To modify an audio profile To erase an audio profile To create a new audio profile press New Profile This page allows creating new audio profile Fill in the following information Codec Sample Rate Channels Mode Bite Rate FEC Dual Stream ...

Страница 57: ... be selected from the list box It can be different from the device s sampling frequency Channels Select if the audio stream encoding is stereo or mono Bit rate Bit rate of the encoded audio FEC Dual Stream A Forward Error Correction FEC can be selected FEC is a technique used to reduce data transmission errors on unreliable networks by sending additional information allowing to correct them It con...

Страница 58: ...IP steam is duplicated in a second IP stream Delay If dual stream is selected the duplicated stream can be delayed to offer time diversity When no delay is selected primary stream and redundant stream are sent at the same time When a delay is selected redundant stream is delayed compared to the primary stream from 100 ms to 1000 ms Click on APPLY before leaving the page to save the changes ...

Страница 59: ... to record in an audio file the TX program output It is not necessary to be in communication to make a sound recording From this page a journalist can Record an audio file Select an audio file from a list and play it Adjust the three microphone input gain Schedule a timer ...

Страница 60: ...60 7 SPECIFICATIONS ...

Страница 61: ...described below Step 1 Download the new firmware in your user zone or one of our links sent by email Step 2 Make sure IQOYA TALK is connected to mains making a firmware update on battery power is strongly not recommended Step 3 Connect your IQOYA TALK to your computer using the supplied USB cable Step 4 A pop up message will be displayed on the screen of your IQOYA TALK to accept to share data bet...

Страница 62: ...te the downloaded file into the Firmware Update folder of the IQOYA TALK storage Step 8 Disconnect the USB cable when the transfer completed Make sure to always eject the drive from the operating system before disconnecting the USB cable Step 9 After disconnect the USB cable click on NOW option to launch the update process The update step can take up to 5 minutes ...

Страница 63: ...mponents are of quality the less latency you will encounter nevertheless In case your network presents disturbances IQOYA TALK allows you to Absorb the network jitter by choosing an appropriate buffer size Choose a FEC scheme to make your stream resilient to packet loss with the AAC option choose an AAC with error resilience making the coding itself more robust against errors However keep in mind ...

Страница 64: ...streams audio FEC 50 bandwidth additional delay of 1 frame recovers 1 lost packet over 2 consecutive packets 33 bandwidth recovery 1 out of 3 2 streams audio FEC 33 bandwidth additional delay of 2 frames recovers 1 lost packet over 3 consecutive packets 20 bandwidth recovery 1 out of 5 2 streams audio FEC 20 bandwidth additional delay of 4 frames recovers 1 lost packet over 5 consecutive packets 1...

Страница 65: ...the duplicate stream compared to the primary stream Although the primary stream and the FEC stream are configured to use different networks it is quite common that some network components are common to both networks last mile router for instance The selected delay avoids that temporary failures occurring on common network components impact both a primary frame and its duplicate frame Multicast and...

Страница 66: ...codes the stream or a multicast address Select the IP interface used to send the FEC stream Notes When in band audio format signaling is enabled FEC stream is sent to the same IP address as the primary stream and on UDP port 2 When in band audio format signaling is disabled it is possible to define the destination address and port of the FEC stream ...

Страница 67: ...nu responsable pour toute faute de frappe erreur ou omission et se réserve le droit d apporter des modifications et des améliorations sans préavis Digigram et le logo Digigram IQOYA sont des marques déposées ou des marques commerciales de Digigram Digital Toutes les autres marques sont la propriété des sociétés respectives Copyright 2020 Digigram All rights reserved No portion of this manual may b...

Страница 68: ...68 END ...

Отзывы: