Digichain Electronics MUH88A-H2 Скачать руководство пользователя страница 23

4K 8x8 HDMI2.0 Matrix Switcher 

18 

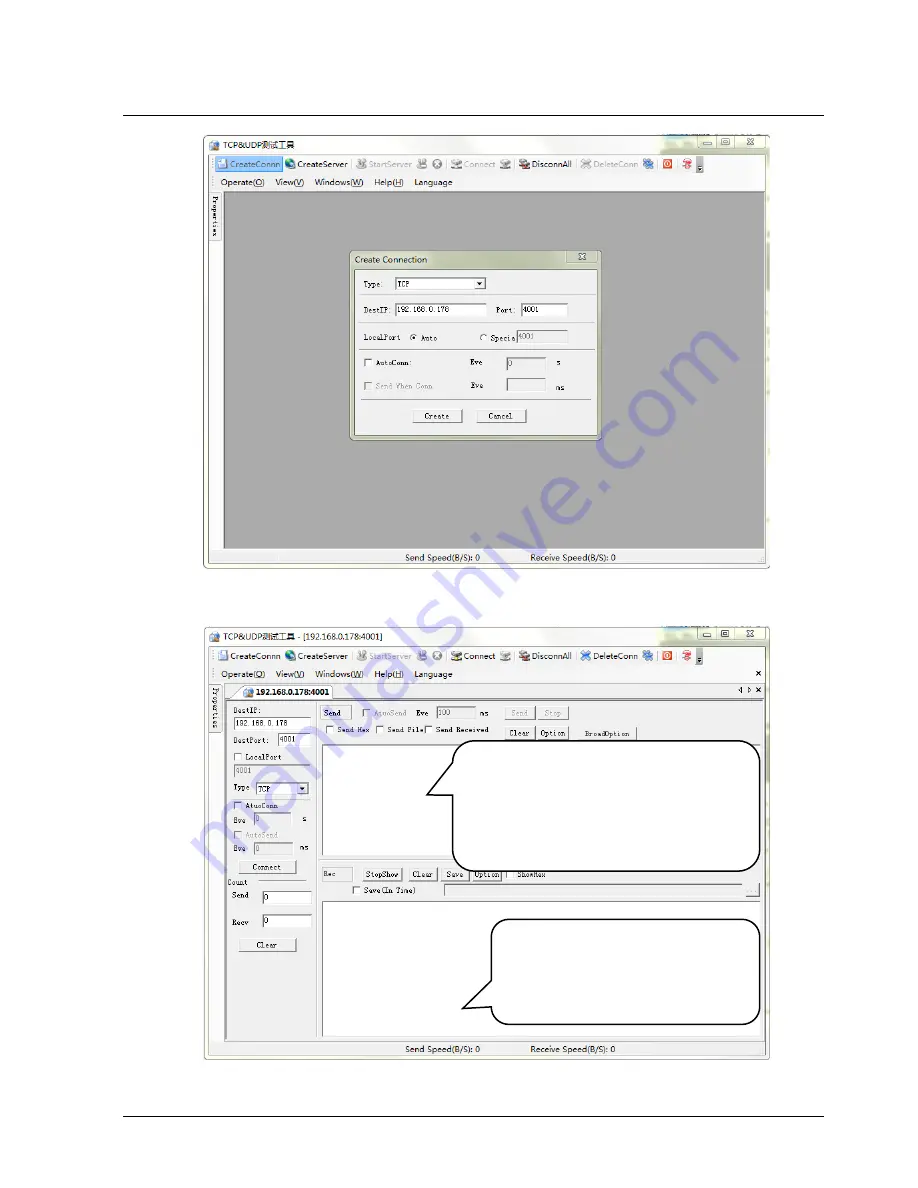
Figure 7-3 Connect to TCPUDP 

2)

Enter commands in designed area to control MUH88A-H2, see as below:

Figure 7-4 Control interface of TCPUDP 

Here you will receive the 
feedback after a command 
is sent. 

Enter your command here. 

Commands are the same with 
RS232 commands listed in 

6.3 

RS232 Communication 
Commands

Содержание MUH88A-H2

Страница 1: ...MUH88A H2 4K 8x8 HDMI2 0 Matrix Switcher User Manual ...

Страница 2: ...uipment generates uses and can radiate radio frequency energy and if not installed and used in accordance with the instructions may cause harmful interference to radio communications It has been tested and found to comply with the limits for a Class B digital device pursuant to part 15 of the FCC Rules These limits are designed to provide reasonable protection against harmful interference in a com...

Страница 3: ...e or install this product near water Do not put any heavy items on the extension cable in case of extrusion Do not remove the housing of the device as opening or removing housing may expose you to dangerous voltage or other hazards Install the device in a place with fine ventilation to avoid damage caused by overheat Keep the module away from liquids Spillage into the housing may result in fire el...

Страница 4: ...ications 5 4 Panel Button Control 6 4 1 I O connection switching 6 4 2 EDID Configuration 6 4 3 I O connection Inquiry 7 5 IR Control 8 6 RS232 Control 9 6 1 Installation uninstallation of RS232 Control Software 9 6 2 Basic Settings 9 6 3 RS232 Communication Commands 10 6 3 1 System Commands 10 6 3 2 Lock unlock Commands 11 6 3 3 Switching Commands 11 6 3 4 Scene Commands 13 6 3 5 HDCP Compliance ...

Страница 5: ... 3 2 I O connection switching 21 7 3 3 EDID Configuration 22 7 3 4 Audio Output 24 7 3 5 Status Setting 24 7 3 6 Network Configuration 26 7 3 7 Password Modification 27 7 4 TCP IP Configuration 28 7 5 GUI Update 28 8 Firmware Upgrade through USB port 29 9 Specification 30 10 Panel Drawing 31 11 Troubleshooting Maintenance 32 12 After sales Service 34 ...

Страница 6: ...HDCP2 2 compatible and is backward compatible to the earlier versions Transmits 4Kx2K 60Hz 4 4 4 signal up to 16 4 feet 5m via HDMI port Provides powerful EDID management built in EDID can be invoked via DIP switcher on rear panel RS232 command or web based GUI Controllable via front panel button IR RS232 TCP IP or web based GUI LCD screen shows real time I O connection status Convenient firmware ...

Страница 7: ... selector button Total 8 input selector buttons press one of buttons to switch input source OUTPUT selector button Total 8 output selector buttons press the buttons to select output channel Pictures shown in this manual are for reference only 2 2 Rear Panel Figure 2 2 Rear Panel No Name Description INPUTS HDMI input ports 8 in total connect with HDMI INPUTS OUTPUTS FIRMWARE 1 2 3 4 5 6 7 8 1 2 4 6...

Страница 8: ...EDID data 1 stands for On 0 stands for Off Refer to 4 2 EDID Configurarion for more detials RS232 Serial control port connect with control device IR IN Connects with external IR receiver for using the IR remote to control the Matrix Switcher TCP IP TCP IP port for unit control DC 24V Connect with 24VDC 2 71A power adaptor Ground Connect to ground Pictures shown in this manual are for reference onl...

Страница 9: ...DMI cables Step2 Connect HDMI displays e g HDTV Projector to HDMI output ports with HDMI cables Step3 Connect speakers amplifiers to the SPDIF audio outputs with Toslink cables Step4 Connect the RS232 ports of control device e g Central Control System PC and MUH88A H2 to enable serial control ON DIP TCP IP IR IN RS232 Tx Rx On Off 1 2 3 4 1 0 EDID 1 2 3 4 5 6 7 8 1 2 3 4 5 6 7 8 SPDIF SPDIF SPDIF ...

Страница 10: ...When connecting to HDMI2 0 sources make sure the HDMI cable is compliant with HDMI2 0 to ensure reliable transmission 2 Connect amplifiers that are capable to decode HDMI audio to the SPDIF ports or there will be no output on the amplifiers 3 4 System Applications As its good performance in control and transmission the MUH88A H2 can be widely used in computer realm monitoring large screen displayi...

Страница 11: ...one then it will be off If the conversion failed they will be off immediately 4 2 EDID Configuration The rear panel boasts a 4 pin EDID DIP switcher to manage EDID The EDID data and its corresponding DIP switcher status are shown in the below list DIP Switcher NO Status EDID 0 0000 Pass though default 1 0001 720P 2D Pass though CH 2 0010 720P 3D Pass though CH 3 0011 1080P 2D Pass though CH 4 0100...

Страница 12: ...4K 8x8 HDMI2 0 Matrix Switcher 7 4 3 I O connection Inquiry Press OUTPUTS button 1 2 3 4 5 6 7 or 8 to inquiry its corresponding input and then the indicator of the input button will turn green ...

Страница 13: ...el selection buttons same with the corresponding front panel buttons Menu buttons ALL Select all inputs outputs To convert an input to all outputs Example Input 1 to all Outputs Press INPUTS 1 ALL ENTER EDID management button 1 One input port learns the EDID data from one output port Example Input 2 learns EDID data from output 4 Press EDID INPUTS 2 OUTPUTS 4 ENTER 2 All input ports learn EDID dat...

Страница 14: ...stly connect MUH88A H2 with necessary input devices and output devices Then connect it with a PC installed RS232 control software Double click the software icon to run this software Here we take the software CommWatch exe as example The icon is showed as below Figure 6 1 Icon of CommWatch The interface of the control software is showed as below Figure 6 2 Control Interface of CommWatch Parameter C...

Страница 15: ...erations 4 Dial the EDID switcher to 1111 before sending commands pertaining to software EDID management with grey background Baud rate 9600 Data bit 8 Stop bit 1 Parity bit none 6 3 1 System Commands Command Function Feedback Example Type Query the model MUH88A H2 Version Query the version of firmware VX X X Demo Switch to the demo mode convert input and output in turn like1B1 1B2 4B3 4B4 1B1 and...

Страница 16: ...dback Example x All Transfer signals from the input channel x to all output channels X To All X 01 08 All Transfer all input signals to the corresponding output channels respectively like 1 1 2 2 All Through All Switch off all the output channels All Closed x Transfer signals from the input channel x to the output channel x X Through X 01 08 x Switch off the output channel x X Closed X 01 08 x Swi...

Страница 17: ...1 02 03 04 Connect Y N Y Y In 05 06 07 08 Connect Y Y Y N 9972 Query the connection status of the outputs Out 01 02 03 04 Connect Y Y Y Y Out 05 06 07 08 Connect Y Y Y Y 9975 Query the I O connection status Out 01 02 03 04 In 03 03 03 03 Out 05 06 07 08 In 03 03 03 03 9976 Query the output resolution Resolution Out 1 3840x2160P Out 2 3840x2160P Out 3 3840x2160P Out 4 3840x2160P Out 5 3840x2160P Ou...

Страница 18: ...for output X 1 8 is the number of the port if the X ALL it means all ports Z is for HDCP compliant status the value may be 1 HDCP compliant or 0 not HDCP compliant Y X Z 0801 Auto HDCP management activate carrier native mode 0801 9973 Query the HDCP status of the input signals In 01 02 03 04 HDCP Y N Y N In 05 06 07 08 HDCP Y Y Y N 9974 Query the HDCP status of the output signals Out 01 02 03 04 H...

Страница 19: ...ctory default EDID data for each input EDIDMInit EDIDM X B Y Manually EDID switching Enable input Y to learn the EDID data of output X If the EDID data is not available then set it as initialized EDID data EDIDM X B Y EDID x y Set the EDID data of input port x to built in EDID No y y 0 11 correspond to the 12 embedded EDID data separately EDID x y EDIDUpgrade x Upgrade EDID data via the RS232 port...

Страница 20: ...utput port x X 1 8 enable the port x X 9 enable all ports DigitAudio ON with x ALL Outputs DigitAudioOFF x Disable SPDIF audio output port x X 1 8 disable the port x X 9 disable all ports DigitAudio OFF with x ALL Outputs 9977 Query the status of digital audio of output channels Out 01 02 03 04 Audio Y Y Y Y Out 05 06 07 08 Audio Y Y Y Y ...

Страница 21: ...CP IP port of the MUH88A H2 and set its network segment to the same as the default IP of the MUH88A H2 192 168 0 178 Figure 7 1 Modify the IP of PC Controlled by PC s in LAN The MUH88A H2 can be connected with a router to make up a LAN with the PC s this make it able to be controlled in a LAN When control just make sure the MUH88A H2 s network segment is the same with the router Please connect as ...

Страница 22: ... Set the PC s network segment to the original one Step5 Connect the MUH88A H2 and PC s to the router In the same LAN each PC is able to control the MUH88A H2 asynchronously Then it s able to control the device via a TCP IP communication software 7 2 TCP IP Communication Software Control Exampled by TCPUDP software 1 Connect a computer with TCPUDP software to MUH88A H2 Open the TCPUDP software or a...

Страница 23: ...er commands in designed area to control MUH88A H2 see as below Figure 7 4 Control interface of TCPUDP Here you will receive the feedback after a command is sent Enter your command here Commands are the same with RS232 commands listed in 6 3 RS232 Communication Commands ...

Страница 24: ...ing Windows XP system may occur issues in finding UPnP icon follow these steps to switch on UPnP protocol 1 Add UPnP component go to Control Panel double click Add Delete Programs double click Add Delete windows component tick UPnP click Next click OK 2 Enable Windows Firewall go to Control Panel double click Windows Firewall click Others tick UPnP framework 3 Enable UPnP auto starting go to Contr...

Страница 25: ...e admin Password admin default setting User mode User name user Password user default setting NOTE Log in as admin can access more configuration interfaces than user Here is a brief introduction to the interfaces 7 3 1 Scene Setting Type the user name admin password admin and then click LOGIN it will show the Scene menu as shown below ...

Страница 26: ...n scenes are shown in above interface Select a scene and then click Load can invoke the selected scene Click Cancel to cancel the current operation 7 3 2 I O connection switching Click to enter the following interface it provide intuitive I O connection switching ...

Страница 27: ...right bottom corner provides quick saving and recall for overall connection status For example Step1 Select button1 at INPUT column Step2 Select button 2 3 and 4 at OUTPUT column If all OUTPUT ports in needed you only need to click All Step3 Choose a scene that you want to save Step4 Click Confirm to save the setting or Click Clear to clear set up 7 3 3 EDID Configuration 1 Click setting button to...

Страница 28: ...witcher 23 Figure 7 8 Embedded EDID All embedded EDID of MUH88A H2 are shown in the above interface User can select EDID in accordance with actual needs 2 Select EDID Copy to enter the following interface Figure 7 9 Copy EDID ...

Страница 29: ... inputs all input devices will copy the EDID from output device Step3 Click Confirm to save the setting or click Cancel to cancel operation 7 3 4 Audio Output Select Audio Out to enter the following interface to turn on off the Audio Output Figure 7 10 Audio Out 7 3 5 Status Setting Product Name Model Click Status to enter the following interface to modify the name and mode of this machine and the...

Страница 30: ...4K 8x8 HDMI2 0 Matrix Switcher 25 Figure 7 11 Status LCD Button label Select Button to enter the following interface to modify the name of buttons Figure 7 12 Status Button ...

Страница 31: ...to enter the following interface to modify the name of scenes Figure 7 13 Status Scene 7 3 6 Network Configuration Click Network to enter the following interface to inquire and configure network settings including MAC address IP address subnet mask and Gateway ...

Страница 32: ...4K 8x8 HDMI2 0 Matrix Switcher 27 Figure 7 14 Network 7 3 7 Password Modification Click Password to enter the following interface to inquire and modify the admin or user password Figure 7 15 Password ...

Страница 33: ... changeable in your browser Enter correct username and password to log in the WebServer Username admin Password admin Here is the main configuration interface of the WebServer Figure 7 16 TCP IP Configuration 7 5 GUI Update GUI for MUH88A H2 supports online update in http 192 168 0 178 100 Type the username and password the same as the GUI log in settings modified password will be available only a...

Страница 34: ...8A H2 to enter upgrade mode Press and hold button 2 3 when rebooting The power indicator will keep blinking in upgrade mode Step3 Double click the icon of upgrade software DfuSe Demonstration see the figure below Figure 8 1 Icon of DfuSe Demonstration It will pop up the following window Figure 8 2 Upgrade firmware via DfuSe Demonstration Step4 Click Choose to load desired upgrade file dfu Step5 Cl...

Страница 35: ...2 Control Connector 3 5mm mini jack female RJ45 3 pin pluggable terminal block Video Signal HDMI2 0 HDCP2 2 Audio Signal Dolby Digital DTS DTS HD General EDID Management In built EDID data and manual EDID management Resolution Range 640x480 60Hz 4Kx2K 60Hz 4 4 4 1080P 3D HDMI Cable Length 5m Power Supply 24VDC 2 71A Power Consumption 21W Dimension W H D 437mm 44mm 236 5mm Weight 1 82Kg Temperature...

Страница 36: ...el Drawing ON DIP TCP IP IR IN RS232 Tx Rx On Off 1 2 3 4 1 0 EDID 1 2 3 4 5 6 7 8 1 2 3 4 5 6 7 8 SPDIF SPDIF SPDIF SPDIF SPDIF SPDIF SPDIF SPDIF DC 24V INPUTS OUTPUTS CONTROL INPUTS OUTPUTS FIRMWARE 1 2 3 4 5 6 7 8 437 mm 44 mm 23 mm 32 mm ...

Страница 37: ...liance is switched off Send command x 1 to change HDCP compliance status The display doesn t support the input resolution Switch for another input source or enable the display to learn the EDID data of the input No output on the amplifiers connected to audio output ports The amplifiers are not able to decode HDMI audio Change for amplifiers that are capable to decode HDMI audio Cannot control the ...

Страница 38: ...not control the device by control device e g a PC through RS232 port Wrong connection Check to ensure the connection between the control device and the unit Wrong RS232 communication parameters Type in correct RS232 communication parameters Baud rate 9600 Data bit 8 Stop bit 1 Parity bit none Broken RS232 port Send it to authorized dealer for checking Static becomes stronger when connecting the vi...

Страница 39: ...ered or removed from the product Damage deterioration or malfunction caused by Normal wear and tear Use of supplies or parts not meeting our specifications No certificate or invoice as the proof of warranty The product model showed on the warranty card does not match with the model of the product for repairing or had been altered Damage caused by force majeure Servicing not authorized by Digichain...

Отзывы: