Digi-Frame DF-560 Скачать руководство пользователя страница 16

28

29

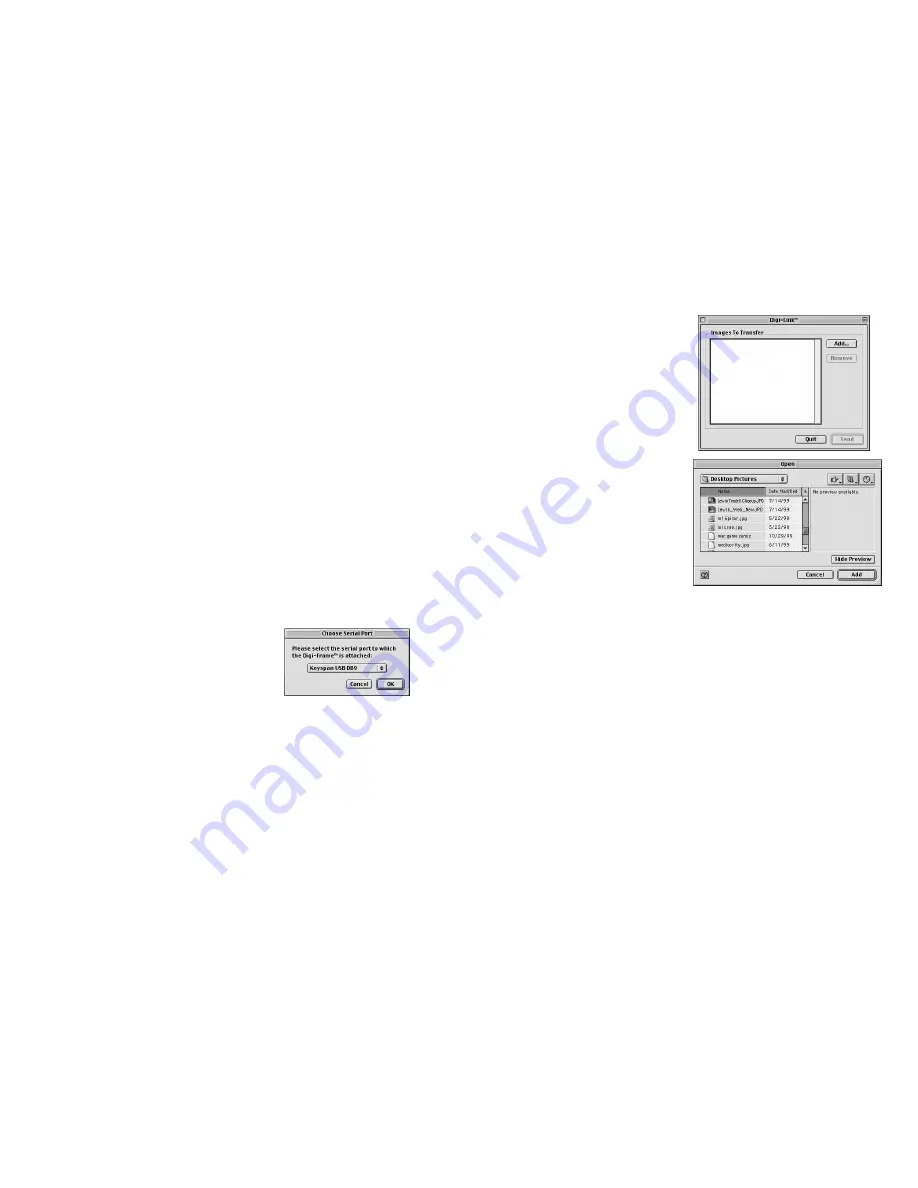
Click on the Add... button, locate the
JPEG image that you want to down-
load to the Digi-Frame™. Select the
JPEG image and click the Add but-
ton. This returns you to the Images
To Transfer window, with your select-
ed image displayed in the window.

Digi-Link™ also supports “drag and
drop.”
Find the icon for the JPEG image
that you want to include in the
Slideshow.
Drag the icon from the desktop or
any finder window to the “Images
To Send” window.
The name of the image will appear
in the list.
The original file will remain in the
folder where it was.

Repeat this process until you have
selected all of the JPEG images that
you wish to download.

Removing images from the Images To Transfer list:

Click on the name of the file to Select the JPEG file that you wish to
remove.
Once it is highlighted, click on the Remove button to remove the JPEG
Image from the list of images to transfer to the Digi-Frame™.

Sending pictures to the Digi-Frame™:

Once all of the JPEG images are listed in the Images To Transfer window;
click the Send button to transfer the images to the Digi-Frame™.

Quitting Digi-Link:

Choosing quit from the File menu will quit the Digi-Link program.
Clicking on the close window box in the upper left corner will also quit the
Digi-Link Program.

IMPORTANT:

Be sure to transfer all of the images that you want to trans-

fer before quitting Digi-Link. Digi-Link does not save the list of items in the
“Images To Transfer” box. 
The JPEG files on your Macintosh® will be left untouched.

For Macintosh®:

Installing Digi-Link™:

Place the Digi-Link CD that comes with the Digi-Frame™ in your PC’s CD-
ROM drive.

Double click on the Digi-Link CD.

Read the “Read Me” file for last-minute information that may not be includ-
ed in this manual.

Double click the folder “Macintosh®” to open it.

Drag the Digi-Link program to whatever folder you would like to install it in
on your Hard drive. 

Running the Digi-Link Software:

Double click the Digi-Link icon.
Click on the Digi-Link Splash screen to continue.
Digi-Link will Automatically scan to see if the Digi-Frame™ is connected to
the selected serial port.
A window labeled Images To Send will appear. This is the primary control
for Digi-Link Software.

Choosing the Modem or Printer Port:

Digi-Link needs to know which port you have connected the Digi-Frame™
to in order to transfer digital pictures to it.

Run the Digi-Link software.

Click on the File menu.
Drag the mouse until Choose Port... is selected.
Release the mouse to select Choose Port.

A new dialogue box will appear that says:
Please select the serial port to which the Digi-Frame™ is attached.
Choose the port from the pull down menu.
Click OK

Transferring pictures to the Digi-Frame™:

Connect the serial end of the Digi-Link serial cable to the printer or modem
port on your mac.; then connect the other end to the Digi-Link port on
your Digi-Frame™.

Double Click the Digi-Link icon to run the program.

You will see a window called Images To Transfer.

Содержание DF-560

Страница 1: ...User Manual Model DF 560 ...

Страница 2: ...mory Storage Cards CompactFlash Cards SmartMedia Cards Self Demonstration Mode Connecting Digi Frame to your desktop PC Easy to use controls The Menu System Quick View Preferences Slideshow Setup Advanced Slideshow Setup Picture Orientation Tools Exit Tips Tricks Digi Link PC software For IBM Compatible PCs For Macintosh Upgrading Digi Frame Software Troubleshooting Technical Specifications Conten...

Страница 3: ...io feedback Menu commands and other actions are confirmed with audi ble tones Introduction Feature List 2 Your Digi Frame can be used in a variety of ways Camera Images Direct to Digi Frame This is the simplest way to use your Digi Frame Take a picture with your digital camera remove the memory card from the camera insert it into your Digi Frame and view your pictures E mail Images When you receiv...

Страница 4: ...chase via download from our website Check the website or your retailer for availability information Important information about the Screen The backlight of the display panel in your Digi Frame has a minimum life expectancy of at least 10 000 hours This is equivalent to about 14 months of con tinuous 24 hour usage To prolong the life of your Digi Frame s display we suggest turning it off when not i...

Страница 5: ...he Digi Frame to your PC or Macintosh by attaching the serial link cable between this socket and the computer s serial COM port Power Supply Jack Connects to Digi Frame Power Adapter that plugs into the wall Power Switch Turns the Digi Frame on and off Always turn off the Digi Frame before inserting or removing memory cards Rotating Stand Supports the Digi Frame for tabletop use it can rotate to s...

Страница 6: ...ame at several viewing angles choose the one that looks best Orientation of the Digi Frame may be changed at any time the Digi Frame will automatically display your slideshow properly The Logo can be rotated to match the current orientation of the Digi Frame 9 Getting Started Unpacking your Digi Frame The DF 560 includes o Digi Frame Electronic Digital Picture Frame o Three different interchangeab...

Страница 7: ...the lever is pressed inside the body of the Digi Frame gently pull the card free 11 Connecting Digi Frame to the Power Supply The Digi Frame runs on AC power from an ordinary wall outlet Use only the Supplied Digi Frame external Power Supply connected to a grounded three prong outlet Other power adapters may cause damage to the Digi Frame Before connecting the power supply make sure the Digi Frame...

Страница 8: ...our Macintosh computer Attach the Digi Frame connector to the Digi Link port on the Digi Frame serial connector Digi Frame connector The Digi Link Cable 13 SmartMedia Cards To insert the SmartMedia card Make sure the Digi Frame is off Insert the card with the gold contacts facing toward the front of the Digi Frame notched end first Do not force the card into the slot To remove the SmartMedia card ...

Страница 9: ...Show Digi Frame Menu System 15 Easy to use controls The icon based menus on the Digi Frame are controlled by a group of three buttons and a wheel Except for the Power Switch all of the controls are located on one side of the Digi Frame It is the top in landscape mode and the right side in portrait mode The Menu Wheel Click the Menu Wheel at any time to enter the control menu From this menu you can...

Страница 10: ...w to appear as if seen through an infra red camera Random A Special effect from the list above is selected randomly for each picture in the Sideshow 17 Preferences The Preferences sub menu allows you to select and change many of the features of your Digi Frame Rotate the wheel to highlight the feature you want to change As each feature is selected its current setting becomes visible To change the ...

Страница 11: ...lideshow This option removes all pictures from the current slideshow It does not delete any pictures off the card it simply clears out the slideshow so you can start over with adding pictures in the order you prefer Add All To Slideshow Selecting this option will add all pictures on inserted cards to the current slideshow 18 19 Slideshow Setup The Slideshow Setup screen is where you select which o...

Страница 12: ...ute the currently highlighted func tion pressing will exit the Tools menu and return to slideshow mode Clean Up Card This function frees up as much space as possible on your card by deleting thumbnail cache files old software updates and other files which Digi Frame may have added to your card Removing thumbnail cache files will slow down opera tion of the Quick View Picture Orientation Slideshow ...

Страница 13: ...your pictures for display on Digi Frame The screen resolution of the Digi Frame is 640 x 480 pixels Displaying images larger than this will not increase detail or resolution when displayed on the Digi Frame Shooting pictures at 640 x 480 or adjusting the resolution in image manip ulation software down to this size will increase the number of pictures that can be stored on a Memory Storage Card It ...

Страница 14: ...the back of most IBM com patible computers The serial connector also connects to the included Macintosh adapter that connects to the Printer Port or Modem port on many Macintosh computers A serial to USB adapter is needed to connect the Digi Frame to the USB ports used on many newer IBM compatible and Macintosh products The Digi Frame connector connects to the Digi Link port on the Digi Frame For ...

Страница 15: ...ntouched For IBM Compatible PCs Installing Digi Link Place the Digi Link CD that comes with the Digi Frame in your PC s CD ROM drive Open the Digi Link CD Read the Read Me file for last minute information that may not be includ ed in this manual Open the Folder PC Drag the Digi Link icon to wherever you want to save it on your hard drive Running Digi Link Software Left click on the Digi Link Icon ...

Страница 16: ...k does not save the list of items in the Images To Transfer box The JPEG files on your Macintosh will be left untouched For Macintosh Installing Digi Link Place the Digi Link CD that comes with the Digi Frame in your PC s CD ROM drive Double click on the Digi Link CD Read the Read Me file for last minute information that may not be includ ed in this manual Double click the folder Macintosh to open...

Страница 17: ... pictures A Your camera may not be storing pictures in standard MS DOS compatible format Please contact Digi Frame customer support to see if there is a software upgrade available to support your camera s storage format Some cards shipped with digital cameras have unusual formats These cards may cause all sorts of problems in a Digi Frame If you are having difficulty displaying pictures you should...

Страница 18: ... and 5V SmartMedia are supported File System MS DOS compatible File Format JPEG JFIF and Exif JPG Resolution 640 x 480 logical resolution Larger pictures are automatically scaled to fit screen Color Depth Thousands of colors Serial Connection RS 232 RS 422 compatible Power 12V 0 5A 5V 1 5A DC AC adapter 100 240 VAC 60 Hz 13 5w Dimensions 6 7 x 9 0 x 1 7 in 170 x 228 x 43 mm w h d Mass 800g 28 oz E...

Страница 19: ...8 Port Chester NY 10573 Customer Service 1 800 771 5476 Customer Service custservice digi frame com Technical Support techsupport digi frame com Email info digi frame com Website www digi frame com Copyright 2000 Digi Frame Inc 560UM 3 7 18 00 ...

Отзывы: