background image

17

16

The Digi-Frame™ Menu System:

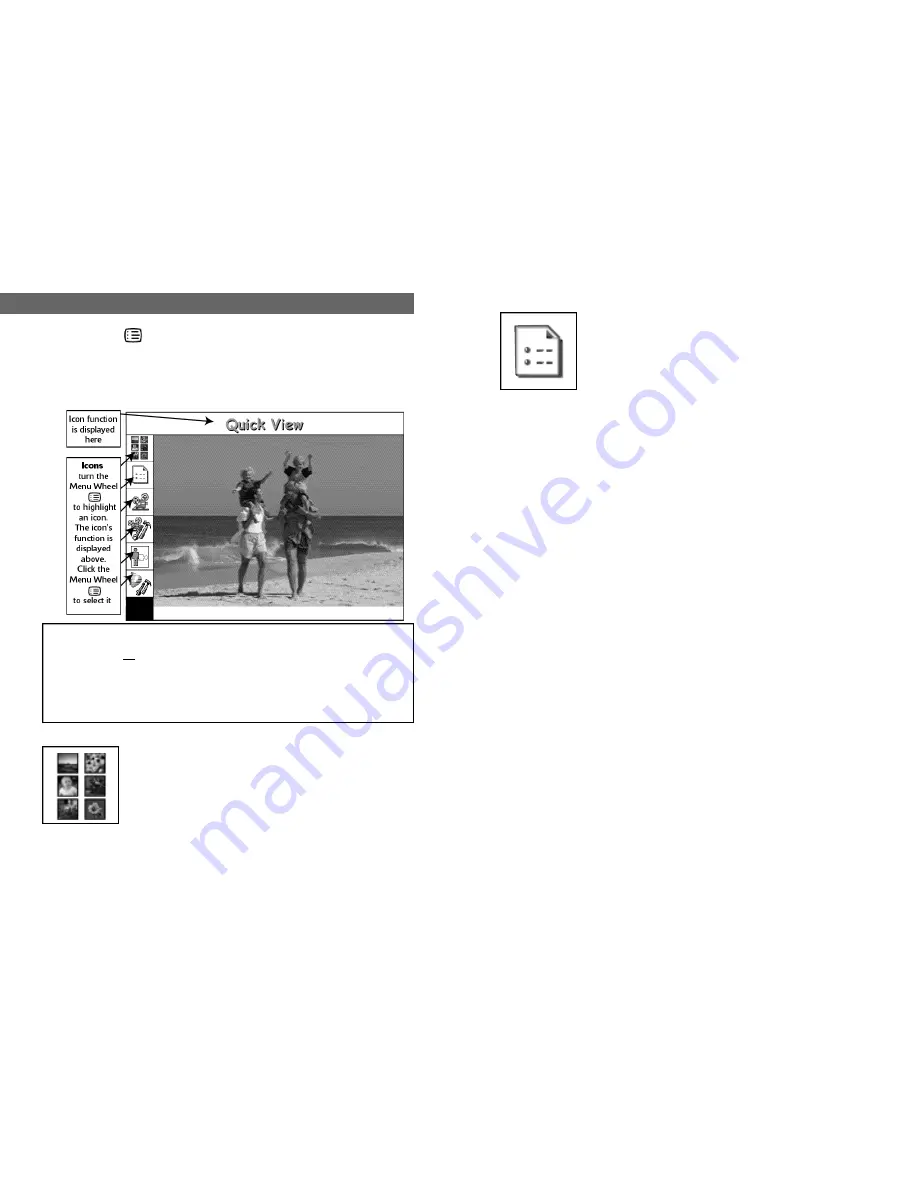
Clicking the       Menu Wheel during the slide show takes you to the
menu system. A list of icons is shown at the left-hand side of the screen,
and the icon’s function is displayed across the top of the screen. Rotating
the Menu Wheel highlights each icon in turn. Click the wheel to enter a
sub-menu for the selected icon. Press (

;

) to exit the menu system and

return to Slide Show at any time. 

Quick View:

Quick View shows a small "thumbnail" for each image on the
memory cards currently inserted. Rotate the wheel to high-
light the desired image, then click the wheel to "zoom in" on
the highlighted image. Click the wheel again to return to the
Quick View screen. If more images are stored than will fit on
the screen at one time, keep rotating the wheel past the last
thumbnail, and the thumbnails will scroll to reveal more
images. Clicking the forward button will select the picture
immediately below the currently selected picture,  the back
button will select the picture immediately above the selected
picture.

Press (

;

) to exit Quick View and return to the Slide Show.

Digi-Frame™ Menu System

Important!

On any menu that has thumbnail images, you cannot select pic-
tures until all of the thumbnails are drawn.

Note that in screens involving thumbnail images the thumbnails will take
a few moments to draw the first time. Once they’ve been drawn in any
menu screen, they will redraw rapidly the next time they’re used in a
menu screen.You may also have your Digi-Frame generate all of the
thumbnails at once by selecting “Optimize Card” from the “Tools” menu.

Preferences:

The Preferences sub-menu allows you to select and change
many of the features of your Digi-Frame™. Rotate the wheel
to highlight the feature you want to change. As each feature is
selected, its current setting becomes visible. To change the
current setting, click the wheel again. The setting information’s
color will change to yellow. Rotate the wheel to view the vari-
ous choices for that feature. Click the wheel again to select the
setting you want. Press Play/Pause (

;

) at any time to return

to the slideshow, the new preferences are saved automatically.

Transition Effect:

Your Digi-Frame™ features a number of interesting transitions between
images. Here are some examples. The transitions in your Digi-Frame™
may differ from those listed below depending on the version of software
shipped with your Digi-Frame™. Check our website for software upgrades.

Wipe:

The screen is filled with black, then the new image "wipes" down from the top of the
screen.

Scattered Slides:

Images are reduced in size and displayed at random positions on the screen, for a
pleasing “varying border” effect.

Light Box:

Images are reduced and displayed as in Scattered Slides mode, but one on top of
another. As each successive image is displayed, the ones in the background become
dimmer and dimmer.

Black Stripes:

The old image is overwritten with stripes, then the new image wipes down from the
top.

Bouncing Thumbnails:

A random selection of thumbnails from stored images is shown bouncing around the
screen for a few seconds between images.

Fade Out:

The current image quickly darkens to black, the next image in the show then wipes
down to replace it.

Dissolve:

The current picture dissolves into the next picture in the slideshow.

Mosaic:

Large chunks disappear, revealing the next picture in the slide show.

Secret panels:

Panels slide to reveal the next picture in the slideshow.

Random:

A transition effect from the list above, is selected randomly between each picture.

Содержание DF-390

Страница 1: ...User Manual Model DF 390 ...

Страница 2: ... Self Demonstration Mode Connecting Digi Frame to your desktop PC The Batteries Charging the Batteries Changing the Batteries The Menu System Quick View Preferences Slideshow Setup Advanced Slideshow Setup Picture Orientation Tools Exit Tips Tricks Digi Link PC software For IBM Compatible PCs For Macintosh Upgrading Digi Frame Software Troubleshooting Technical Specifications 1 2 3 5 6 7 7 8 8 9 1...

Страница 3: ...a card of great works of art profes sionally photographed landscapes sports heroes you name it The image col lections will also be available for purchase via download from our website Check our website or your retailer for availability information Ways to use your Digi Frame JPEG picture viewing View image files in the popular JPEG image format used by most digital cameras Picture files may be any...

Страница 4: ...ff Digi Frame before inserting or removing cards Digi Link port Connect the Digi Frame to your PC or Macintosh by attaching the serial link cable between this socket and the computer s serial COM port Power Supply Jack Connects to the Digi Frame charging adapter that plugs into the wall Battery Door Remove to change the batteries Power Switch Turns the Digi Frame on and off Always turn off the Dig...

Страница 5: ...re Frame o Executive carrying case o External power supply 100 240 VAC 50 60 Hz o Macintosh PC compatible serial cable Digi Link cable o Digi Link Macintosh PC compatible software on CD ROM o Quickstart Card o User Manual Make sure all of these parts are included before continuing If something is missing contact customer service 1 800 771 5476 Using your Digital Camera with Digi Frame MOST IMPORTA...

Страница 6: ...omatically display your slideshow properly The Digi Frame logo can be rotated to match the current orientation of the Digi Frame Easy to use controls The icon based menus on the Digi Frame are controlled by a group of three buttons and a wheel Except for the Power Switch all of the controls are located on one side of the Digi Frame It is the top in landscape mode and the right side in portrait mod...

Страница 7: ...igi Frame It has two positions On and Off Inserting Memory Storage Cards The Digi Frame 390 is designed to read either SmartMedia or Compact Flash memory storage cards Turn the Digi Frame off before inserting or removing Memory Storage Cards Both kinds of cards may be inserted into the Digi Frame at the same time If no memory storage cards are inserted or if no pictures are found on the card the D...

Страница 8: ...gi Frame Connecting to a Macintosh compatible computer Attach the Macintosh adapter to the serial end of the Digi link cable Attach the Macintosh adapter to either the Printer or Modem port on the back of your Macintosh computer Attach the Digi Frame connector to the Digi Link port on the Digi Frame serial connector Digi Frame connector The Digi Link Cable Charging the batteries The DF 290 runs on...

Страница 9: ...its built in charging circuitry are designed to provide maximum operating time and charge discharge cycles Please note the following important points 1 Your Digi Frame begins a charging cycle each time the power adapter is plugged into the unit The charging circuit will charge the batteries until a full charge is detected or until a period of approximately three and one half hours has passed after...

Страница 10: ...features of your Digi Frame Rotate the wheel to highlight the feature you want to change As each feature is selected its current setting becomes visible To change the current setting click the wheel again The setting information s color will change to yellow Rotate the wheel to view the vari ous choices for that feature Click the wheel again to select the setting you want Press Play Pause at any t...

Страница 11: ...ck and White This displays all of the pictures in the slideshow as black white pictures Sepia Tone This displays all of the pictures in the slideshow as warm brown old time photos Starlight This displays the pictures in the slideshow as if they were seen through light intensifier goggles Infra red This displays the pictures in the slideshow to appear as if seen through an infra red camera Random A...

Страница 12: ...ent slideshow It does not delete any pictures off the card it simply clears out the slideshow so you can start over with adding pictures in the order you prefer Add All To Slideshow Selecting this option will add all pictures on insert ed cards to the current slideshow Add Slides By Folder Some digital cameras allow you to store pictures in different folders on the card You can also organize your ...

Страница 13: ...image to finish you can then go back later and resume where you left off It sometimes takes as long as 15 seconds to register the abort com mand This is normal A progress bar is shown at the bottom of the screen and a thumbnail of the image currently being processed is shown in the center of the screen The progress bar is only an estimate of the time remaining actual time will very depending on th...

Страница 14: ...pixels Displaying images larger than this will not increase detail or reso lution when displayed on the Digi Frame Shooting pictures at 640 x 480 or adjusting the resolution in image manipulation software down to this size will increase the number of pictures that can be stored on a Memory Storage Card It will also speed decompression of the pictures improving slideshow performance Your Digi Frame...

Страница 15: ...k Digi Link does not save the list of items in the Images To Transfer box The JPEG files on your PC will be left untouched For IBM Compatible PCs Installing Digi Link Place the Digi Link CD that comes with the Digi Frame in your PC s CD ROM drive Open the Digi Link CD Read the Read Me file for last minute information that may not be included in this manual Open the Folder PC Drag the Digi Link ico...

Страница 16: ... transfer before quitting Digi Link Digi Link does not save the list of items in the Images To Transfer box The JPEG files on your Macintosh will be left untouched For Macintosh Installing Digi Link Place the Digi Link CD that comes with the Digi Frame in your PC s CD ROM drive Double click on the Digi Link CD Read the Read Me file for last minute information that may not be included in this manua...

Страница 17: ...camera may not be storing pictures in standard MS DOS compatible format Please contact Digi Frame customer support to see if there is a software upgrade available to support your cam era s storage format Some cards shipped with digital cameras have unusual formats These cards may cause all sorts of problems in a Digi Frame If you are having difficulty displaying pictures you should try for matting...

Страница 18: ...rtMedia are supported File System MS DOS compatible File Format JPEG JFIF and Exif JPG Resolution 640 x 480 logical resolution Larger pictures are automatically scaled to fit screen Color Depth Thousands of colors Serial Connection RS 232 RS 422 compatible Power 5V Regulated 2 8A AC adapter 100 240 VAC 50 60 Hz 13 5w Dimensions 5 6 x 4 5 x 1 5 in 143 x 114 8 x 40 mm w h d Mass 1 lb 0 45 kg with 4 ...

Страница 19: ... Port Chester NY 10573 Customer Service 1 800 771 5476 Customer Service custservice digi frame com Technical Support techsupport digi frame com Email info digi frame com Website www digi frame com Copyright 2000 Digi Frame Inc 390UM 3 6 7 18 00 ...

Отзывы: