background image

17

Before First Use

Inspect the attachment for any shipping damage. If damage does exist, do not operate until the damaged parts 

have been replaced or repaired.

Before Each Use

•  Make sure all the nuts and bolts are placed and properly tightened.

• 

Make sure that all other fasteners are in place and are performing their specified function.

• 

Make sure that all hydraulic fittings are tightened and there are no leaks in any fittings or hoses.

•  Make sure that all safety signs are in place, and are clean and legible.

•  Check for any oil leaks.

•  Ensure any damage or excessively worn parts are replaced.

• 

Always wear safety goggles or glasses when inspecting equipment.

This attachment is used by fitting it to your Digga planetary drive, which operates on hydraulic fluid under pressure. 

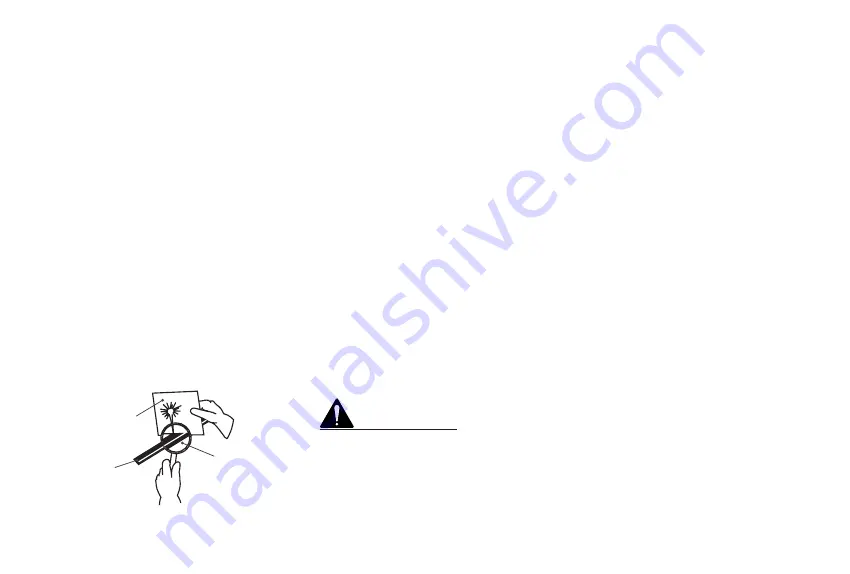
Escaping fluid under pressure can have sufficient force to penetrate the skin  causing serious personal injury. 

Fluid escaping from a very small hole can be almost invisible. Use a piece of cardboard or wood, rather than 

hands to search for suspected leaks 

(L)

. Keep unprotected body parts, such as  face, eyes, and arms as far away 

as  possible from a suspected leak. Flesh injected with hydraulic fluid may develop gangrene or other permanent 

disabilities.

Cardboard

Hydraulic Hose or 

Fitting

Magnifying Glass

(L)

This attachment operates on high pressure hydraulic fluid. 

Always wear eye protection when operating or performing 

maintenance on this attachment. If injured see a Doctor.

WARNING

8     Maintenance

Содержание MI-000011

Страница 1: ...PM 000044 A Operator s Manual CEMENT MIXER...

Страница 2: ...2 PM 000044 A Operator s Manual Cement Mixer August 2021...

Страница 3: ...eparation for Use 5 4 Safety Precautions General Information 7 5 Safety Working with the Attachment 12 6 Safety Decal Labels 12 7 Installation and Operating Instructions 13 8 Maintenance 17 9 Spare Pa...

Страница 4: ...able service Only minor maintenance such as visual checking is required to keep it in top working condition Be sure to observe all safety precautions and any maintenance procedures described in this m...

Страница 5: ...et the brake so the unit cannot roll CAUTION 3 Preparation for Use MODELS COVERED IN THIS MANUAL AGRICULTURE MODELS EXCAVATOR MODELS MINI LOADERS MODELS SKID STEER LOADER MODELS MI 000012 MI 000173 MI...

Страница 6: ...page of this manual which you may have ordered SR NO DESCRIPTION QUANTITY A Cement Mixer Bowl 01 B Cement Mixer Attachment Cradle Suitable for Skid Steer Loaders Optional 01 C Pins D Lynch Pins E J D...

Страница 7: ...o use your Digga attachment The DANGER designation indicates an imminently hazardous situation that if not avoided will result in death DANGER The WARNING designation indicates a potentially hazardous...

Страница 8: ...remove stripper with soap and water before welding Remove solvent or paint stripper containers and other flammable material from area Allow fumes to disperse at least 15 minutes before welding or hea...

Страница 9: ...tors helpers and other personnel working near cement mixer must wear steel toe safety shoes safety glasses and hard hats as a minimum Hearing protection respirators and personal protective clothing wi...

Страница 10: ...efore you start ensure correct assembly and installation of the attachment and never operate equipment that is not in proper working order Practice the operation of your new attachment and become fami...

Страница 11: ...on connecting and disconnecting hydraulic attachments Ensure that all parts meet the specifications for your Digga Auger drive when installing or replacing hydraulic hoses or fittings Do not lock the...

Страница 12: ...d each label is clean visible and legible To clean the decals use a soft cloth water and soap Avoid the use of solvents gasoline or other harsh chemicals as these may damage the decals If a label has...

Страница 13: ...ent mixer to dig and carry material or to lift heavy items Installation Instructions Remove the shipping banding from around the Cement mixer bowl and attachment cradle Remove any Digga augers from th...

Страница 14: ...uxiliary hydraulics to start the cement mixer before adding the material Add material to the rotating drum and leave the mixer running the entire time it contains cement Do not overload the Cement mix...

Страница 15: ...structions 7 Installation and Operating Instructions Installation Instructions Remove the shipping banding from around the Cement mixer bowl and Adaptor Remove any Digga augers from the auger drive un...

Страница 16: ...the Cement mixer 7 Installation and Operating Instructions Removal and Storage of Attachment Set the cement mixer bowl vertical open end on the ground and follow the standard shut down procedure in yo...

Страница 17: ...inspecting equipment This attachment is used by fitting it to your Digga planetary drive which operates on hydraulic fluid under pressure Escaping fluid under pressure can have sufficient force to pen...

Страница 18: ...a com Web www diggausa com EUROPE DIGGA EUROPE Unit 6 Smitham Bridge Road Hungerford Trading Estate Hungerford Berkshire RG17 0QU England United Kingdom Phone 44 0 1488 688 550 Email infouk digga com...

Страница 19: ...under this warranty must be made within fourteen 14 days after the buyer learns of the facts upon which claim is based All claims not made in writing and not received by Digga within the time specifie...

Страница 20: ...20 PM 000044 A Operator s Manual Cement Mixer August 2021 PM 000044 A...

Отзывы: