

Dieselboss Inc |
www.dieselboss.com
| 866-851-2346 Rev3
DB4 Windshield Camera Quick tips and tricks
1. State laws vary in terms of video and audio surveillance.
We include a weatherproof vinyl sticker for the window indicating that
video security is in use on this vehicle. It is advisable to inform a law enforcement officer in the event that you get pulled over if you
are recording video and/or audio while he is speaking with the driver at the side of the rig.
2. The “rec/snap” dual function button on the left.
It serves as the way to start/stop recording or to snap a picture (when in picture
mode.) It is also like the mouse button or the “enter key” on a computer. You press it to enter into sub-menus after you have pressed
the “menu” button.
3. The audio portion of the recording is selectable.
If the driver wants it recording cab audio as well, it is entirely up to him or her.
(Select “Menu / Down / Rec-Snap” to enter the audio setting.)
4. Date and time stamp.
The camera can stamp the video with the date and time. We recommend that the driver use the same time
and time zone as their logs so that things match up regardless of where there are in the country. To set the date and time, press
“Menu” on the left side while in video mode and then use the “Down” key to cycle down to “Date / Time” and then press “Rec-Snap” to
enter the date and time setup.
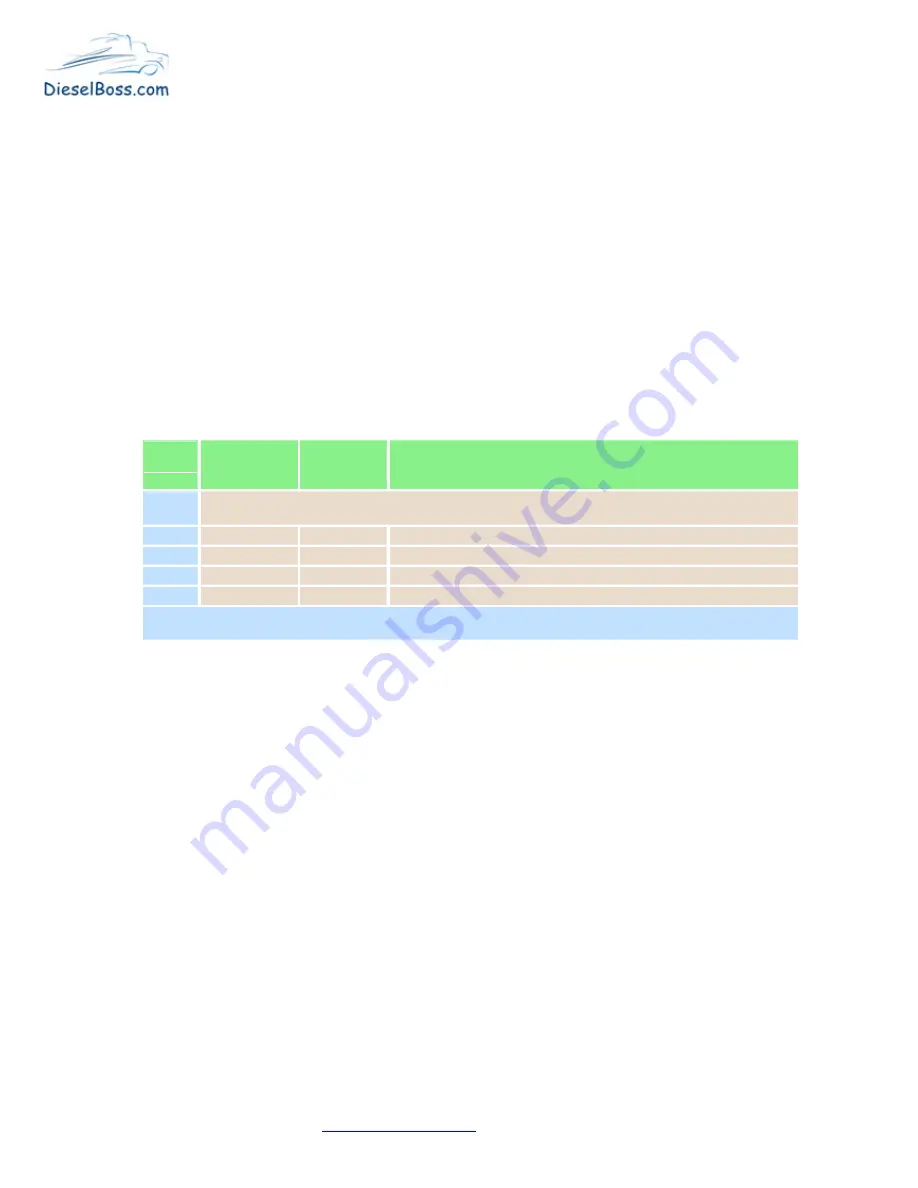
5. Video Quality.
There are 3 sizes of video selectable. The larger the size will dictate how much video is stored on the card before it
begins to write over from the beginning. (see chart below.) * Tip: the middle mode (848 x 480) is able to record more time than the
HD setting but still able to have a very good image. If the driver desires super high quality suitable for playback on a large TV or full-
screen computer, then HD (1280 X 720) is available. Note that the highest probability of being able to read a license plate for
example would be on the 1280 X 720 setting. If he or she wants to maximize recording time then they could go the other direction
(640 x 480) and still have good video with more recorded on the same sized card, but understand that the video as seen on a
computer screen will be smaller. To enter the video size setting, use the “Movie Size” area after pressing the “Menu” key on the left.
Here is the timing chart for this model:
Video
size
setting
HD
1280X720
Wide
848X480
Normal
640X480
Card
Size:
Approximate recording minutes before over-writing older videos
4 Gig
82
145
195
8 Gig
164
290
390
16 Gig
328
580
780
32 Gig
656
1,160
1,560
* IMPORTANT NOTE!: if you are going to purchase your own extra memory cards, ensure that they are
"Class 6 or higher" rated or you can experience video glitches while recording!
6. Modes.
By pressing the mode button on the right side you can switch between video recording, picture-taking, and playback modes.
When you plug in an HDMI cable (not included) to a TV then the system automatically goes into playback mode.
7. Record Time.
This setting dictates how many minutes each video is on the card before it closes the file and starts another. If you
choose “Off” in the Record Time setting then it will record one long video and stop when the card is full. NOTE that the screen will go
blank for about 1-2 seconds between each video as it ends one and begins another. This is normal and not a glitch. *Tip: the built-in
battery will record 20-30 minutes when it is not plugged into power as well. To set it to continuously overwrite the oldest videos when
the card is full use 2, 5, or 15 minutes in this setting. We recommend the 5 minute setting as our favorite during testing.
8. Motion Detection.
If motion detection is turned on in the Menu settings then the camera will record only when there is motion in front
of it and then will stop when the video time that you selected in the time menu has been reached until motion occurs again. It can
detect motion for 20 – 25 feet.
9. Playing back video.
You can play the video back on the unit screen by pressing the “Mode” key on the right side twice to enter the
playback menus. Use the “Up/Down” keys and choose the Year, Month, Day, and particular video to watch. Use the “Rec-Snap”
button to enter menus or to start and stop a particular video. You can also take the memory card out and put it in any computer that
has an SD card reader to access the videos. You transfer videos to a computer using the included USB cable.
10. Night and Day brightness -
While in the normal recording screen, press the up or down buttons on the right side to increase the “EV”
setting as shown at the top of the screen. Higher EV numbers mean brighter and lower mean dimmer. The default EV is “0” and is
normally where you want to keep it. However, you can increase or decrease the EV number to adjust for extreme bright or extreme
dim condition recording.
11. Do not remove or install the SD card while the camera is powered on.
Although doing this will not usually cause any permanent
damage to the camera, it may “lock” and appear as to not be able to power on.
12. How to Reset: Read below if this does not work call us for help.
A. Turn off camera or unplug from power.
B. Remove SD Card. Note: SD card must be class 6 or higher.
C. Find the RESET hole on the opposite side of the camera body from the screen and use a paperclip to into insert it and press down
and hold down for more than 30 seconds.
D. Remove paperclip and plug camera in to power. The screen will come on and say “No SD Card”
E.
Turn off camera
and place the SD card back in it and turn on camera. This resets the firmware in the camera.


