background image

b. Hard Reset – This function is useful to solve malfunctions that the “Soft Reset” is unable 

to repair. Except for time and date, all previous settings will be reset to factory defaults. All 

files on the internal memory will be erased. 

i. With the LOCK switch in the “up” position, press and hold the BACK button. 

ii. While continuing to hold in the BACK button, press and release the RESET button. 

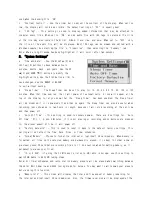
iii. Continue to hold the BACK button until “FormatPlease Wait … ” is displayed, then 

release. Formatting takes about one minute to complete. 

iv. When formatting is finished, position the LOCK switch to the “down” position before 

using. 


(13) – BUTTON 


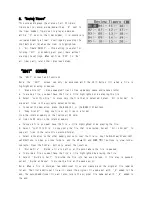
The  – Button has 30 levels of loudness. 

Press and release or press and hold “+” to increase or “–” to decrease the volume. 


(14) LOCK SWITCH 

The LOCK SWITCH has two positions: If moved to the “up” position, then the CC Witness will be 

locked  and  all  buttons  will  be  disabled.  This  feature  is  used  to  prevent  buttons  from  being 

accidentally pressed during travel or storage. If a button is pressed while locked, the time and 

date will be displayed, along with the “Lock Switch ON”message. 


(15) MIC 

The internal microphone is used to make voice recordings. 


(16) MIC/LINE IN JACK 

This  jack  is  used  to  record  from  an  external  source  such  as  a  CD  player,  radio,  or  external 

microphone. Choose between using a MIC or LINE IN source. 


(17) SD CARD SLOT 

Add up to 16GB of memory storage by inserting an optional SD card. 


(18) HEADPHONE JACK 

The Headphone Jack has 2 purposes: 

a. To connect headphones or earphones. 

b. To connect the FM Antenna Wire, for improved FM 

reception, when using the built-in speakers. 


(19)LOCK SWITCH 

To turn the CC Witness LOCK Switch “On”, slide the LOCK Switche“up”. 

Before using the CC Witness, check the LOCK switch to be sure it is off. While the LOCK switch is 

Содержание DDR-4500

Страница 1: ...FM USB 2 0 interface for easy data transfer to and from a computer 24 pin USB connection for faster data transfer Highly sensitive built in microphone External microphone can be attached through Mic Line In Jack Key lock function to prevent unintentional operation Sleep mode in 15 30 45 60 75 90 100 and 120 minutes Digital volume control 30 steps Equalizer modes Normal Classic Live Pop Rock Jazz V...

Страница 2: ...and then select Timers Highlight and then select Set Timers Use the RIGHT 5 and LEFT 8 buttons to change to the Timer you wish to set or review Use the UP 2 and DOWN 7 buttons to move between highlighted items Use the RIGHT RIGHT 5 and LEFT 8 buttons to modify a highlighted item When finished press the PLAY Button 6 to save your timer 6 To Record from the Internal Microphone or LINE MIC Jack Press...

Страница 3: ...and then again at the end of the desired section B Play will repeat between A and B until INT SD A B is pressed again 5 RIGHT BUTTON The RIGHT Button has 8 functions a Toggles through the AM or FM radio frequencies Hold down to auto scan to next AM or FM station b Opens a highlighted File folder c Fast forwards a playing file up to 4 speeds d Highlights items e Increments slider bars in Settings f...

Страница 4: ...n Settings f Modifies or toggles through selected timer setup options g Unlocks a highlighted file 9 PLAY SPEED BUTTON The PLAY SPEED Button has 2 functions a Toggles a playing file through 5 play speeds b Marks or unmarks a file as Favorite when highlighted 10 MENU BUTTON The MENU Button has 1 function Toggles between Previous Selection and MENU 11 EDIT BUTTON The EDIT Button has 1 function Opens...

Страница 5: ... positions If moved to the up position then the CC Witness will be locked and all buttons will be disabled This feature is used to prevent buttons from being accidentally pressed during travel or storage If a button is pressed while locked the time and date will be displayed along with the Lock Switch ON message 15 MIC The internal microphone is used to make voice recordings 16 MIC LINE IN JACK Th...

Страница 6: ...3 To View and Play Files or Recordings Highlight Files Then press and release the PLAY Button 6 Button Use the UP 2 and DOWN 7 Buttons to highlight a folder Then press and release the PLAY Button 6 to select the highlighted folder and view the files within Highlight a file you wish to play using the UP 2 and DOWN 7 Buttons and then press and release the PLAY Button 6 to play it 4 To View and Confi...

Страница 7: ...ess the PLAY Button 6 to confirm Note There are 10 memory presets available on each band 4 To recall a Station from Memory Preset Press the UP 2 and DOWN 7 to recall memory presets 5 Delete a Station from Memory Preset While playing a station that is preset press the BACK Button 3 A message will ask you to confirm the deletion of the preset Highlight Yes then press the PLAY Button 6 to confirm 6 R...

Страница 8: ...uely identify each file Files Menu Controls Open Folder Press the PLAY Button Close Folder Press the BACK Button 3 Mark a File as Favorite Press the Press the PLAY SPEED Button 9 when the file name is highlighted Repeat this process to remove a Favorite mark from a file It is possible to view only files that are marked as Favorites See Settings Play Settings Folder Views from the MENU 10 for more ...

Страница 9: ...iles menu press the BACK Button 3 several times SETTINGS SCREEN The Settings screen is categorized into 5 main groups 1 Play Settings a Folder Views Choose how your files are displayed when viewed i View by Folders This setting groups your files into folders that are categorized by recording source ...

Страница 10: ...layback Modes Choose from 5 methods of file playback Play 1 File 1 Time This setting plays the selected file one time and then stops play Playback All 1 Time This setting plays all the files in a folder one time in order then stops play Repeat 1 File This setting plays the selected file repeatedly Repeat All This setting plays all files in a folder and then continues to repeat playing the files Ra...

Страница 11: ...k Live Voice Low Cut and Filter High These settings will change the sound of file in playback only These settings are also helpful for filtering out high pitched electronic noise or to improve voice on playback of AM files b 3D Effect On Off When this setting is turned On the CC Witness will adjust file playback to sound three dimensional c Beep On Off When this setting is turned On the CC Witness...

Страница 12: ... Sleep Timer will be disabled if it is powered off and then on again The Sleep Timer can also be useful when recording radio shows up to two hours in length because it will stop recording at the set time and then power off c Auto Off Time This setting is used to conserve power There are 4 settings for Auto Off Time Off 1 3 and 5 Minutes If itis not playing or recording and no buttons are pressed f...

Страница 13: ...om If the timer status is set to play then select which source AM radio FM radio or a saved File to play from Preset If you have set radio stations to memory presets then you can select them in this setting Freq Manually tune to the desired radio station Day s Choose to play or record on a specific Date or Weekday If Weekday is selected then by default every day will be selected to activate the ti...

Страница 14: ...he MENU 10 buttons 2 Copy File s Copy one file or all files in a folder from the internal memory to the optional SD card or from the SD card to the internal memory a To copy a file you must have the file s title highlighted or be playing the file b Select Just This File to copy only the file that is selected Select All in Folder to copy all files in the currently selected folder c Select a locatio...

Страница 15: ...s from a file b Clear Favorite While a file is playing or highlighted select Clear Favorite to remove the Favorite File status FILE PLAY To locate and view files to play select Files from the MENU and then press and release the PLAY Button 6 Select the folder and press and release the PLAY Button 6 to open the folder to view files Select the file then press and release the PLAY Button 6 to play th...

Страница 16: ...il you have recorded for five seconds then press the REC 1 or MENU 10 button To create a new recording track while recording press the UP Button 2 To pause or unpause a recording press the PLAY Button 6 When the recording is completed it will be stored in Files in the AM FM Timers Mic or Line folder Note The save location for a recorded file depends on what source you were recording from TRANSFERR...

Страница 17: ... De activate from a Mac Drag the external drive icons that were added when you connected your CC Witness to the trash can usually found in the Dock Another method is to Control Click and select Eject from the drop down menu Model DDR 4500 ANSI C63 4 2003 THIS DEVICE COMPLIES WITH PART 15 OF THE FCC RULES OPERATION IS SUBJECT TO THE FOLLOWING TWO CONDITIONS 1 THIS DEVICE MAY NOT CAUSE HARMFUL INTER...

Страница 18: ...radio communications However there is no guarantee that interference will not occur in a particular installation If this equipment does cause harmful interference to radio or television reception which can be determined by turning the equipment off and on the user is encouraged to try to correct the interference by one or more of the following measures Reorient or relocate the receiving antenna In...

Отзывы: