background image


7. 

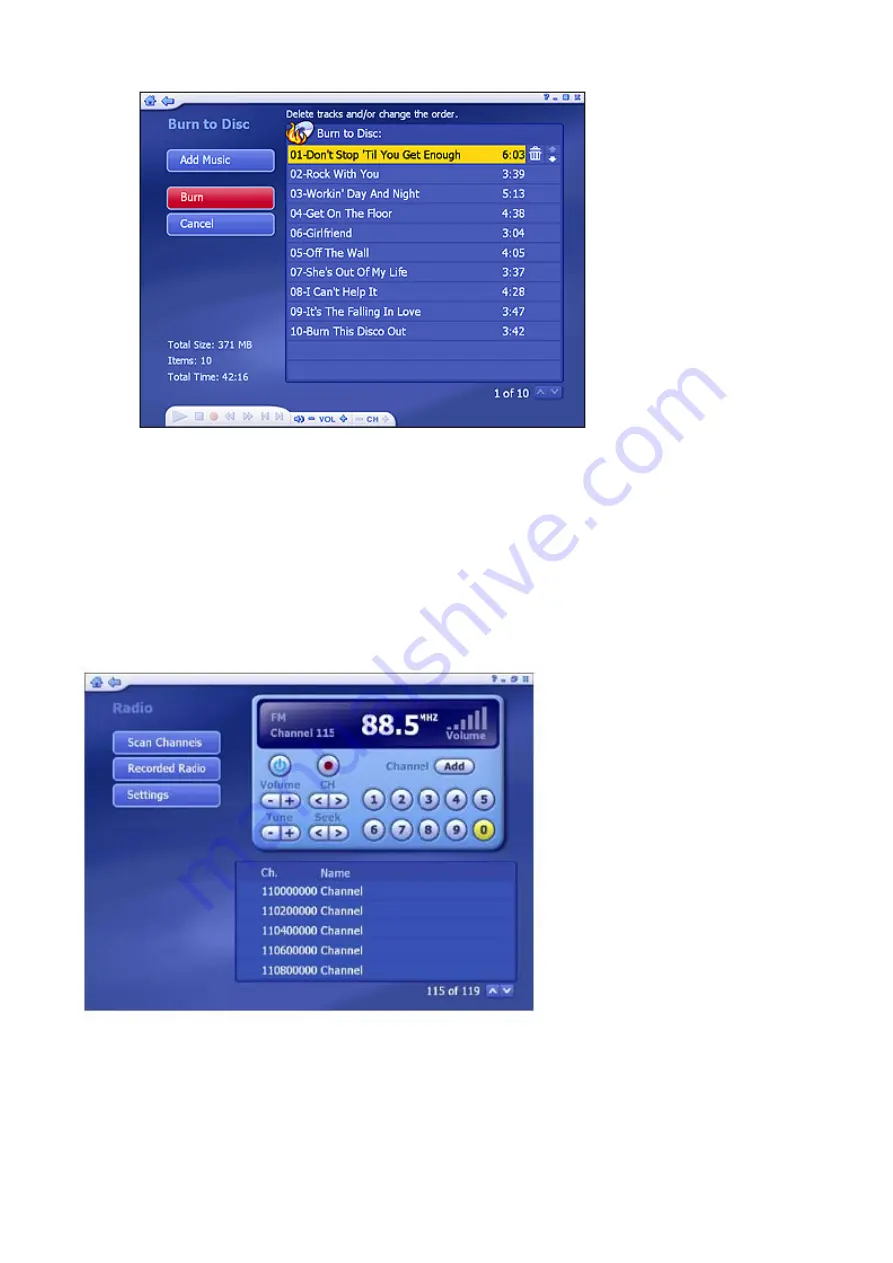
To remove a track, click its corresponding "Delete" icon (trash can).


8. 

To rearrange your list, use the Up/Down arrow buttons to the right of each track.


9. 

When your list is ready for CD, click "Burn." 


4.4 Radio


With a supported tuner card, you can listen to local radio on your computer.


The radio has the same basic functionality as standard receivers or car stereos. The numbers on 
the console indicate various channels/stations that are preset. 


Содержание TVW 750USB

Страница 1: ...1 ...

Страница 2: ...2 ...

Страница 3: ...3 ...

Страница 4: ...4 ...

Страница 5: ...5 ...

Страница 6: ...6 ...

Страница 7: ...7 ...

Страница 8: ...8 ...

Страница 9: ...9 ...

Страница 10: ...10 ...

Страница 11: ...11 ...

Страница 12: ...12 ...

Страница 13: ...13 ...

Страница 14: ...14 ...

Страница 15: ...15 ...

Страница 16: ...16 ...

Страница 17: ...17 ...

Страница 18: ...18 ...

Страница 19: ...19 ...

Страница 20: ...20 ...

Страница 21: ...21 ...

Страница 22: ...Printing 3 5 Editing Photos 4 Music Module 4 1 My Play lists 4 2 Ripping Music CDs 4 3 Burning Music CDs 4 4 Radio Module 5 Video Module 5 1 Trimming Videos 5 2 Capturing Videos 5 3 Burn Video Disc 6 To Go Module 6 1 Automatically Sync 6 2 Manually Sync 6 3 Schedule Sync 6 4 Settings 6 5 Select Module 6 5 Share Module 7 Setup Module 8 Others 8 1 Monitor 8 2 Shortcut Support 8 3 TotalMedia FAQ 8 4 ...

Страница 23: ... divided into the main sections below Note that some versions of TotalMedia may not contain all the sections listed depending on the hardware configuration and the specific version of TotalMedia installed TV DVD Picture Music Radio Video To Go Share Setup Floating Toolbar The floating toolbar appears for a few seconds whenever you move the mouse The Home button it looks like a house takes you to t...

Страница 24: ...eos and recorded TV shows Use these buttons to skip forward by roughly 27 seconds or backwards by roughly 27 seconds These buttons are useful for bypassing commercials or skipping back slightly if you accidentally skip ahead too far When watching movie discs Use these buttons to skip to the next or previous chapter When watching TV shows Click this button to select channel from the Favorite Channe...

Страница 25: ...When watching TV shows Click this button to choose a subtitle when there are two or more subtitles in the digital TV signal When watching TV shows Click this button to choose an input video source ...

Страница 26: ... of the screen Note If you are using a digital tuner and have channels scanned using LCN Local Channel Number available in most European countries you can use LCN to select a channel You may pause and rewind TV while you re watching using both the remote control and the toolbar Options include Full Screen Displays the video over the entire program display area typically the entire screen You can c...

Страница 27: ... disc Schedule Program the application to record TV shows Capture Frame Take a screen capture of the current video screen The captured image will be saved in the My Documents My Pictures folder by default Teletext Watch teletext if available Settings View and edit the settings for the TV module Favorite Channel List Press Ctrl D to display the Favorite Channel List and select a channel to watch Cl...

Страница 28: ...hannel program lists If you are using a digital device please select to access EPG or network EPG to view the program lists While using analog device the program will take you to the network EPG directly Note This option is only available if you are using an EPG service The Internet EPG may not be available in all countries and the EPG on some digital services may not be supported 2 2 Channels Thi...

Страница 29: ...TV main screen and the program will start showing Options include Add to Favorite Highlight a channel on the list and click on the button to set it as a favorite channel A checkmark indicates favorite channel Delete From Favorite If you select a favorite channel click on this button to remove it from the favorite channels list From the Channel Type choose either to view All or only the Favorite ch...

Страница 30: ...ils of the available photos and folders Detail view includes file folder names and dates From the Sort section choose to arrange the photos according to name or date To trim a video click the scissors icon to the right of the file To rename a video file click the A_ icon to access a virtual keyboard Click the Delete trash can icon to delete a file Burn To Disc Create a DVD or VCD depending on your...

Страница 31: ...ck the Disc Settings button to select the proper disc drive change the video format and modify other disc options Click DVD menu design to personalize your DVD disc with a custom title and graphics When you re ready to make a disc click Burn 2 4 Schedule This section lets you program the application to record TV shows then the application will monitor the schedule and record the scheduled programs...

Страница 32: ... virtual keyboard then select a channel recording frequency once daily or weekly source type and a recording start or stop time Note If you are using a digital tuner and have channels scanned using LCN Local Channel Number available in most European countries you can use LCN to select a channel ...

Страница 33: ...n the preview area Click the Delete trash can icon to delete a file Click the Clear All button to discard all the files The Frequency option enables you to filter shows by how often they are recorded once daily weekly If conflicting recording sessions are scheduled you will be presented with a summary of the conflicts and asked to update the schedule ...

Страница 34: ...view area Move your mouse to select different teletext channels The selected titles will be shown on the red green yellow and blue area Click the button with the corresponding color to watch it Click the Live TV button to go back to the TV screen Click the Teletext Home button to go back to the teletext main index page Note This function is not available in all countries Typically only Europe 2 6 ...

Страница 35: ...your region 2 Select video device 3 Click Start to scan for available channels Note The last channel list will be saved so there is no need to rescan channels 4 Set up two tuners After setting up one tuner if there is another tuner in your PC you can repeat the steps for the second tuner Choose the options you want from the various pull down lists The program also provides Previous and Next button...

Страница 36: ...es sometimes the automatic scan may not pick up a channel if the signal is poor To manually add a channel click Add Channel You can enter the channel number as well as a name for the channel To select the channels you can click on one by one or using the Select All option Or click Deselect All button to undo the selection Checkmarks indicate channels selected To rename the channel click the A_ ico...

Страница 37: ...channel list using LCN Note If you are using an analog tuner and a digital tuner together the screen will be slightly different Click the arrow icon to change the signal 2 6 3 TV Settings This section lets you view and edit the TV settings ...

Страница 38: ... low performance graphics card checking this option is not recommended To enable or disable subtitle select the Show Hide option from the list The Video Standard option is only available for analog tuners Setting the Time Shifting feature to On enables you to pause live TV and watch recorded TV before the recording is complete This feature requires a high performance PC Note If your computer CPU r...

Страница 39: ...ck on the Up One Level button to go up one directory level Check the channel list file chl you want to import When you re ready click Import 2 6 5 Export Channel List This section lets you export the current channel list Browse your computer and go to the folder that you want to save the channel list file ...

Страница 40: ...annels in internet EPG that can be scheduled Select channels you want to map from Available Channels on tvtv list and Scanned Channels list The program of the selected channel will be display in the preview area Click Map after choosing Or click Unmap to discard the mapped channels Note The function is just available in Germany Austria Switzerland UK France Spain Italy and Netherlands 2 7 DVD Watc...

Страница 41: ...de Full Screen Displays the video over the entire program displaying area DVD Menu Takes you to the DVD menu screen Frame Capture Takes a screen capture of the current video screen Eject Ejects the disc Settings View and edit the settings for playing DVDs and capturing video ...

Страница 42: ...s on the screen Click a thumbnail to display it in full screen mode From the View section you can choose either Detail or Thumbnail view Both views show you thumbnails of the available photos and folders Detail view includes file folder names and dates From the Sort section choose to arrange the photos according to name date or size Options within the Picture area include Play Settings Print Edit ...

Страница 43: ...iting options Click here to learn more Exit Quit the full screen view 3 2 Play Selecting a photo from this screen and clicking the Play button will start a slide show of the photos in the current location starting with the one you selected Before playing a slide show please set the Slide Show Settings Stop the slide show by double clicking the mouse or pressing Esc on the keyboard 3 3 Settings Set...

Страница 44: ...to have your slide show automatically restart once it completes Press the Esc key to exit a looping slide show In the Music Soundtrack section choose On to play one or more songs during the slide show Click the Add button to set background music The added music files will be listed You can also remove a music track by selecting it and clicking the Delete trash can button The total time of the musi...

Страница 45: ...otos and folders Detail view includes file folder names and dates 3 From the Sort section choose to arrange the photos according to name date or size 4 To see the photo in greater detail move the mouse to each file to show a larger view 5 Select the photos you want to print by clicking on the photos one by one or using the Select All button Click the Deselect All button to undo the selection Check...

Страница 46: ... each printed page 9 Click Print 3 5 Edit A multitude of editing options are available each one being extremely easy to use Options include Rotate Zoom Pan Auto Enhance Red Eye Removal Crop Previous Next Photo Delete Exit Go back to the previous screen 3 5 1 Rotate Rotate the photo 90 degrees counterclockwise or clockwise by clicking the corresponding icon ...

Страница 47: ...ool 3 5 3 Auto Enhance Selecting this option presents you with three automatically enhanced versions of your photo plus your original Simply choose the one you like best 3 5 4 Red Eye Removal This tool helps you remove red eye from photos automatically If you re not satisfied with the result it is possible to fix it manually using the following steps ...

Страница 48: ... can crop your photo to any one of a variety of set proportions that are ideal for perfect printing 1 Choose the proportion to which you want your photo cropped 8x6 7x5 4x6 etc 2 Using the and buttons resize the crop box to your liking 3 Choose Move and then position the crop box over the area of the photo you want to keep 4 To execute the crop command choose Crop It 5 Choose Done to cancel ...

Страница 49: ...o the folder containing the photos you want to archive to disc or turn into a slide show Click the Up One Level button to go up one directory level 2 From the View section you can choose either Detail or Thumbnail view Both views show you thumbnails of the available photos and folders Detail view includes file folder names and dates 3 From the Sort section choose to arrange the photos according to...

Страница 50: ...reates a DVD or VCD slide show of the selected files for playback on TV or computer Burn Slide Show To Disc With Archive Of Original Photos creates a DVD slide show and copies the original files to a directory on the disc Archive Original Photos To Disc makes a backup disc of the selected files 8 Whether you create a DVD or VCD disc depends on your Disc Creation settings Note some versions of the ...

Страница 51: ...een You can click the button next to it to display it in full screen mode Press Esc to exit full screen Filter tracks by music genre such as All Hip Hop Pop R B and Other Sort files by name date genre artist or album Additional options within the Music area include My Playlists Rip Music CD Burn To Disc 4 1 My Playlists Here you can play organize and create new audio playlists Playlists are compat...

Страница 52: ...el Takes you back to the main Music page Select a playlist to open it Click a file to play it and use the standard playback buttons on the floating toolbar to control playing files There is a preview window in the bottom left corner of the screen You can click the button next to it to play it in full screen mode Press Esc to exit full screen ...

Страница 53: ...sic on you computer 1 Go to any folder to find the music you want to add to your new playlist Click the Up One Level button to go up one folder level in the directory 2 Filter tracks by music genre such as All Hip Hop Pop R B and Other 3 Sort files by name date genre artist or album 4 Check each file that you want to add The selected files are listed below and the information such as total size nu...

Страница 54: ...ghlighting it and clicking the Delete trash can button 8 To add more music files click the Add Music button to go back to the previous screen Once your playlist is set click Save or click Cancel to exit without saving 4 1 2 Edit Playlist This screen allows you to update the current playlist by adding removing and rearranging music files ...

Страница 55: ...mote 2 To remove a music file by clicking the Delete button trash can 3 To add more songs to your playlist click Add Music navigate to the folder containing the songs you want to add select the songs then click Next 4 Once your playlist is set click Save 4 2 Rip Music CD It s easy to rip convert your audio CDs into audio files you can play back on your computer ...

Страница 56: ...ctory used for saving the ripped files The Get CD Information for the Internet option will automatically search the Internet for CDDB information title artist album name etc for the songs contained on your CD If corresponding information is found it will be embedded into your ripped music To use this feature make sure your system is connected to the Internet 4 3 Burn To Disc This feature enables y...

Страница 57: ...one folder level in the directory 3 Filter tracks by music genre such as All Hip Hop Pop R B and Other 4 Sort files by name date genre artist or album 5 Select the tracks you want to burn to the CD Each time you select a track it is added to the list at the bottom of the page Note You can add music files from different folders to the list 6 When you have selected all the files you want click Next ...

Страница 58: ...tons to the right of each track 9 When your list is ready for CD click Burn 4 4 Radio With a supported tuner card you can listen to local radio on your computer The radio has the same basic functionality as standard receivers or car stereos The numbers on the console indicate various channels stations that are preset ...

Страница 59: ...e the seek buttons to scan forward backward to the next available station Options include Scan Channels Scan for available channels All the channels will be listed below Recorded Radio Check the recorded audio files Settings View and edit the settings for the Radio module Note The Radio feature may not be available in all versions of the program Settings View and edit Radio settings Choose the dev...

Страница 60: ...on to the right of your selection To rename the video file click the A_ icon to access a virtual keyboard Click the Delete trash can icon to delete the file From View you can choose either Detail or Thumbnail Detail view includes file names dates and other information Thumbnail view shows the file thumbnail You can set a different frame in the video as the thumbnail in the Edit Video section Use t...

Страница 61: ...ine the area to be trimmed out of your video Note You can remove multiple sections of a video by repeating steps 1 4 over other areas of the video track Use the Undo button if you ve made a mistake while editing Press the Reset button to remove all trimmed areas and restore the video to its full length The buttons beneath the Mark In and Mark Out buttons can be used to jump to the previous next ed...

Страница 62: ...ck the A_ button to access a virtual keyboard Set the capture duration To automatically burn your video to disc after it has been captured check the Automatically create a disc box When you re ready to begin capturing video click Capture Note If you re capturing video from a DV camcorder you will be prompted to choose a recording format DV AVI or MPEG 2 Depending on your choice various options wil...

Страница 63: ...To Disc Burn one or more video clips to disc Browse to the folder that contains the videos and select the specific files you want Check the video files you want to burn to a disc Click again to deselect uncheck a video file To trim a video clip or to choose the frame be used as the chapter button thumbnail click the scissors icon to the right of the file name Click the disc settings button to sele...

Страница 64: ...er the screen above Options include Automatically Sync Synchronize your device folder and PC folder automatically Manually Sync Manually select files to synchronize between your PC and device Schedule Sync Set a schedule to synchronize between your PC and device Settings Set your file conversion format synchronization folder etc Select Device Select another device 6 1 Automatically Sync This secti...

Страница 65: ... box next to To Go IPOD VIDEO This option must be checked in both the Videos and Music tabs Device name may vary 6 2 Manually Sync Manually select files to synchronize between your PC and device There are three sections on the screen My computer My device and a Preview area You can click and drag the line in the middle to change the size My computer and My device sections You can select a folder u...

Страница 66: ...rrow button in the middle to add it to the list of files to synchronize Create a New folder or delete a selected file folder by clicking the corresponding icon Click the music icon to open your playlist Check the Preview box to play a selected file Use the buttons on the floating toolbar to control playback The required disc space and the available space will be shown at the bottom of the screen I...

Страница 67: ...her is for the overall progress When the sync has completed the program will prompt you to view the sync log To cancel the sync click the Stop button at any time 6 3 Edit Video This area enables you to remove unwanted portions of the selected video file Standard playback controls are available to trim your video ...

Страница 68: ... original The buttons beneath the Mark In and Mark Out buttons can be used to jump to the previous next edits on the time bar For video files longer than 10 minutes a seek bar appears beneath the time bar to indicate your current position relative to the entire video file 6 3 Schedule Sync This section lets you set a schedule to synchronize between your PC and mobile device The program will monito...

Страница 69: ... To Go module Device Name Photo Music Video PC Folder Device Folder Note The Device Folder button is only available when you are using a Windows Mobile Device 6 4 1 Device Name Settings Click on the Device Name button in the Settings screen to edit device name ...

Страница 70: ... to default settings click Default 6 4 2 Photo Settings Click the Photo button in the Settings screen to edit the Photo options for the To Go module From the Conversion Settings section you can select Convert All Photo Files or select Convert All Incompatible Files for a particular device Set the resolution and quality by selecting from the list ...

Страница 71: ...r a particular device Set the file format bitrates sample bitrates channels by selecting from the pull down list Note Some combinations of these options are not available in a particular format You may see some options change automatically as you change a different option This prevents you from accidentally creating an unusable file When you re ready click Save Or click Cancel at any time to exit ...

Страница 72: ...related So it is quite possible that when you select a certain option the other options will change or become unavailable to prevent you from creating an unusable file When you re ready click Save Or click Cancel at any time to exit without saving If you want to switch back to original default settings click Default 6 4 5 PC Folder Settings Click the PC Folder button in the Settings screen to sele...

Страница 73: ...synchronize files Note The photo option will not be available for iPod When you re ready click Save Or click Cancel at any time to exit without saving 6 4 6 Device Folder Settings Click the Device Folder button in the Settings screen to edit the Device Folder options for the To Go module The folders for Device sync are set here ...

Страница 74: ...sted here The devices not seen here are either not connected or unavailable Click on a device to start synchronizing files with your PC Remove a device by highlighting it then click Delete trash can 6 6Share This section lets you view and play the photo video and audio files in the Shared Folder of any DLNA compatible servers on your network DLNA servers allow you to stream media files between dif...

Страница 75: ...y Select any file to play it and use the buttons on the floating toolbar to control playback of the file There is a preview window at the bottom left corner of the screen You can click the button next to it to play it in full screen mode Press the Esc key to exit full screen mode From the View section you can choose either Detail or Thumbnail view Both views show you thumbnails of the available ph...

Страница 76: ... settings for each module of the program General TV DVD Video Pictures Music 7 1General This screen enables you to view and edit basic program settings Options include Disc Creation Change disc creation settings Printer Choose your default printer ...

Страница 77: ...tings for how the program displays on different types of hardware About TotalMedia Get information about ArcSoft TotalMedia and access tools for registering your product and searching for program updates and patches 7 2 Settings View and edit TV settings Reset TV Signal Edit Channels TV Settings Import Channel List Export Channel List tvtv settings EPG Go to the tvtv or EPG wizard The wizard will ...

Страница 78: ...io track and the DVD menus Parental Control Set passwords that must be entered before movies at specific ratings PG PG 13 R etc can be played Frame Storage Here you can set the save location and file type for captured screenshots Auto Resume You can choose to resume playback of a DVD from the last stopped point or from the very beginning 7 4 Capture Settings Modify settings for capturing video ...

Страница 79: ...deo Signal to let the program detect your video input S video composite etc automatically Check the Don t show capturing instructions box to bypass the help screen when capturing video When you re ready click Save or click Cancel to exit without saving 7 5 Picture Here you can set the transition effects timing and background music for your slide show ...

Страница 80: ...oop Slide Show box to have your slide show automatically restart once it completes Press the Esc key to exit a looping slide show In the Music Soundtrack section choose On to play one or more songs during the slide show Click the Add button to set background music The added music files will be listed You can also remove a music track by selecting it and clicking the Delete trash can button The tot...

Страница 81: ...r MP3 if available Choose the quality setting and set the destination for your ripped music The Get CD Information for the Internet option will automatically search the Internet for CDDB information title artist album name etc for the songs contained on your CD If corresponding information is found it will be embedded into your ripped music To use this feature make sure your system is connected to...

Страница 82: ...t menu consisting of the following items Stop Recording Stop the current TV program recording Automatically sync now Immediately start the scheduled sync Show sync progress Display the sync progress Stop sync Stop the synchronization in progress Schedule sync setup Set up the sync schedule View sync log Display a synchronization log file Exit Exit the monitor 8 2Shortcut Support The following remo...

Страница 83: ...rd CTRL SHIFT D Help F1 Recorded TV CTRL O Record CTRL R Channel Channel Time Shift F2 Closed Caption F3 Subtitle F3 Snapshot F5 MTS F6 Jump F11 DVD CTRL Y TV CTRL T Music CTRL M Picture CTRL I Radio CTRL J Video CTRL E Share CTRL H Setup CTRL K Home CTRL Q Repeat CTRL SHIFT R Surfing CTRL SHIFT S Full Screen Alt ENTER EPG CTRL G Channels CTRL SHIFT C ...

Страница 84: ...h 512Mbyte RAM is required 2 If your CPU speed is below a Pentium 4 2 4GHz and less than 512Mbyte RAM we recommend disabling the time shifting feature by from Setup TV TV Settings Time Shifting 3 Hard Disk DMA should be enabled from the device properties for your hard drive The method for setting this varies in different operating systems 2 How do I enable disable time shifting PVR functionality Y...

Страница 85: ...gnal Yes 9 What is the Share module used for Share is an optional module in TotalMedia that enables you to share the multimedia files on your computer with your streaming devices such as mobile phones networked DVD players or digital media adapters 10 Can I burn my recorded TV show to a DVD video disc Yes You can create DVD movies from your recorded TV shows and videos You can even select custom m...

Страница 86: ...lable within Windows from Control Panel Sounds and Audio Device If not verify that your hardware is installed properly with the hardware vendor documentation 2 TV is not smooth Verify that your system meets the minimum requirements and is configured properly see question 1 in the FAQ section for configuration assistance Also make sure there are no other applications running in the background 3 No ...

Отзывы: