Diamond Digital DV300 Скачать руководство пользователя страница 8

DV300/DV301B 30" 

Multimedia Information Display

14

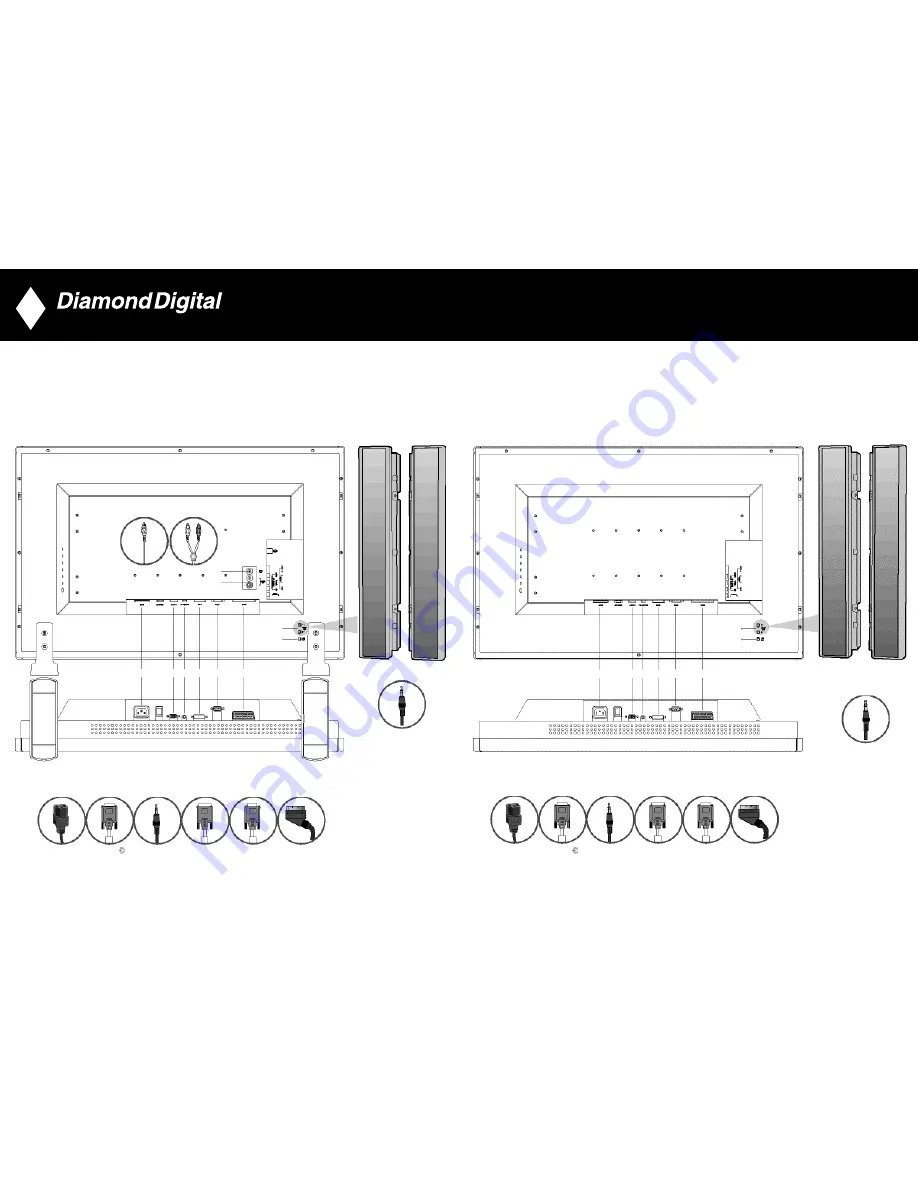
6. Setting up your TFT Monitor

Connecting the monitor/TV

Connect the cables to the rear of your monitor/TV according to the numbers: 

DV300

13

DV301B

AC IN 

DC-SUB         PC AUDIO IN          DVI-D               RS232             SCART

•  •

7             8

••

7

8

••

••

9

10

7

8

• •• • • •

1              2   3       4       5            6

• •• • • •

1              2   3      4       5            6

EXTERNAL SPEAKERS

•  •  • • •  •

•  •  • • •  •

1          2   3      3           4            5            6 

9

10

EXTERNAL SPEAKERS

7

8

AC IN 

DC-SUB         PC AUDIO IN          DVI-D               RS232             SCART

1          2   3      3           4            5            6 

(Optional)

Содержание DV300

Страница 1: ...l rights reserved No part of this publication may be reproduced transmitted transcribed stored in a retrieval system or translated into any language or computer language in any form or by any means el...

Страница 2: ...Installation 4 2 About this Manual 5 3 Product Information 6 4 Accessory Pack 7 5 Installing your LCD Monitor 8 6 Setting up your TFT Monitor 13 7 On Screen Display 21 8 Remote Control 45 9 Troublesh...

Страница 3: ...will disappear gradually over a period of time after the power has been switched off Be aware that the after image symptom cannot be repaired and is not covered under warranty Consult a service techn...

Страница 4: ...erview of information included along with notation icon descriptions and other documentation for your reference Product Information gives an overview of the monitor s features Installing Your Monitor...

Страница 5: ...7 5 Installing your LCD Monitor Product Description Side View Left 1 INPUT INPUT Selecting input source 2 Increase or decrease the channel number or moving up or down to highlight the function in OSD...

Страница 6: ...dio L Output Audio L output for the detachable speaker L Audio R Output Audio R output for the detachable speaker R 11 Line out Audio output for external speakers 9 DV301B 1 AC IN AC power in 2 AC Pow...

Страница 7: ...8 RF 75 TV Antenna or CATV cable in 11 DV301B 1 Audio L Audio L for component video 2 Audio R Audio R for component video 3 Component Video Component video Y Pb Pr input 4 Composite Video Composite v...

Страница 8: ...TV Connect the cables to the rear of your monitor TV according to the numbers DV300 13 DV301B AC IN DC SUB PC AUDIO IN DVI D RS232 SCART 7 8 7 8 9 10 7 8 1 2 3 4 5 6 1 2 3 4 5 6 EXTERNAL SPEAKERS 1 2...

Страница 9: ...section Connect to DVD VCD VCR Connect to DVD VCR VCD through S VIDEO Connect to DVD VCR VCD through S VIDEO 15 Connect to DVD VCR VCD through SCART for Europe only Connect to DVD VCR VCD through comp...

Страница 10: ...IN G Y B Cb Pb R Cr Pr AUDIO R COMPONENT VIDEO DVD HD IN CVBS L R S VIDEO Cable TV Cable TV Signal Input Back of Monitor TV Round Cable 75 ohm Cable TV Converter Box Connection 300 ohm to 75 ohm Adap...

Страница 11: ...NT VIDEO DVD HD IN G Y B Cb Pb R Cr Pr CVBS L R S VIDEO AUDIO AUDIO L R COMPONENT VIDEO DVD HD IN G Y B Cb Pb R Cr Pr CVBS L R S VIDEO AUDIO AUDIO L R COMPONENT VIDEO DVD HD IN G Y B Cb Pb R Cr Pr CVB...

Страница 12: ...nction icons As you move from one icon to another the function name will be highlighted 3 Push the MENU button once to activate the highlighted function Push or to select the preferred parameter push...

Страница 13: ...PC TV VIDEO mode POWER SAVING ON OFF AUDIO 24 Icon Menu Name and Sub menus Description The Brightness function Push the button to increase luminance push the button to decrease luminance min 0 max 100...

Страница 14: ...e 26 Icon Menu Name and Sub menus Description Positioning moves the viewing area around on the monitor screen EXIT Exit this menu H POSITION V POSITION When making changes to either the Horizontal or...

Страница 15: ...seconds OSD LOCK Controls user access to adjustments Show key icon after selecting lock OSD SETTINGS Note When the OSD is locked pressing the menu button again and it will take user to OSD LOCK menu P...

Страница 16: ...TUNER For DV300 only EXT COMPOSITE VIDEO S VIDEO COMPONENT VIDEO PICTURE IN PICTURE 30 Icon Menu Name and Sub menus Description LANGUAGE Language sets the OSD to display in one of the five or six lan...

Страница 17: ...TEMP Select from Normal Cool or Warm by and buttons PICTURE NOTE 1 TINT is not available in component input in all models 2 TINT is available in NAFTA model only 3 HOR SHIFT only function in componen...

Страница 18: ...DE 4 3 FULL SCREEN NONLINEAR SCALING SPECIAL FEATURES FOR DV300 AUTOMATIC 16 9 4 3 FULL SCREEN NONLINEAR SCALING 34 Icon Menu Name and Sub menus Description AUDIO Adjust audio characteristics to suit...

Страница 19: ...Y RESET Exit from this menu EXIT 36 Icon Menu Name and Sub menus Description 1 When users first enter the PARENTAL CONTROLS the screen will show the window asking user key in the code 2 Users will see...

Страница 20: ...ot available in component input Adjustable from 0 to 100 COLOUR TEMP Select from Normal Cool or Warm by and buttons NOTE NOTE 1 TINT is not available in component input in all models 2 TINT is availab...

Страница 21: ...ITALIANO NOTE In AP China models Simplified Chinese is supported 40 Icon Menu Name and Sub menus Description AUDIO Adjust audio characteristics to suit personal preference EXIT Exit from this menu TRE...

Страница 22: ...CK CHANGE CODE CLEAR ALL 3 Enter Master code 0711 twice or the code entered in step 1 42 Icon Menu Name and Sub menus Description Activate special control features EXIT Exit from this menu SLEEP TIMER...

Страница 23: ...on MANUAL STORE CHANNEL SKIP CHANNEL SWAP FACTORY RESET Reset the setting to default values NO Keep the setting as current YES Load factory setting 44 Icon Menu Name and Sub menus Description SETUP SY...

Страница 24: ...evel 8 Mute To disable sound To restore sound press button again 9 Teletext features Works only in areas where the Teletext service is available 10 Sound mode To switch from STEREO to MONO or to choos...

Страница 25: ...ky Jittery Video Wavy picture or Auto adjust image through Menu Image Setting fine movement Auto Adjust Adjust Phase and Clock controls via OSD Perform the LCD Monitor TV factory reset via Menu Factor...

Страница 26: ...n your the LCD with sound was playing Monitor TV and audio output connectors on your PC or Video player If on certain TV channels you receive a picture but no sound this means that you do not have the...

Страница 27: ...gives better picture Component gives best picture No sound See video but no audio Check if the LCD Monitor volume is turned off or muted Connect the audio cable securely Audio cable is connected incor...

Страница 28: ...nning lines at the same time thus distorting the picture Q What does the Refresh Rate mean for LCD A Unlike CRT display technology in which the speed at which the electron beam is swept from the top t...

Страница 29: ...h the spiral structure of the liquid crystal molecules and goes through the polarized filter at the bottom When impressed with voltage liquid crystal molecules are arranged vertically from the origina...

Страница 30: ...e an XGA monitor has 1024x3 R G B x 768 pixels and a higher resolution may not be available without additional software processing The panel is designed to optimise the display for a 65MHz dot clock o...

Страница 31: ...dard for ensuring correct exchange of colours between different devices e g digital cameras monitors printers projectors scanners etc Using a standard unified color space sRGB will help represent pict...

Страница 32: ...dean WA 6054 Telephone 08 9377 3411 Fax 08 9377 3499 62 Automatic Power Saving If you have VESA DPMS compliance display card or software installed in your PC the monitor can automatically reduce its p...

Отзывы: