Diadora D-Walk Скачать руководство пользователя страница 33


Содержание D-Walk

Страница 1: ...D Walk D D GB I USER MANUAL DIADORA D WALK 20090716 ...

Страница 2: ......

Страница 3: ...tellen und runterzuladen und bei Bedarf einen Personal Trainer zu buchen Zusätzlich gibt es die passende Ernährungsberatung und ein Forum in dem man sich über neueste Trends im Bereich Fitness informieren kann Wir wünschen Ihnen viel Spaß und Erfolg bei Ihrem Training Ihr Diadora Team Garantie Diadora Qualitätsprodukte werden konstruiert und getestet um für ein engagiertes Fitness Training im Heim...

Страница 4: ...name Seriennummer Entsorgungshinweise Kontakt Greenfit International Kirchweg 28 95336 Mainleus e mail service greenfit int de web www diadora fitness com Hinweis Diese Gebrauchsanweisung dient nur zur Referenz für den Kunden Diadora übernimmt keine Haftung für Fehler die durch Übersetzung oder technische Änderungen des Produkts entstehen Diadora Geräte sind recyclebar Bitte führen Sie Ihr Gerät a...

Страница 5: ...rstellers ist ausgeschlossen Benutzer Gesundheit Bei gesundheitlichen Einschränkungen oder für individuelle und persönliche Trainingsparameter konsultieren Sie bitte vor dem ersten Training Ihren Arzt Er kann Ihnen sagen welche Art des Trainings und welche Belastung für Sie geeignet sind Benutzer Gesundheit Falsches oder exzessives Training kann Ihre Gesundheit gefährden Benutzer Gesundheit Falls ...

Страница 6: ...Team Warranty Diadora quality products have been designed and tested to meet the needs and requirements of a committed Fitness Training of in home use This product is tested to the European Standard EN 957 Diadora warrants to the original purchaser 2 years against possible defects in material Excluded from warranty are wearing parts and damages caused by misuse of the product In the case of claim ...

Страница 7: ...ste Disposal Contact Greenfit International Kirchweg 28 95336 Mainleus e mail service greenfit int de web www diadora fitness com Advice The owner s manual is only for the customer reference Diadora can not guarantee for mistakes occurring due to translation or change in technical specification of the product Diadora products are recyclable At the end of its useful life please dispose of this arti...

Страница 8: ...do not extend to any product or damage to the product caused by commercial use User Health Consult your physician before starting with any exercise programs to receive advice on the optimal training technique User Health Incorrect excessive training can cause health injuries User Health If you feel sickness chest pain fits of dizziness or breathlessness during your training stop training immediate...

Страница 9: ... informati su rischi e precauzioni Vi auguriamo un buon allenamento Il vostro Team Diadora Garanzia La qualità dei prodotti Diadora è stata ideata e testata per soddisfare le richieste dell home fitness Questo prodotto segue le regole della Norma Europea EN 957 Diadora garantisce al primo acquirente 2 anni di garanzia per difetti di fabbricazione Esclusi dalla garanzia sono i danni causati da un e...

Страница 10: ...o rifiuti Contatti Greenfit S p A via dell industria 2 D 47843 Misano Adriatico Rimini Italy FAX 0541 480631 800358388 assistenza greenfitspa it Attenzione Il manuale è solo una referenza per il cliente Diadora non può garantire per errori commessi dal cliente nella sostituzione o modifica di parti del prodotto I prodotti Diadora sono riciclabili Alla fine del loro utilizzo per cortesia disporne c...

Страница 11: ...etto eccessivo può causare danni fisici Salute Se durante l allenamento non vi sentite bene se sentite dolore fitte al petto agli arti o mancanza di respiro fermatevi immediatamente e consultate il vostro medico Preparazione L allenamento può iniziare solo dopo un corretto assemblaggio e l ispezione dell attrezzo Preparazione Seguire attentamente gli steps dell assemblaggio Preparazione Per l asse...

Страница 12: ...O DESCRIPTION Q TY 1 Main frame 1 29 Handle bar 1 23 Bottom frame 1 30 Computer 1 24 Right side handle post 1 33 Left side handle post 1 27R R L Cover of handle R 2 38 Plastic Cover 1 28L L R Cover of handle L 2 44 Computer Bracket 1 ...

Страница 13: ...Check List F M8 50 2PCS M S5 1PC L S6 1PC B ID8 2 OD16 2 4PCS G ID8 2 OD22 2 2PCS I M4 15 4PCS H M8 45 4PCS E 6 2 2PCS J M8 60 1PC N S13 1PC A M8 50 4PCS C M5 15 2PCS K M8 4PCS D M6 10 2PCS ...

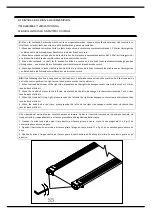
Страница 14: ...AUFBAU ASSEMBLY ASSEMBLAGGIO S5 1PC S6 1PC S13 1PC STEP 1 S13 2 30 MIN ...

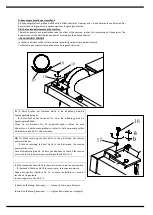
Страница 15: ...STEP2 S6 D M6 10 2PCS E 6 2 2PCS ...

Страница 16: ... des Hauptrahmens liegen 1 Insert C through A Note G through under the Main Frame 1 Inserire C attraverso A Nota G sotto il telaio principale L O R T N O C N O I S N E T HIGH LOW 8 7 6 5 4 3 2 1 D Überprüfen Sie bitte ob die Spannungs anzeige auf 8 steht bevor Sie das Spannungs kabel einbauen GB Before you assemble the tension cable please make sure that it is at the level 8 I Prima di assemblare ...

Страница 17: ... make A be near B insert F into B I Tenere G inclinato in modo che A sia vicino a B inserire F in B 3 D Revolve D as the drawing direction in order to tighten these two parts well GB Drehen Sie D wie unten abgebildet um beide Teile gut mit einander zu verschrauben I Ruotare D stringerle come da disegno ...

Страница 18: ...STEP 4 S6 ...

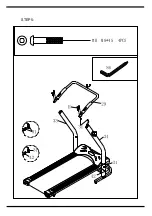
Страница 19: ...STEP 5 H M8 45 4PCS ...

Страница 20: ...STEP 6 ...

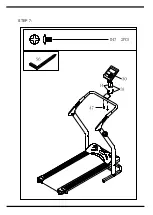
Страница 21: ...STEP 7 47 2PCS ...

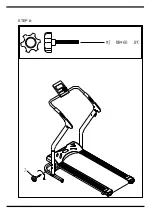
Страница 22: ...STEP 8 J M8 60 1PC ...

Страница 23: ...Knopf J zur Befestigung um Unfälle vorzubeugen GB Please loosen knob J completely before folding the treadmill Then lift the NO 1 Main frame to the upright position and use knob J to fasten it tightly to prevent any accident in advance I Allentare il dado J completamente prima di chiudere il tappeto Quindi sollevare il NO 1 telaio principale in posizione verticale ed utilizzare il dado J per strin...

Страница 24: ...chine So if the tread belt is not in the center position too tight or too loose please use the tool to adjust it 1 When the tread belt moves to the right side please revolve the right side hexagon socket screw clockwise 1 or 2 circles revolve back a little bit 2 When the tread belt moves to the left side please revolve the left side hexagon socket screw clockwise 1 or 2 circles revolve back a litt...

Страница 25: ...r Schraube No 16 in die b Richtung wird die Spannungskraft höher Wenn Sie die Schraube No 16 eingestellt haben sollten Sie auch überprüfen ob das Spannungskabel zu locker ist Falls notwendig sollten Sie die Schrauben No D und E einstellen GB 1 When revolving the bolt No 16 in the a direction the tension power will be less 2 When revolving the bolt No 16 in the b direction the tension power will be...

Страница 26: ...de easier by focusing on a fixed object in front of you in the room Run as if you wanted to approach the object Always keep a distance which you can reach the front hand bar Major exercise type This equipment focuses on your lower body and it can train your muscle of thigh and shank Important Incorrect excessive training can cause health injuries I Posizione biomeccanica corretta Riferirsi alla fi...

Страница 27: ...Exploded view Explosionszeichnung Esploso ...

Страница 28: ...ear End Cap L Hintere Endkappe L TAPPO POSTERIORE L 1 7 Screw M4 15 Schraube M4 15 VITE M4 15L 2 8 Rear Axle Hintere Achse DADO 1 9 Rear suspension Hintere Federung SOSPENSIONE POSTERIORE 2 10 Side Rail Seitenschiene ROTAIA 2 11 Nut M8 Mutter M8 DADO M8 2 12 Plastic End Cap Plastik Endkappe TAPPO PLASTICA 4 13 Bolt M8x45 Bolzen M8x45 BULLONE M8 45L 1 14 Handle pulse wire Handpulskabel CAVO HAND PU...

Страница 29: ...deckung COVER 1 39 Front Axle Frontachse DADO 1 40 Front Roller Frontrolle RUOTA FRONTALE 1 41 Screw M3 Schraube M3 BULLONE M3 2 42 Sensor Control Sensor Controller SENSORE CONTROLLO 1 43 Handle Bar Grip Griff Handgriff MANOPOLA 2 44 Computer Bracket Computerklammer BASE PER COMPUTER 1 45 Hand pulse connector Handpuls Connector CONNETTORE HAND PULSE 2 46 Screw M4 20 Schraube M4 20 BULLONE M4 20 2 ...

Страница 30: ...ärts 3 SPEED Geschwindigkeit Anzeige der Trainingsgeschwindigkeit in km h von 0 0 bis 168 0 oder Meilen pro Stunde von 0 0 bis 99 9 4 DISTANCE Distanz Anzeige der zurückgelegten Distanz während jeden Trainings bis maximal 168 0 km oder 99 9 Meilen 5 CALORIES Kalorien Anzeige der in etwa verbrannten Kalorien während des Trainings 6 PULSE Puls Anzeige des Pulses in Schlägen pro Minute während des Tr...

Страница 31: ...lays your workout speed value in KM per hour from 0 0 to 168 0 or MILE per hour from 0 0 to 99 9 4 DISTANCE Displays the accumulative distance traveled during each workout up to a maximum of 168 0KM or 99 9MILE 5 CALORIES Your computer will estimate the cumulative calories burned at any given time during your workout 6 PULSE Your computer displays your pulse rate in beats per minute during your wo...

Страница 32: ...tra il tempo di esercizio 3 SPEED visualizza la velocita a cui si sta utilizzando il prodotto in kmh 4 DISTANCE mostra la distanza percorsa in km 5 CALORIE visualizza la stima delle calorie consumate 6 PULSE rileva il battito cardiaco Per tale misurazione e necessario appoggiare il palmo di entrambe le mane sulle 2 placche sensore e mantenere la posizione per 10 secondi facendo attenzione a non mu...

Страница 33: ......

Отзывы: