DGTEC DG-HD19LCDVD Скачать руководство пользователя страница 15

14

13

OK

Enter

Select EXIT Exit

Setup

Display Mode

OSD Language

16:9

On

English

Time Setup

Subtitle

Teletext

Blue Screen

Reset Default

4  SETUP  MENU

Select EXIT Exit

Time Setup

Time Zone

As Broadcaster

Time

Off

Sleep Timer

Select EXIT Exit

Time 

Auto Synchronization

2000/01/01

16:51:46

00:00:00

00:00:00

Timer

On

Off

Date

Power On Timer

screen

Power Off Timer


Select EXIT Exit

Subtitle

Normal

Subtitle Type

Select EXIT Exit

Teletext

Off

Digital Teletext

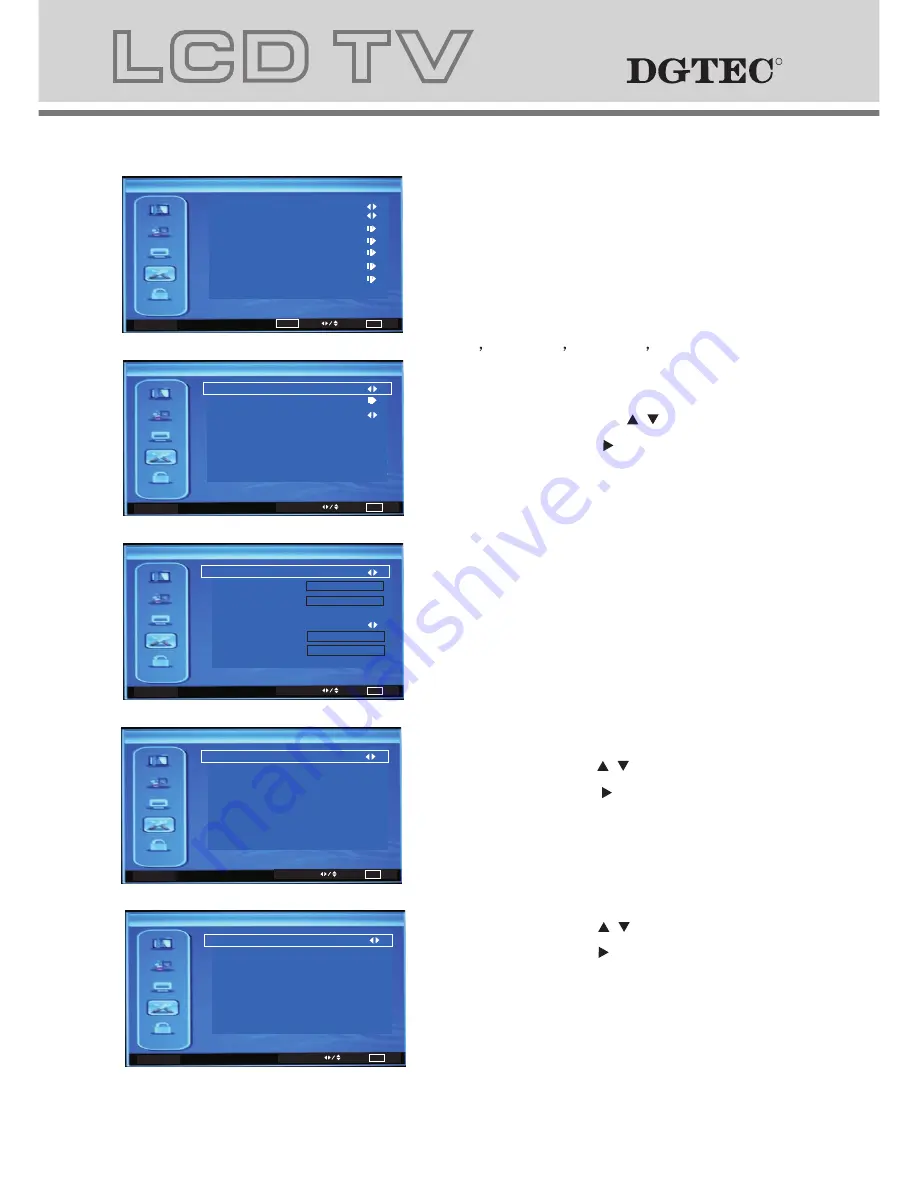
a. The image on the left depicts the setup 
menu.
b. The definition of each option:
b-1

. OSD Language

: Changes the OSD

Language in sequence as: 

.

b-2

. Display Mode

: Changes the Display 

Mode in sequence as: 16:9,4:3.
b-3. 

Time Setup

: Press    /    key to this 

position, Then press     key to enter Time 
Setup , Other menu options include
Time Zone,Time,Sleep Timer.

Time Zone:As Broadcaster,GMT+0:00,
GMT+1:00,GMT+2:00,GMT+3:00...

Time:Auto Synchronization,Timer

Sleep Timer:Off,10Minutes,20Minutes...

English, 

French

Spanish

German

Italian

b-4.

 Subtitle

: Press    /    key to this 

position, Then press     key to enter 
Subtitle, and activate ON.

b-5.

 Teletext

: Press    /    key to this 

position, then press     key to enter 
Teletext, Other menu options include 
Digital Teletext.

R

R

R

R

Analog Manual Scan

EXIT Exit

Start Frequency (MHz)

Scan Down

Scan Up

47.0

Search for analog channels

Digital Manual Scan

OK

Scan

EXIT Exit

RF Channel

Signal Level

6

0

Start Frequerny (MHz)

0%

177.5

Digital manual scan channel.

Digital Channel Range Scan

OK

Scan

EXIT Exit

Scan with a range of channels

From Channel

6

69

To Channel

0%

Digital Channel Range Scan

Digital Manual Scan

Analog Manual Scan

Manual Scan

OK

Enter

Select EXIT Exit

Manual Scan:Press"OK"to enter Manual Scan,
Select one of the following options: 
Digital Channel Range Scan,Digital Manual 
Scan,Analog Manual Scan.

OR

OR

Digital Channel Range Scan:Press"OK"to enter 
Digital Channel Range Scan.

Digital Manual Scan:Press"OK"to enter 
Digital Manual Scan.

Analog Manual Scan:Press"OK"to enter 
Analog Manual Scan.

Содержание DG-HD19LCDVD

Страница 1: ...USER MANUAL DG HD19LCDVD DG HD22LCDVD R The Future of Home Entertainment A clever A clever product product Hills Hills...

Страница 2: ...LCD TV panel overview Connecting to external devices The OSD menus TV NEED HELP DVD Functions operating instructions Supporting DVD format Basic operation Trouble shooting Function Settings MP3 JPEG...

Страница 3: ...roduct or require set up assistance please contact the DGTEC Service Centre The call is free from anywhere in Australia Our operators will assist you in plain English without the technical jargon Aust...

Страница 4: ...C service technician for inspection and if necessary repair Turn off and disconnect the power cable before cleaning or storing this product Ensure this product does not get wet or splashed Only use th...

Страница 5: ...ths and curtains Make sure the LCD TV stand is adjusted to a stable position Damage caused by using this product in an unstable position or by failure to follow any other warning or p recaution contai...

Страница 6: ...ion button Volume adjusting button Sleep button Mute button SUBTITLE Return channel button TV setup menu ENTER PREV RED button Information button Play Pause TTX Stop EPG button GOTO button ANGEL butto...

Страница 7: ...ume play Press STOP for the second time to stop playback and clear the memory Press the button for quick forward search Press the button for quick rewind search When playing a DVD disc press NEXT to p...

Страница 8: ...justing 2 Channel selecting 3 Main menu display and confirm 4 Selecting exterior signal input 5 On off button 1 2 3 4 5 1 2 3 5 4 1 STOP button 2 PREV button 3 PLAY PAUSE 4 NEXT button 5 OPEN CLOSE bu...

Страница 9: ...HDMI input 4 VGA input 5 Component input terminal 6 AV input 7 PC audio input 8 Headphone output 9 Antenna input 75 Ohm VHF UHF 1 Power input 2 S VIDEO input 3 HDMI input 4 VGA input 5 Component input...

Страница 10: ...common PC AUDIO in 6 Connecting to external devices Connecting external devices to your LCD TV The rear of TV YPBPR RCA OR OR OR DVD HDMI S Video VCR DG HD19LCDVD VGA RF 75 PC AUDIO R L VIDEO HDMI DC...

Страница 11: ...Please select your region Region NSW ACT VIC QLD SA WA TAS NT Back Select Next EXIT Exit Initial Setup Please select your Language Language English French Spanish German Italian Back Select Next EXIT...

Страница 12: ...aturation with the key in the range of 0 to 100 b 5 Sharpness Changes the value of sharpness with the key in the range of 0 to 7 b 6 Color Temperature Changes the color temperature in sequence as Stan...

Страница 13: ...ode Changes the Sound Mode in sequence as Standard Pop Rock News b 2 Balance Changes the value of Balance with the key in the range of 50 to 50 b 3 Bass Changes the value of Bass with the key in the r...

Страница 14: ...nge of channels From Channel 6 69 To Channel 0 Digital Channel Range Scan Digital Manual Scan Analog Manual Scan Manual Scan OK Enter Select EXIT Exit Manual Scan Press OK to enter Manual Scan Select...

Страница 15: ...s the setup menu b The definition of each option b 1 OSD Language Changes the OSD Language in sequence as b 2 Display Mode Changes the Display Mode in sequence as 16 9 4 3 b 3 Time Setup Press key to...

Страница 16: ...et Default Press key to this position then press key to enter Default Password is 0000 EXIT Back Password OK Enter Select EXIT Exit Setup Display Mode OSD Language 16 9 On English Time Setup Subtitle...

Страница 17: ...put block you can block any input source b 4 Change password changing of the parental password b 5 Clear All Blocks restore your settings SOURCE 1 Press SOURCE button to change from DTV to other avail...

Страница 18: ...DVD Operation DVD Operation...

Страница 19: ...y the Super VCD VCD Disc Menu Press the MENU button to display the PBC status For Super VCD and VCD disk playback default the PBC status to ON For DVD discs use the navigation buttons to select and Pl...

Страница 20: ...and video MPEG2 Compressed digital audio and video MPEG1 Compressed digital audio and video CD DA Digital audio HD DA Digital audio Disc Size Diameter Recorded Time DVD 12cm Single side 120mins Approx...

Страница 21: ...While rewinding you may press to resume normal speed For CD HD CD MP3 rewind also has audio and only for forwardx2 4 ANGLE Press to adjust picture for personal viewing NOTE During Slow motion the soun...

Страница 22: ...discs This function allows you to play your favourite Title Chapter track Press GOTO button to activate the on screen scroll down menu for edit Access the highlighted area input your favourite Title c...

Страница 23: ...Playback MP3 JPEG Playback After loading the MP3 JPEG disc player will start to scan for the stored MP3 JPEG folders It will display the MP3 content automatically and start to play the first file high...

Страница 24: ...button to flip horizontally button to flip vertically button to rotate left 90 Button to rotate right 90 Play or pause with picture playback you Use D MENU button to enter preview mode to display 12 p...

Страница 25: ...sion screen you may see black borders above and below the picture 16 9 Wide Choose this setting if you have a widescreen television NOTE Playback screen size may vary according to the disc content For...

Страница 26: ...English Audio Language Use navigation buttons to select the AUDIO LANG setup icon press OK button to confirm There are 5 languages for you selection press buttons to toggle between different languages...

Страница 27: ...tons to select the MENU LANG setup icon press OK button to confirm There are 5languages for your selection press buttons to toggle between different languages Press OK button to confirm Audio Setup Au...

Страница 28: ...LL the peak signal value is smallest When selecting OFF the peak signal value is biggest Dual Mono You can select four different audio outputs STEREO MONO L MONO R MIX MONO The audio out description o...

Страница 29: ...set TV VCR etc Install new batteries Power is suddenly turned off Is the sleep timer set Check the power control settings Power interrupted Picture appears slow after switching on This is normal the i...

Страница 30: ...xtend the life span of the product Be sure to turn the power off and unplug the power cord before you begin any cleaning Cleaning the screen Cleaning the screen 1 Here s a great way to keep the dust o...

Страница 31: ...L SECAM S Video Input Composite Video input Antenna RF Audio Output Maximum Audio Output Input Connections TV Input Analogue TV Antenna 1 RF 75 Ohm VGA Input 1 15 pin D Sub AV Input L R Audio Input Fo...

Страница 32: ...SC PAL SECAM S Video Input Composite Video input Antenna RF Audio Output Maximum Audio Output Input Connections TV Input Analogue TV Antenna 1 RF 75 Ohm VGA Input 1 15 pin D Sub AV Input L R Audio Inp...

Страница 33: ......

Отзывы: