background image


After Sales Support   TEL

1800 189 941                                                                                                           

17


INSTRUCTIONS 


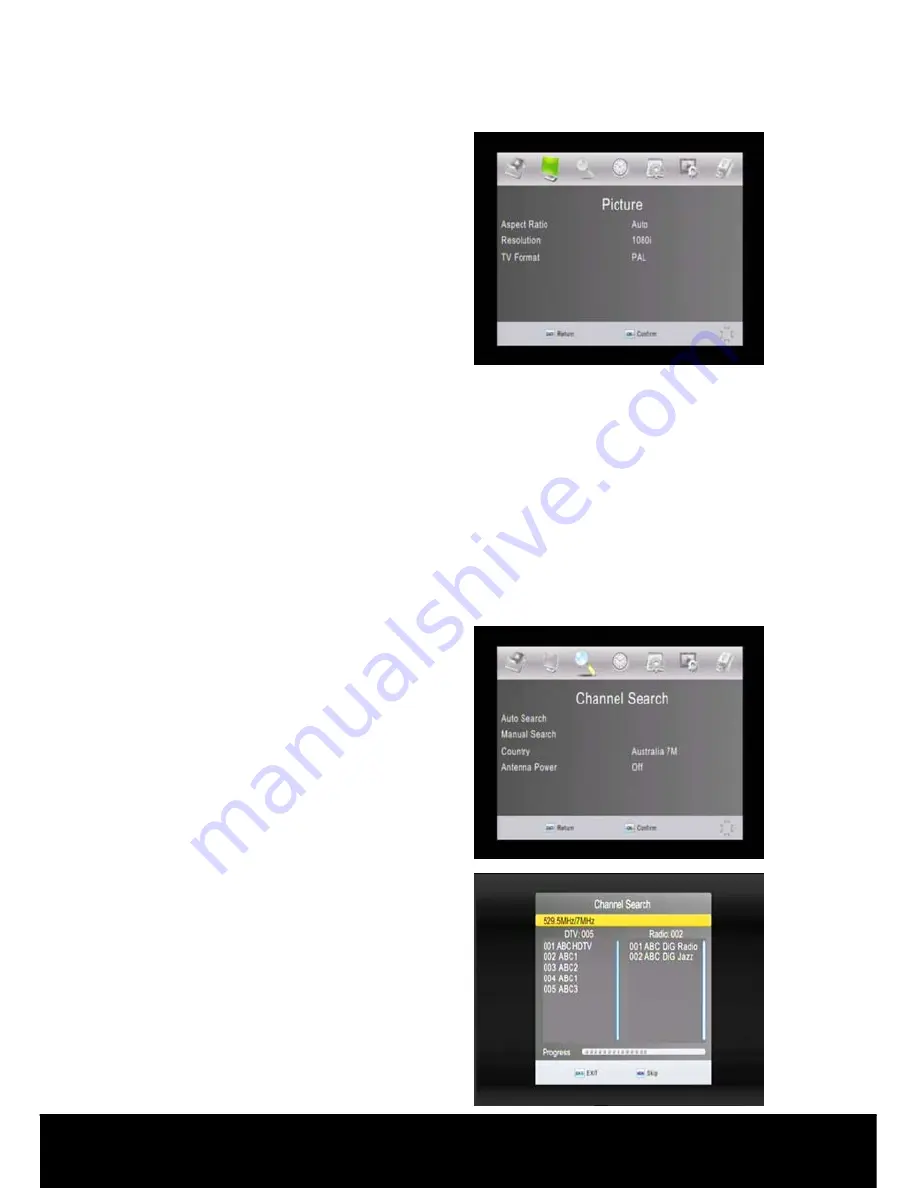
Aspect Ratio:

 Press the

/

 keys on 

the remote control to highlight the


Aspect Ratio

 selection. Use the 

/


keys to select the aspect ratio setting to 
suit your screen (16:9 
Widescreen/16:9Pillar Box/16:9 Pan& 
Scan/AUTO/4:3 Full/4:3 Pan&Scan/4:3 
Letterbox). 


Resolution: 

Press the

/

 keys on the remote control to highlight the 

Resolution


selection.


Use the 

/

 keys to select the resolution setting to suit your screen and 

connection method (1080i/576i/576p/720p). 
 

TV Format:

 Press the

/

 keys on the remote control to highlight the 

TV Format


selection.


Use the 

/

 keys to select the TV Format setting to suit your screen 

(PAL [default for Australia] and NTSC). 


2.4 Channel Search 

Press the 

 key on the remote control 

to select 

Channel Search

 from the Main 

Menu options to display the Channel 
Search sub menu. 


< Auto Search > 

Press the

/

 keys on the remote 

control to highlight the

 Auto Search


then press 

OK

 to activate Auto search 

for digital channels in your region. 
Press the 

EXIT

 key stop Auto Search at 

any time. 


Содержание BC80048

Страница 1: ...THE FUTURE OF HOME ENTERTAINMENT HIGH DEFINITION SET TOP BOX PVR READY INSTRUCTION MANUAL MODEL NUMBER DG HD0810 BC80048 After Sales Support TEL 1800 189 941 ...

Страница 2: ...sed properly In the event of product failure within its intended use over the course of the first 1 year after the date of purchase we will remedy the problem as quickly as possible once it has been brought to our attention In the unlikely event of such an occurrence or if you require any information about the product please contact us via our after sales support services details of which can be f...

Страница 3: ...t Top Box PVR Ready Congratulations on choosing to buy a DGTEC product Our products are manufactured to the highest standards of performance and safety and are backed by our comprehensive 1 Year Warranty We hope you will enjoy using your DGTEC product for many years to come ...

Страница 4: ...RONT PANEL 6 1 3 REAR PANEL 7 1 4 REMOTE CONTROL UNIT 8 1 5 INSTALLING THE BATTERIES IN THE REMOTE CONTROL 9 1 6 CONNECTING TO EQUIPMENT 10 GETTING STARTED 12 INSTRUCTIONS 14 2 1 INSTRUCTIONS 14 2 2 PROGRAM 14 2 3 PICTURE 16 2 4 CHANNEL SEARCH 17 2 5 TIME 18 2 6 OPTION 19 2 7 SYSTEM 19 2 8 USB 21 2 9 REC QUICK START GUIDE 23 FAQ 25 TROUBLE SHOOTING 26 SPECIFICATION 27 MEMO 28 ...

Страница 5: ...illed with liquids such as vases are not placed on the apparatus If an object or liquid gets into the unit disconnect the plug and ask an approved technician to check the unit Never place the unit in a confined space such as a bookcase or built in cabinet unless proper ventilation is provided Leave a 10cm gap around the unit The recommended operating temperature is from 0 40 and humidity should be...

Страница 6: ... ASSEMBLY AND PARTS LIST 1 1 Parts List Please make sure the following accessories are supplied with the STB High Definition Digital Set Top Box Remote Control RCA Composite Video Audio Cable Batteries AAA Size User Manual Quick Start Guide ...

Страница 7: ...p when the channel is locked in A hidden sensor senses infrared signal from the remote control 2 Volume Button Moves the cursor left right when menu is selected or adjusts the volume level in operational mode 3 CH Button Moves the cursor down up when in the menu or changes the current program to the next previous channel in operational mode 4 Standby Button Press to switch between operation and st...

Страница 8: ...nput or an External Audio Amplifier 6 DIGITAL AUDIO S PDIF Optical Connects to an External Audio Amplifier with S PDIF Optical Digital Audio optional 7 HDMI Connector Connects High Definition Multimedia output to HD Monitors HDMI Type 8 USB USB port is used for viewing external files MP3 audio files and JPEG or BMP images recording contents to an external USB memory device playback of contents rec...

Страница 9: ...s to display Favorite Channel List 10 Up Down Changes the channel or moves the cursor in the menu 11 Left Right Adjusts volume or moves the cursor in the menu 12 MENU Press to display the Main Menu 13 PAGE PAGE Press to page up down in the channel list 14 OK Press to select the item in the menu or to list the TV Radio channels 15 INFO Displays the information of the current program 16 TIMER Enter ...

Страница 10: ...ys replace both batteries at the same time Never mix new and old batteries or batteries of a different type 4 If you don t intend to use the remote control for an extended period remove the batteries to prevent possible leakage and corrosion 5 Do not drop apply shock or step on the remote control 6 Do not spill water on the remote control Note If the STB does not respond when operating the remote ...

Страница 11: ...nection ii Connect the HDMI Out on the STB to HDMI In on the HDTV using a HDMI cable not provided OPTION 2 High Definition connection using YPbPr cables not supplied iii Connect the YPbPr connectors and AUDIO L R connectors on the back of the STB to the COMPONENT IN on your television using RED GREEN BLUE RCA type YPbPr cables Note RED GREEN BLUE Component cables carry video signal only you will n...

Страница 12: ...on the STB and the AV in sockets at the rear of the TV Optional Connect Optical S PDIF out connector on the STB to the Audio Amplifier using optical cable Instead of using L R WHITE and RED RCA leads Note Please ensure that your TV is set to the correct input channel depending on your connection type e g AV1 AV2 Component Scart1 HDMI etc Use the TV remote control to select the TV input channel con...

Страница 13: ...dio broadcasts If you skip the Installation Guide screen you can press MENU key to display the main menu then use the keys to navigate to the Channel Search sub menu use the keys to navigate to and highlight Auto Search Press OK to commence Auto Search Switching programs 1 Press the NUMERIC keys 0 9 on the remote control to select the channel number you want 2 Alternatively press the keys on the r...

Страница 14: ...ormation for the NEXT program use the key to highlight the NEXT program Extended information will be displayed 4 Press INFO EXIT to exit view Subtitle Closed Captions CC Press SUBTITLE key to switch CC on off NOTE Closed captions are not available for all programs Teletext service 1 Press TEXT key to open teletext page if teletext is transmitted 2 Press TEXT key again or press EXIT key to close te...

Страница 15: ... password is 000000 Red Key You can move a channel s position First press the keys to highlight the channel Press the RED key to mark the channel to be moved Use the keys to move the channel to the position you want and press the OK key to drop the channel Green Key Use the keys on the remote control to highlight the channel to be skipped then press the GREEN key The SKIP symbol will be displayed ...

Страница 16: ...o rename it Use the keys to navigate the keyboard You can enter into the favorite list if you press the FAV key while you are watching TV in normal status EPG EPG shows the event information on the current and all channels The event is displayed only for the channels that have EPG information If you press the EPG key on the remote control the following screen will appear Press the keys to select c...

Страница 17: ... the EXIT key to close the EPG menu Sort In this sub menu environment use the keys to select the Sort mode By LCN By ONID By Service Name By Service ID The default setting is Logical channel Numbering LCN These are the actual numbers sent out by the broadcaster as their channel descriptor for example ABC 2 21 22 23 24 and 7 Network 7 70 71 72 73 LCN In this menu use keys to select LCN ON OFF 2 3 P...

Страница 18: ...resolution setting to suit your screen and connection method 1080i 576i 576p 720p TV Format Press the keys on the remote control to highlight the TV Format selection Use the keys to select the TV Format setting to suit your screen PAL default for Australia and NTSC 2 4 Channel Search Press the key on the remote control to select Channel Search from the Main Menu options to display the Channel Sear...

Страница 19: ...ect setting for you set top box and Australia 8M this is for future use only Antenna Power Press the keys on the remote control to highlight the Antenna Power option Use the keys to navigate through the available selections ON OFF 2 5 Time Press the key on the remote control to select Time from the Main Menu options to display the Time sub menu In this menu use the keys to change the Local Time an...

Страница 20: ...he keys on the remote control to highlight the Subtitle language option then use the keys to navigate through the language options available Please note this will depend on the subtitle options transmitted by the broadcaster Audio language Press the keys on the remote control to highlight the Audio language option then use the keys to navigate through the language options available Please note thi...

Страница 21: ...d the level of the Parental Block required press the EXIT key to save the setting When watching Live TV you will be required to enter the password to view programs at the level of the Parental Block set or above Set Password To change the current password input the old password then input the new password you want to use then confirm it Press keys to select the item use numerical keys to input pas...

Страница 22: ...the key on the remote control to select USB from the Main Menu options to display the USB sub menu In this menu environment use the keys to highlight the item then press OK to enter any of the following items Multimedia Photo Configure Movie Configure and PVR Configure Multimedia Press the keys on the remote control to highlight the Multimedia option then press OK to enter the Multimedia sub menu ...

Страница 23: ...t menu In this environment only recordings made on this unit as a TS format file can be played In Playback Mode of a recorded file use the following remote control keys REW Fast reverse Press the key repeatedly to navigate through the rewind speed options FF Fast forward refer to REW PLAY Starts playback at the beginning of the current recorded file session or returns to normal playback speed from...

Страница 24: ...ge Media Must Be Connected to the USB Port Only FAT32 USB Flash Drives are supported Instant Recording You can at any time record a program that you are watching by simply pressing the REC key on the remote control An icon will then appear on the top left hand corner of the TV which will time out after 15 seconds The 6 digits indicate the recording duration in hh mm ss You can stop the recording a...

Страница 25: ...chedule menu Press OK to save the scheduled events and EXIT to exit the menu Playback Recorded Programs Insert a USB storage device that contains programs recorded on your STB Press the USB key on the remote control Select Multimedia in the USB menu environment then enter the PVR menu item All the recordings made in this STB will be stored here in the PVRRECORD folder Navigate to the desired progr...

Страница 26: ...e appropriate connections Picture quality will vary compared to HD ready TV s however accessing the additional HD stations is still applicable What are the added benefits of a HD Receiver The added benefits of a HD Receiver include Sharper Pictures Clearer Sound Widescreen viewing Extra Channels Do I require an antenna in association with this receiver Yes a professionally installed antenna is rec...

Страница 27: ...io cable Connect the audio cable correctly Sound on mute Turn off mute function Only sound no image on the screen No or incorrect connection with AV cable Make sure cables are connected correctly The program is a radio program Press TV RADIO key to shift into TV mode Remote Control is not responding The battery is exhausted Change battery Remote Control is not facing or close enough to the Set Top...

Страница 28: ...eo Output Type YPbPr HDMI SD Video Output Type CVBS Audio Algorithm MPEG 1 layer I and II Ac3 Frequency Response 20Hz 20k Hz 0 6dBu Sampling Frequency 32 44 1 48KHz Audio Output Type Stereo RCA photo jack Digital Audio Output S PDIF Optical Power Power AC90 250V Operating Frequency 50 60Hz Environmental Condition Operating Temperature 0 40 Weight Around 1 2 kg Dimension 280mm W x 240mm D x 60mm H ...

Страница 29: ...After Sales Support TEL 1800 189 941 28 Memo ...

Отзывы: