background image

18

2

Hardware Installation

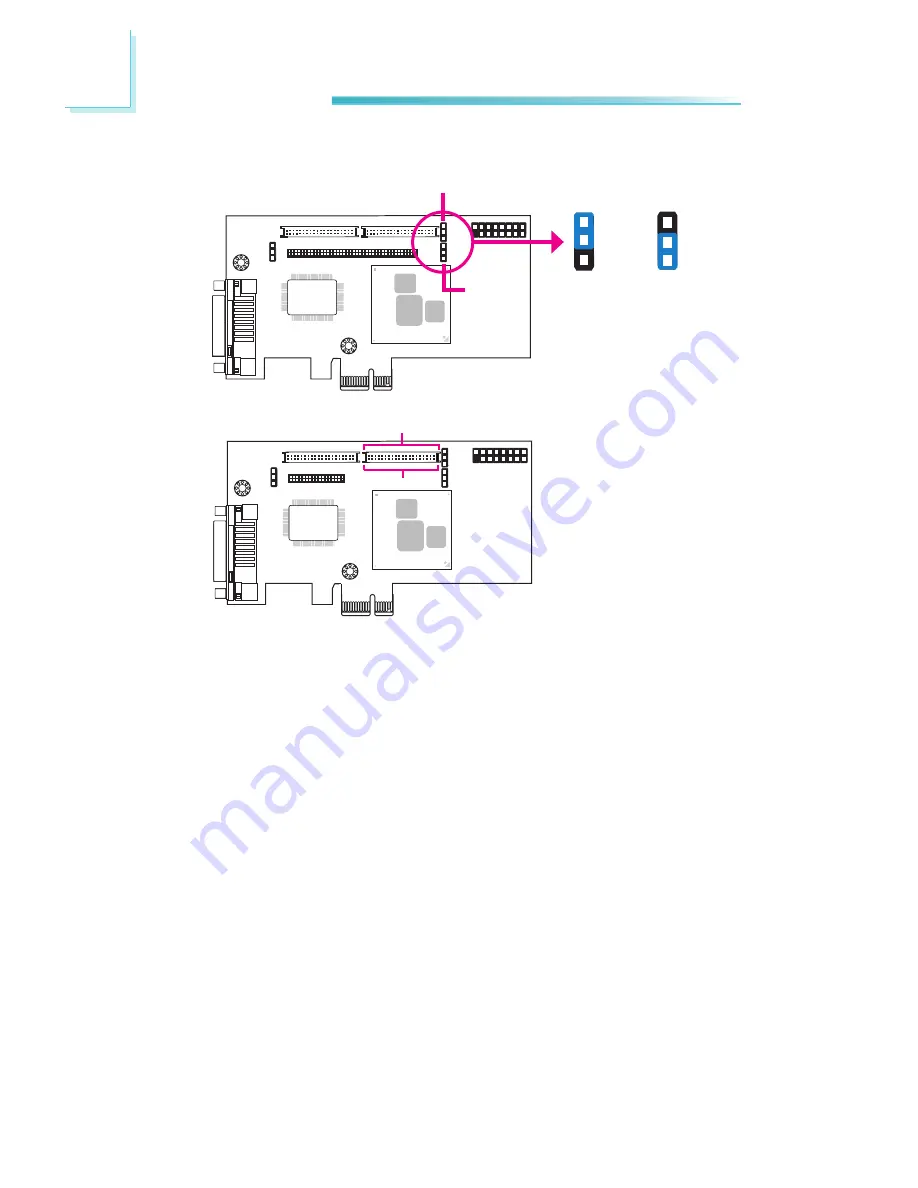
Dual Link LVDS Port 2 / Port 3 Power Select (optional)

JP2 and JP3 are used to select the power supplied to LVDS Port 2 and LVDS Port 
3.

LVDS Port 2 and Port 3 support 24-bit single channel LVDS display.

2-3 On: 

5V

1-2 On: 3.3V

(default)  

JP2

1

3

2

1

3

2

LVDS Port 2

LVDS Port 3

JP3

Содержание LAX100

Страница 1: ...LAX100 Graphics Card User s Manual A14510051 ...

Страница 2: ...tents or use of this manual and specifically disclaims any express or implied warranties of merchantability or fitness for any particular purpose The user will assume the entire risk of the use or the results of the use of this document Further the manufacturer reserves the right to revise this publication and make changes to its contents at any time without obligation to notify any person or enti...

Страница 3: ...ticular installation If this equipment does cause harmful interference to radio or televi sion reception which can be determined by turning the equipment off and on the user is encouraged to try to correct the interference by one or more of the following measures Reorient or relocate the receiving antenna Increase the separation between the equipment and the receiver Connect the equipment into an ...

Страница 4: ...oard Layout 10 Mechanical Dimensions 12 Block Diagram 14 Handling the Graphics Card 15 Tips in Handling the Graphics Card 15 Installing the Graphics Card 15 Jumper Settings 17 Connecting Display Devices 19 Connecting an Analog Monitor to the VGA Port 20 Connecting a Digital LCD Monitor to the DVI D Port 21 Connecting EXT LAX100 to LAX100 22 Connector Pin Definition 23 Chapter 3 Supported Software ...

Страница 5: ...proper installation modification accidents or unauthorized repair of the product 3 Unless otherwise instructed in this user s manual the user may not under any circumstances attempt to perform service adjustments or repairs on the product whether in or out of warranty It must be returned to the purchase point factory or authorized service agency for all such work 4 We will not be liable for any in...

Страница 6: ...ir ends Important Electrostatic discharge ESD can damage your processor disk drive and other components Perform the upgrade instruction procedures described at an ESD workstation only If such a station is not available you can provide some ESD protection by wearing an antistatic wrist strap and attaching it to a metal part of the system chassis If a wrist strap is unavailable establish and maintai...

Страница 7: ...epresentative for as sistance One graphics card One CD One QR Quick Reference The graphics card and accessories in the package may not come similar to the information listed above This may differ in accordance to the sales region or models in which it was sold For more information about the standard package in your region please contact your dealer or sales representative ...

Страница 8: ...0 dots 60Hz when a single screen is displayed A screen of this resolution can be displayed together with a screen of 640 x 480 dots or smaller total of two screens Maximum 1280 x 1024 dots 60Hz when three screens are displayed Maximum 1024 x 768 dots 60Hz when four screens are displayed Overlay bilinear scaling four independent displays Hardware cursor 8 bit gradation stencil operation four in dep...

Страница 9: ...1 9 Introduction Temperature Humidity PCB Dimensions 0o C to 60o C 10 to 90 120mm 4 7 x 69mm 2 7 ...

Страница 10: ... VGA LVDS Port 1 LVDS Port 2 1 Dual Link LVDS Port 1 power select JP1 1 1 Single Link LVDS Port 2 3 power select JP2 JP3 Silicon Image SiI7170 JP2 JP3 AXELL AG10 DVI D Daughterboard connector 2 1 80 79 LVDS Port 3 LAX100 Graphics Card Note The LVDS ports and the Daughterboard connector are optional ...

Страница 11: ...11 2 Hardware Installation VGA DVI D DVI D LAX100 Graphics Card TMDS HDMI EXT LAX100 Daughterboard TMDS HDMI ...

Страница 12: ...2 Hardware Installation Mechanical Dimensions 100 80 52 59 67 20 3 13 0 0 15 48 29 90 90 0 100 8 25 0 64 4 20 3 13 0 0 15 33 35 41 35 45 57 15 65 3 120 03 4 5 8 25 64 4 120 03 48 29 0 LAX100 Graphics Card ...

Страница 13: ...13 2 Hardware Installation 100 80 52 59 67 20 3 13 0 0 15 48 29 90 90 0 100 8 25 0 0 0 15 33 35 41 35 45 57 15 65 3 120 03 4 5 AX100 EXT LAX100 Daughterboard ...

Страница 14: ... D TMDS Transmitter LVDS Single HDMI Transmitter LVDS Single HDMI TMDS TMDS lock Diagram AX100 XT LAX100 LAX100 Graphics Card AG10 PCI Express Golden Finger Board to Board Connector Transmitter Analog RGB LVDS Dual Reset OSC SPI ROM VGA DVI D TMDS LVDS Dual LVDS Single LVDS Single Board to Board Connector Transmitter LVDS Dual DVI D TMDS Transmitter LVDS Single HDMI Transmitter LVDS Single HDMI TM...

Страница 15: ...its edges only Be careful not to touch any of the components contacts or connections especially gold contacts on the board Installing the Graphics Card For most computer systems you will only need a medium size Phillips screw driver to remove the cover and a small flat blade screwdriver to secure the moni tor cable Important Electrostatic discharge ESD can damage the graphics card system board pro...

Страница 16: ...r side of the system unit and then slide the cover off Step 3 Remove the Slot Cover Remove the slot cover screw and slot cover adjacent to the PCI Express slot Put them in a safe place for later use Step 4 Unpack the Graphics Card Remove the graphics card from the shipping carton and its protective packing Please do not throw away the packing material or the shipping box You may use these again to...

Страница 17: ... Jumper Settings Dual Link LVDS Port 1 Power Select optional JP1 is used to select the power supplied to LVDS Port 1 LVDS Port 1 supports 24 bit dual channel LVDS display 2 3 On 5V 1 2 On 3 3V default JP1 1 3 2 1 3 2 LVDS Port 1 ...

Страница 18: ... Port 3 Power Select optional JP2 and JP3 are used to select the power supplied to LVDS Port 2 and LVDS Port 3 LVDS Port 2 and Port 3 support 24 bit single channel LVDS display 2 3 On 5V 1 2 On 3 3V default JP2 1 3 2 1 3 2 LVDS Port 2 LVDS Port 3 JP3 ...

Страница 19: ...necting Display Devices The graphics card allows multiple displays by means of the VGA port DVI D port and the LVDS connectors Devices connected to these interfaces can be displayed simultaneously VGA DVI D LVDS Port 1 LVDS Port 2 3 ...

Страница 20: ...ecting an Analog Monitor to the VGA Port Connect the analog monitor s cable connector to the VGA port After you plug the cable connector into the VGA port gently tighten the cable screws to hold the connector in place Analog Monitor ...

Страница 21: ...igital LCD Monitor to the DVI D Port Connect the digital LCD monitor s cable connector to the DVI D port After you plug the cable connector into the DVI D port gently tighten the cable screws to hold the connector in place Digital LCD Monitor ...

Страница 22: ...T LAX100 daughterboard to the LAX100 graphics card for a total of 5 display outputs EXT LAX100 LAX100 VGA DVI D DVI D TMDS HDMI TMDS HDMI Important LAX100 supports either the EXT LAX100 daughterboard or the LVDS outputs LVDS is not supported once you have connected the daughter board ...

Страница 23: ...LVDS1_Out6 11 LVDS1_Out2 12 LVDS1_Out6 13 GND 14 GND 15 LVDS1_Out1 16 LVDS1_Out5 17 LVDS1_Out1 18 LVDS1_Out5 19 GND 20 GND 21 LVDS1_Out0 22 LVDS1_Out4 23 LVDS1_Out0 24 LVDS1_Out4 25 GND 26 GND 27 LVDS1_CLK1 28 LVDS1_CLK2 29 LVDS1_CLK1 30 LVDS1_CLK2 31 GND 32 GND 33 LVDS1_DDCCLK 34 N C 35 LVDS1_DDCDATA 36 N C 37 Panel Power port1 38 Panel Power port1 39 Panel Power port1 40 Panel Power port1 LVDS P...

Страница 24: ...9 LVDS2_Out2 10 LVDS3_Out2 11 LVDS2_Out2 12 LVDS3_Out2 13 GND 14 GND 15 LVDS2_Out1 16 LVDS3_Out1 17 LVDS2_Out1 18 LVDS3_Out1 19 GND 20 GND 21 LVDS2_Out0 22 LVDS3_Out0 23 LVDS2_Out0 24 LVDS3_Out0 25 GND 26 GND 27 LVDS2_CLK1 28 LVDS3_CLK1 29 LVDS2_CLK1 30 LVDS3_CLK1 31 GND 32 GND 33 LVDS2_DDCCLK 34 LVDS3_DDCCLK 35 LVDS2_DDCDATA 36 LVDS3_DDCDATA 37 Panel Power port2 38 Panel Power port3 39 Panel Powe...

Страница 25: ...CLK 14 Port3_Hot plug detect 15 LVDS1_DDCDATA 16 Port2_Hot plug detect 17 LVDS1_DDCCLK 18 Port1_Hot plug detect 19 GND 20 GND 21 LVDS3_Out2 22 LVDS3_Out3 23 LVDS3_Out2 24 LVDS3_Out3 25 GND 26 GND 27 LVDS3_Out0 28 LVDS3_Out1 29 LVDS3_Out0 30 LVDS3_Out1 31 GND 32 GND 33 LVDS2_Out3 34 LVDS3_CLK1 35 LVDS2_Out3 36 LVDS3_CLK1 37 GND 38 GND 39 LVDS2_Out1 40 LVDS2_Out2 41 LVDS2_Out1 42 LVDS2_Out2 43 GND 4...

Страница 26: ...t7 53 LVDS1_Out6 54 LVDS1_Out7 55 GND 56 GND 57 LVDS1_Out4 58 LVDS1_Out5 59 LVDS1_Out4 60 LVDS1_Out5 61 GND 62 GND 63 LVDS1_Out3 64 LVDS1_CLK2 65 LVDS1_Out3 66 LVDS1_CLK2 67 GND 68 GND 69 LVDS1_Out1 70 LVDS1_Out2 71 LVDS1_Out1 72 LVDS1_Out2 73 GND 74 GND 75 LVDS1_CLK1 76 LVDS1_Out0 77 LVDS1_CLK1 78 LVDS1_Out0 79 GND 80 GND ...

Страница 27: ...ol 8 LVDS2_ACTRL1 LVDS2 Analog Control 1 0V to 5 0V Analog Out ACTRL1 to ACTRL2 Register 9 LVDS2_ACTRL2 LVDS2 Analog Control 2 0V to 5 0V Analog Out ACTRL1 to ACTRL2 Register 10 LVDS2_ACTRL3 LVDS2 Analog Control 3 0V to 5 0V Analog Out 11 LVDS2_ACTRL4 LVDS2 Analog Control 4 0V to 5 0V Analog Out 12 GND Ground 13 LVDS3_BR LVDS3 Back Light On Off I2C Control 14 LVDS3_ACTRL1 LVDS3 Analog Control 1 0V...

Страница 28: ...rformance of the graphics card Insert the CD into a CD ROM drive The autorun screen Graphics Card Utility CD will appear If after inserting the CD Autorun did not automatically start which is the Graphics Card Utility CD screen did not appear please go directly to the root directory of the CD and double click Setup Chapter 3 Supported Software ...

Страница 29: ... driver click AXELL Graphics Drivers on the main menu AXELL Graphics Drivers 1 Select the language to use for the installation and then click OK 2 The installation program is ready to install the graphics driver Click Next 3 Click Install to begin the installation ...

Страница 30: ...ted Software 5 Click Install 6 You have successfully installed the driver Click Finish 7 Restart the system for the configuration changes to take effect Click Yes to re tart or No to restart later 4 Click Continue ...

Страница 31: ...o install the driver click AXELL Graphics Drivers on the main menu 1 Select the language to use for the installation and then click OK 2 The installation program is ready to install the graphics driver Click Next 3 Click Install to begin the installation ...

Страница 32: ...ted Software 5 Click Install 6 You have successfully installed the driver Click Finish 7 Restart the system for the configuration changes to take effect Click Yes to re tart or No to restart later 4 Click Continue ...

Страница 33: ...l the driver click AXELL Graphics Drivers on the main menu 1 Select the language to use for the installation and then click OK 2 The installation program is ready to install the graphics driver Click Next 3 Click Install to begin the installation ...

Страница 34: ...ed Software 4 A warning message will appear Click Continue Any way 6 You have successfully installed the driver Click Finish 5 The screen will show the name of the software you are installing Click Con tinue Anyway ...

Страница 35: ...35 3 Supported Software 7 Restart the system for the configuration changes to take effect Click Yes to re tart or No to restart later ...

Страница 36: ...all the driver click AXELL Graphics Drivers on the main menu 1 Select the language to use for the installation and then click OK 2 The installation program is ready to install the graphics driver Click Next 3 Click Install to begin the installation ...

Страница 37: ...e 4 A warning message will appear Click Continue Any way 5 You have successfully installed the driver Click Finish 6 Restart the system for the configuration changes to take effect Click Yes to re tart or No to restart later ...

Страница 38: ...then click Control Panel Double click System On the Hardware tab click Device Manager Double click Display Adapt ers Right click Standard VGA Graphics Adapter and then click Properties 8 On the Driver tab click Up date Driver and then click OK ...

Страница 39: ...d Software 9 Click No not this time and then click Next 10 Click Install from a list or specific location Ad vanced and then click Next 11 Click Don t search I will choose the driver to in stall and then click Next ...

Страница 40: ...40 3 Supported Software 12 Select the driver and then click Next 13 A warning message will appear Click Continue Anyway 14 Click Finish ...

Страница 41: ...41 3 Supported Software 15 Restart the system for the configuration changes to take effect Click Yes to re tart or No to restart later ...

Страница 42: ...7 Windows Vista To install the reader click Adobe Acrobat Reader 9 3 on the main menu Adobe Acrobat Reader 9 3 1 Click Next to install or click Change Destination Folder to select another folder 2 Click Install to begin instal lation ...

Страница 43: ...43 3 Supported Software 3 Click Finish to exit installa tion ...

Страница 44: ...l the reader click Adobe Acrobat Reader 9 3 on the main menu 1 Click Next to install to the destination folder or click Change Destination folder to select another folder 2 Click Install to begin instal lation 3 Click Finish to exit instal laion ...
Отзывы: