background image

3

Removing the Chassis Cover

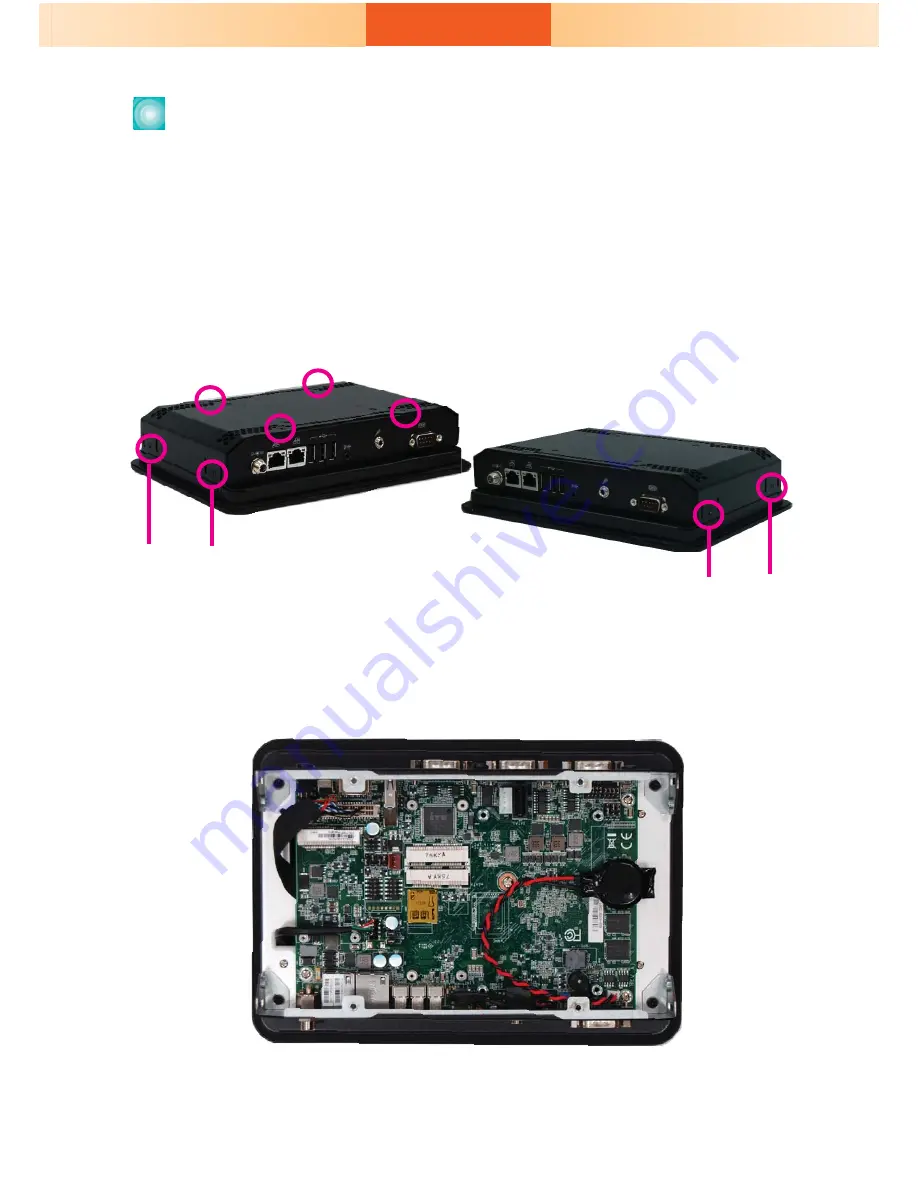
1.  Make sure the system and all other peripheral devices connected to it 

have been powered-off.

2.  Disconnect all power cords and cables.

3.  The 8 mounting screws on the rear side of the system are used to 

secure the cover to the chassis. Remove these screws and put them in a 

safe place for later use.

4.  Lift the cover up to open the system.
5.  The Mini PCIe and the micro SD slots are readily accessible after 

removing the chassis cover.

Mounting screw

Mounting screw

Содержание KS070-BT

Страница 1: ...ron foam One HDD drive bay kit 1 DVD disk includes Manual DFI reserves the right to change the specifications at any time prior to the product s release For the latest revision and more details of the installation procedure please refer to the user s manual on the website www dfi com ...

Страница 2: ... 0 Antenna hole COM 2 RS232 RS422 RS485 COM 4 8 bit DIO Antenna hole Reset Power button Green LED COM 1 RS232 RS422 RS485 Status LED Blue Antenna hole Line out Bottom View COM 3 RS232 RS422 RS485 USB 2 0 LAN 2 DC in Mic in LAN 1 ...

Страница 3: ...er cords and cables 3 The 8 mounting screws on the rear side of the system are used to secure the cover to the chassis Remove these screws and put them in a safe place for later use 4 Lift the cover up to open the system 5 The Mini PCIe and the micro SD slots are readily accessible after removing the chassis cover Mounting screw Mounting screw ...

Страница 4: ... SATA HDD with the mounting holes on the HDD drive bay and use the provided mounting screws to attach the SATA HDD to the drive bay 1 The SATA data and power connectors are on the system board SATA mounting location SATA connectors Mounting screw Mounting screw ...

Страница 5: ...end of the SATA cable to the SATA power and data connectors on the system board 4 Align the mounting holes of the HDD drive bay with the mounting holes on the system and use the provided mounting screws to secure the drive bay in place SATA power data cable SATA drive Mounting screw SATA drive SATA connectors ...

Страница 6: ...ts two full size and one half size slots Here we will demonstrate the installation of a full size Mini PCIe card mSATA interface for capacity expansion 1 Grasp the Mini PCIe card by its edges and align the notch in the connector of the PCIe card with the notch in the connector on the system board 2 Push the Mini PCIe card down and use the provided mounting screws to secure the card on the system b...

Страница 7: ...where you will mount the Panel PC 3 Use the provided mounting screws to attach wall mount bracket 1 to the wall Mounting Options Wall mount Wall mount bracket 1 Wall mount bracket 2 Wall mount bracket 1 Mounting screw 1 Before starting any installation procedures attach the poron foam to the Panel PC Poron foam ...

Страница 8: ... mount bracket 2 to the rear of the Panel PC Wall mount bracket 2 Mounting screw Hooks Screw 5 Slide the Panel PC to wall mount bracket 1 to attach the two brackets with the hooks Then tighten the screw to secure the assembly in place ...

Страница 9: ... 3mm and ensure that the Panel PC can be fitted into the panel properly 4 Insert the Panel PC from the outside surface of the panel into the mounting hole until it is properly fitted against the panel 5 Position the mounting clamps along the rear edges of the Panel PC and insert them into the slits around the Panel PC 1 Before starting any installation procedures attach the poron foam to the Panel...

Страница 10: ...clamp s screw using an electric screwdriver by pressing the white plastic cap onto the back of the panel The illustration below shows that all clamps are properly mounted White plastic cap fi Slit for mounting the clamp Mounting clamp Note The maximum thickness of your panel s mounting wall should be 10 mm for secure panel mount ...

Страница 11: ...l I O 4 7 Output State 1 COM 3 RS232 RS422 RS485 4 1 JP2 JP2 LCD Inverter Power Select SATA 1 4 1 SATA Power 1 SATA 2 0 Line out DC in USB 2 U U U U U U U U U U USB 2 U U U U U U U U U U USB 2 USB 2 USB Power Select 0 JP5 1 2 JP6 5 7 JP7 5V_standby default 1 2 On 5V 2 3 On Clear CMOS Data JP24 Normal default 1 2 On Clear CMOS Data 2 3 On Panel Power Select JP23 12V 1 2 On 5V 3 4 On 3 3V default 5 ...

Отзывы: