16
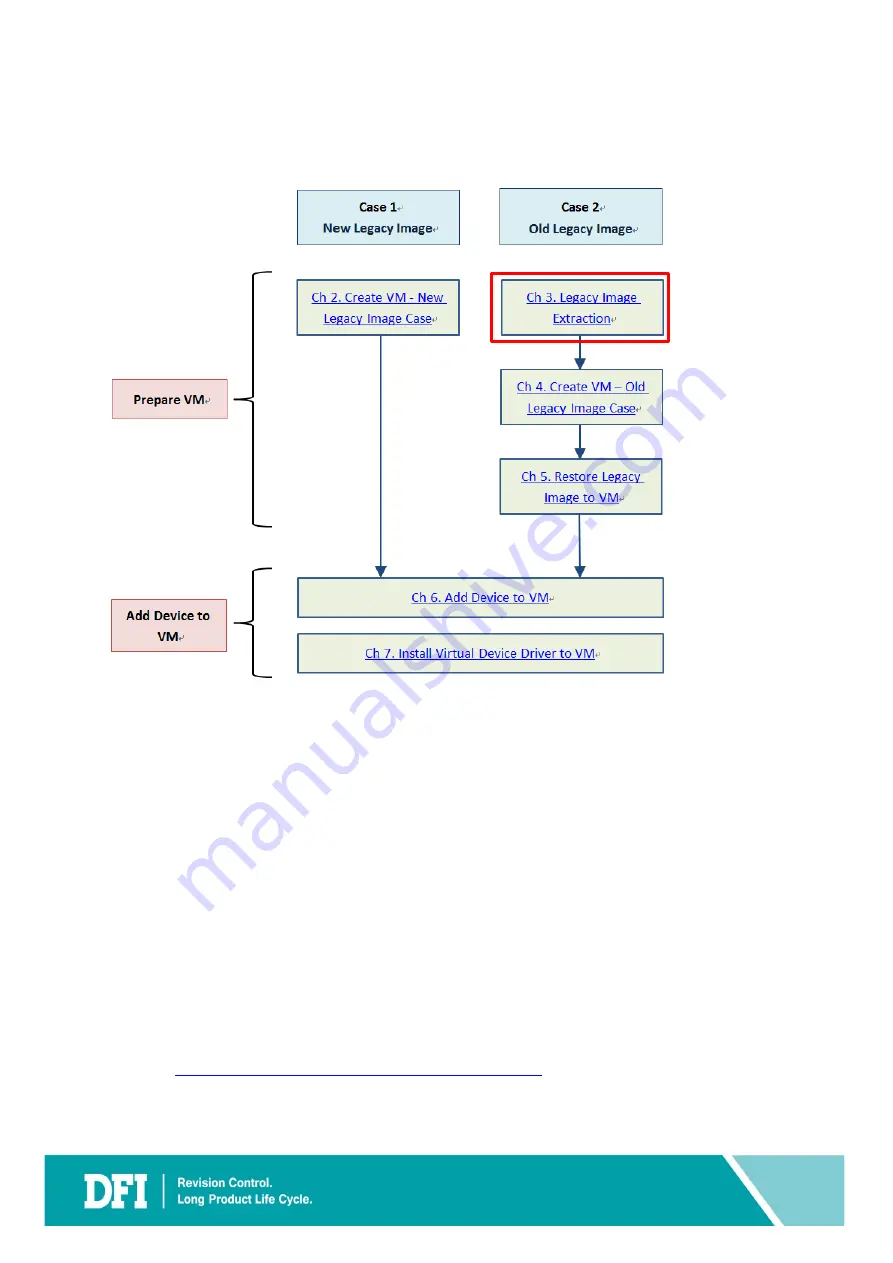
3 Legacy Image Extraction
This section will guide you on how to carry out the legacy system image extraction starting
from the system preparation tool
Sysprep
thru to the restoration of the new system. You
need two USB drive for this section.
3.1 Sysprep
Sysprep
is a tool that comes with Windows. This is the initial step prior to cloning. This step is
known as generalizing the PC. It removes PC-specific information from the Windows image,
including the PC’s security identifier (SID). This allows you to capture the image and apply it
to other PCs.
NOTE
Sysprep
files for Windows XP are available in the installation CD or can be downloaded
online at
https://www.petenetlive.com/KB/Article/0000599
. For other versions of Windows,
the
Sysprep
is already included and can be found at
C:\Windows\System32\sysprep
folder.
Содержание CS620
Страница 1: ...DFI CS620 ISA Device User Guide V 1 1...
Страница 6: ...www dfi com 6 2 Create VM New Legacy Image Case...
Страница 11: ...www dfi com 11 9 Click Tablet Then click Remove 10 Select Yes...
Страница 13: ...www dfi com 13 15 Press S in this step as below picture 16 Press Enter in this step as below picture...
Страница 17: ...www dfi com 17 Steps for Sysprep 1 In your legacy system create a new folder in C drive called Sysprep...
Страница 29: ...www dfi com 29 4 Create VM Old Legacy Image Case 1 Copy Clonezilla iso file to the Ubuntu 2 Run virt manager...
Страница 31: ...www dfi com 31 5 Click Browse Local 6 Choose Clonezilla iso file which you saved then click Open...
Страница 42: ...www dfi com 42 6 Add Device to VM...
Страница 46: ...www dfi com 46 Ex ISA Card document IO setting Ex ISA Card IO Setting...
Страница 50: ...www dfi com 50 6 1 6 Add ISA Device 1 Select VM and click Open 2 Click Show virtual hardware details...
Страница 52: ...www dfi com 52 6 2 Add Serial Device 1 Click Serial 2 In Device Type select Physical host character device dev...
Страница 54: ...www dfi com 54 6 3 Add Sound Device 1 Click Sound 2 In Model select AC97 Click Finish...
Страница 55: ...www dfi com 55 3 Sound Device added to hardware details...
Страница 57: ...www dfi com 57 3 In Path input dev parport0 CS620 has only parport 0 Click Finish...
Страница 58: ...www dfi com 58 6 5 Add USB Disk Device 1 Click USB Host Device 2 Select your USB Device Click Finish...
Страница 59: ...www dfi com 59 3 USB Device added to hardware details...
Страница 60: ...www dfi com 60 6 6 Add PCI Host Device 1 Click PCI Host Device 2 Select your PCI Host Device Click Finish...
Страница 61: ...www dfi com 61 3 PCI Device added to hardware details...
Страница 65: ...www dfi com 65 7 Install Virtual Device Driver to VM...
Страница 67: ...www dfi com 67 4 In next page click Browse Local 5 Click Home Then click Left Arrow...
Страница 69: ...www dfi com 69 8 In source path the file path will be shown on it then click Apply 9 Back to graphical console...
Страница 75: ...www dfi com 75 3 Click OK 4 Click Browse...
Страница 76: ...www dfi com 76 5 Click down arrow then select virtio win 0 1 1 D then click Open 6 Double click Net...
Страница 77: ...www dfi com 77 7 Double click PRO1000 8 Double click WinXP Related...
Страница 78: ...www dfi com 78 9 Double click Legacy 10 Click E1000325 then click Open...
Страница 79: ...www dfi com 79 11 Click OK 12 Click Finish...
Страница 81: ...www dfi com 81 3 Click Finish...


