Dexin MWP190-P6M Скачать руководство пользователя страница 5

DC190_P6M    2.4GHz Wireless Touch Optical Mouse 

Page 5 of 9 

1.0 Edition 


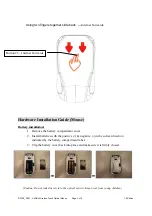
Using two fingers together slide back. ---
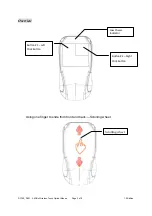
 Internet Forwards


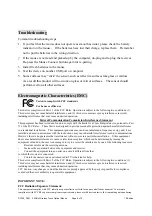
Hardware Installation Guide (Mouse) 

Battery installation: 

1.


Remove the battery compartment cover.      

2.


Install batteries with the positive (+) & negative (-) in the correct direction 

indicated by the battery compartment label. 

3.


Clip the battery cover back into place and make sure it is firmly closed. 


(Caution: Do not look directly in to the optical emitter. Keep away from young children) 


Button #5 – Internet Forwards 

Содержание MWP190-P6M

Страница 1: ... your computer s operating system is Windows 98 98SE please prepare the Windows98 or 98SE compact disk for system s request during the installation Before you begin Keep this manual for future reference It contains Important Troubleshooting Information Keep your old PS 2 or USB mouse as back up devices Getting Started Thank you for choosing the Wireless Optical Mouse By using the advanced RF techn...

Страница 2: ...ED A very dark surface will cause higher power consumption For optimal performance mouse should be no more than 5M away from receiver For a better transmission distance avoid using this device on a metal plate or desktop because a large surface of iron aluminum copper and other metal will act as a shield or ground to the RF antenna of the mouse and receiver Operating on a metal surface may shorten...

Страница 3: ...z Wireless Touch Optical Mouse Page 3 of 9 1 0 Edition Overview Using one finger to slide from front and back Scrolling wheel Low Power Indicator Button 2 Right Click Button Button 1 Left Click Button Scrolling wheel ...

Страница 4: ... 4GHz Wireless Touch Optical Mouse Page 4 of 9 1 0 Edition Using one finger to slide from left and right Tilt wheel Using two fingers together slide front Internet Backwards Button 4 Internet Backwards Tilt wheel ...

Страница 5: ...Battery installation 1 Remove the battery compartment cover 2 Install batteries with the positive negative in the correct direction indicated by the battery compartment label 3 Clip the battery cover back into place and make sure it is firmly closed Caution Do not look directly in to the optical emitter Keep away from young children Button 5 Internet Forwards ...

Страница 6: ...battery power the mouse is is also designed with the consideration of the trade off between friendly usage and power consumption Stages of power consumption include normal operation and idle The idle mode is entered immediately upon stopping moving mouse The optical sensor of the mouse will reduce current consumption gradually In idle mode moving the mouse can bore the mouse back to work POWER ON ...

Страница 7: ...USB is now active and ready to be inserted into your computer s USB port GENERAL SPECIFICATIONS Wireless touch panel control optical mouse Precision optical sensor 1200dpi resolution Long range less interference wireless connection Low power indicator USB storable nano receiver Ergonomic design universal left and right handed 2 AAAlkaline batteries to operate the mouse Push in B A Pull out ...

Страница 8: ...nable protection against harmful interference in a residential installation This equipment generates uses and can radiate radio frequency energy and if not installed and used in accordance with the instructions may cause harmful interference to radio communications However there is no guarantee that interference will not occur in a particular installation If this equipment does cause harmful inter...

Страница 9: ...Edition transmitting End users must follow the specific operating instructions for satisfying RF exposure compliance This transmitter must not be co located or operating in conjunction with any other antenna or transmitter CE Type acceptance EN300 328 FHSS Device ...

Отзывы: