


ENGLISH
5
Note:
Because it is a manual tool, sufficient force is
required when using this tool to completely drive flush
a single fastener with one strike of the hammer. Do not
use the hammer twice on the same fastener, unless the
ratcheting mode is engaged.
Note:
Never hit the plunger with the metal face of the
hammer as the plunger may be damaged and cause injury.
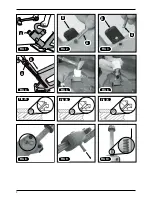
LOADING THE TOOL (Fig. 4)
1. Release the pusher spring clip and remove pusher
blade. (fig 4A)
2. Load fasteners into guide channel.
3. Insert rounded end of pusher blade into channel to
retain fasteners.
4. Latch pusher spring clip to notched end of pusher
blade. Ensure sufficient engagement of pusher blade for
smooth fastener feeding. (fig 4B)
Note: Use only fasteners recommended by
D
e
WALT
for
use in
D
e
WALT
tools or fasteners that meet
D
e
WALT
specifications.
TOOL MAINTENANCE
CAUTION:
Pusher spring (constant force spring). Caution
must be used when working with the
spring assembly. The spring is wrapped around, but not
attached to, a roller. If the spring is extended beyond its
length, the end will come off the roller and the spring will
roll up with a snap, with a chance of pinching your hand.
Also, the edges of the spring are very thin and could cut.
Care must also be taken to insure no permanent kinks are
put in the spring as this will reduce the spring’s force.
Note: Only spare parts specified by
D
e
WALT
should be
used in any tool maintenance.
MALLET MAINTENANCE
Over time the rubber face on the mallet may became
worn, cracked, or chipped. These are signs that a new
rubber face will need to be installed.
To remove old rubber face:
1. Secure the rubber face in a bench vice. (Fig 5)
2. Pull upward on the handle till the rubber face is
released from the steel stud.
To install a new rubber face on the mallet, we recommend
doing it in the shop with the use of an arbor press. If you
must do it manually follow these instructions.
1. Secure the mallet head in a bench vice. (Fig 6)
2. Put the rubber cap slightly inclined on top of the steel
stud, push downward with a twisting motion to engage
the rubber cavity over the edge of the steel stud.
3. Once fully engaged over the edge, you can release
the mallet from the vise and hit it on solid surface to
properly seat the rubber face on the mallet head.
CORRECT FASTENER PLACEMENT
Some adjustment may be required to ensure the correct
drive depth as follows:
Fig. 7A
Fastener above tongue.
• Increase force applied with hammer.
Fig. 7B
Fastener buried.
• Decrease force applied with hammer.
Fig. 7C
Fastener just below surface.
• Correct force is used.
Important:
Always test on a scrap piece of flooring first.
JAM CLEARANCE
1. Release the pusher spring clip and remove pusher
blade. (Fig 4A)
2. Remove any remaining fasteners from the magazine.
3. Remove the retaining pin (Fig 8) and slide out the
retention bolt (Fig 9)
4. Remove the driver blade mechanism. The jammed
fastener can then be accessed from either the top or the
bottom of the tool depending on the location of the jam.
5. Slide the driver blade mechanism back into the channel
making sure that the driver blade blade is correctly
positioned facing the front of the tool (Fig 10).
6. Slide the retention bolt back into position and refit the
retaining pin.
Содержание DMF1550-XJ
Страница 1: ...DMF1550 XJ ...
Страница 4: ...2 FIG 7A FIG 7B FIG 7C FIG 5 FIG 9 FIG 6 FIG 10 FIG 1 A FIG 2 A B FIG 3 A B FIG 4 FIG 8 A B ...
Страница 5: ...3 ...
Страница 48: ......
Страница 49: ......
Страница 51: ......
Страница 52: ...9R211755 FT73186f a 0515 Stanley Black Decker bvba Kanaalweg 112 3980 Tessenderlo Belgium ...


