background image

English

9

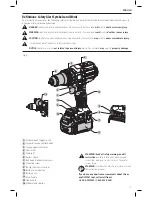
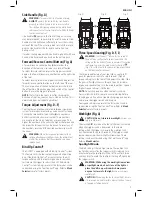
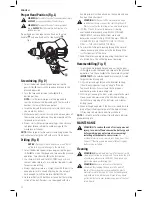
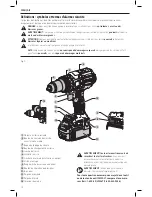
Side Handle (Fig. A)


WARNING: 

To reduce the risk of personal injury, 

ALWAYS

 operate the tool with the side handle 

properly installed. Failure to do so may result in 
the side handle slipping during tool operation and 
subsequent loss of control. Hold tool with both hands 
to maximize control.

Side handle 

 13 

 clamps to the front of the gear case and 

may be rotated 360° to permit right- or left-hand use. Side 
handle must be tightened sufficiently to resist the twisting 
action of the tool if the accessory binds or stalls. Be sure to 
grip the side handle at the far end to control the tool  
during a stall.
If model is not equipped with side handle, grip drill with one 
hand on the handle and one hand on the battery pack.

Forward/Reverse Control Button (Fig. A)

A forward/reverse control button 

 2 

 determines the 

direction of the tool and also serves as a lock-off button.
To select forward rotation, release the trigger switch and 
depress the for ward/re verse control button on the right side 
of the tool.
To select reverse, release the trigger switch and depress the 
forward/reverse control button on the left side of the tool.
The center position of the control button locks the tool in 
the off position. When changing the position of the control 
button, be sure the trigger is released.

nOTE: 

The first time the tool is run after changing the 

direction of rotation, you may hear a click on start up. This is 
normal and does not indicate a problem.

Torque Adjustment (Fig. D–F)

Your tool has an electronic adjustable torque screwdriver 
system for driving and removing a wide array of fasteners. 
Circling the torque adjustment collar 

 3 

 are numbers, a 

drill bit symbol and a hammer symbol. These numbers 
are used to set the clutch to deliver a torque range. The 
higher the number on the collar, the higher the torque and 
the larger the fastener that can be driven. To select any of 
the numbers, rotate until the desired number aligns with 
the arrow.


WARNING:

 When the torque adjustment collar is 

in the drill or hammerdrill positions, the drill will not 
clutch. The drill may stall if overloaded, causing a 
sudden twist.

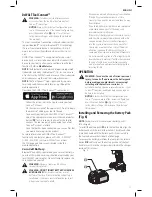
Bind-Up Control®

The DCD997 is equipped with a Bind-Up Control® system. 
This feature limits the tool output torque in drill position 
only. If the Bind-Up Control

®

 system activates, the drill 

torque will drop and the tool will give a buzz sensation. 
Just release the trigger to restart the drill. The Bind-Up 
Control

®

 system setting is preset at the factory but can be 

customized using the Tool Connect™ app. Refer to 

Mode 

Selector

 table for factory presets.

Fig. D

Fig. E

Fig. F

3

3

4

4

Three-Speed Gearing (Fig. D–F, J)


WARNING:

 Tool Connect™ allows for the speed of 

the drill to be configured to values lower than the 
rating on the tool label. If you are unsure of the current 
configuration, press the mode selector button 

 14 


(Fig J) to set the tool to the Home setting as described 
on the label and this manual.

The three-speed feature of your tool allows you to shift 
gears for greater versatility. To select speed 1 (highest 
torque setting), turn the tool off and permit it to stop. Slide 
the gear shifter 

 4 

 all the way forward. Speed 2 (middle 

torque and speed setting) is in the middle position. Speed 3 
(highest speed setting) is to the rear.

nOTE:

 Do not change gears when the tool is running. 

Always allow the drill to come to a complete stop before 
changing gears. If you have trouble changing gears, depress 
and release the trigger switch and try again.
Gear speed settings are preset at the factory but can be 
customized using the Tool Connect™ app. Refer to 

Mode 

Selector

 table for factory presets.

Worklight (Fig. A)


CAUTION: Do not stare into worklight.

 Serious eye 

injury could result.

The worklight 

 5 

 located on the foot of the tool is activated 

when the trigger switch is depressed. In the Home 
setting, when the trigger is released, the worklight will 
stay illuminated for up to 20 seconds. If the trigger switch 
remains depressed, the worklight will remain on. These 
settings can be customized using the Tool Connect™ app. 
Refer to 

Mode Selector.


Spotlight Mode

The high setting is the spotlight mode. The spotlight will 
run for 20 minutes after the trigger switch is released. Two 
minutes before the spotlight will shut off, it will flash twice 
and then dim. To avoid the spotlight shutting off, lightly tap 
the trigger switch.


WARNING:


While using the worklight in medium 

or spotlight mode, do not stare at the light or 
place the drill in a position which may cause 
anyone to stare into the light.

 Serious eye injury 

could result.


CAUTION:

 When using the tool as a spotlight, be sure 

it is secured on a stable surface where it will not cause 
a tripping or falling hazard.

Содержание DCD997

Страница 1: ... o comentarios contáctenos 1 800 4 DeWALT Instruction Manual Guide D utilisation Manual de instrucciones DCD997 20V Max Tool Connect Drill Driver Hammerdrill Perceuse visseuse perceuse à percussion Tool ConnectMC 20 V Max Taladro destornillador taladro percutor de 20 V Máx Tool Connect final page size 8 5 x 5 5 in ...

Страница 2: ...English English original instructions 1 Français traduction de la notice d instructions originale 14 Español traducido de las instrucciones originales 29 ...

Страница 3: ...OTICE Indicates a practice not related to personal injury which if not avoided may result in property damage WARNING Read all safety warnings and all instructions Failure to follow the warnings and instructions may result in electric shock fire and or serious injury WARNING To reduce the risk of injury user must read the instruction manual If you have any questions or comments about this or any De...

Страница 4: ...t such as dust mask non skid safety shoes hard hat or hearing protection used for appropriate conditions will reduce personal injuries c Prevent unintentional starting Ensure the switch is in the off position before connecting to power source and or battery pack picking up or carrying the tool Carrying power tools with your finger on the switch or energizing power tools that have the switch on inv...

Страница 5: ... operation Wear gloves when handling them if performing heat producing applications such as hammerdrilling and drilling metals Do not operate this tool for long periods of time Vibration caused by hammer action may be harmful to your hands and arms Use gloves to provide extra cushion and limit exposure by taking frequent rest periods Additional Safety Information WARNING ALWAYS use safety glasses ...

Страница 6: ...ape the trigger switch in the ON position Do not incinerate the battery pack even if it is severely damaged or is completely worn out The battery pack can explode in a fire Toxic fumes and materials are created when lithium ion battery packs are burned If battery contents come into contact with the skin immediately wash area with mild soap and water If battery liquid gets into the eye rinse water ...

Страница 7: ...ickel metal hydride or lithium ion batteries or battery packs indicates that the costs to recycle these batteries or battery packs at the end of their useful life have already been paid by DeWALT In some areas it is illegal to place spent nickel cadmium nickel metal hydride or lithium ion batteries in the trash or municipal solid waste stream and the Call 2 Recycle program provides an environmenta...

Страница 8: ...rted by foreign material Foreign materials of a conductive nature such as but not limited to grinding dust metal chips steel wool aluminum foil or any buildup of metallic particles should be kept away from the charger cavities Always unplug the charger from the power supply when there is no battery pack in the cavity Unplug the charger before attempting to clean Wireless Certifications and Safety ...

Страница 9: ...fusing to light or by displaying a problem pack or charger blink pattern NOTE This could also mean a problem with a charger If the charger indicates a problem take the charger and battery pack to be tested at an authorized service center Hot Cold Pack Delay When the charger detects a battery pack that is too hot or too cold it automatically starts a Hot Cold Pack Delay suspending charging until th...

Страница 10: ... charge The battery pack will need to be recharged before use SAVE THESE INSTRUCTIONS FOR FUTURE USE COMPONENTS FIG A WARNING Never modify the power tool or any part of it Damage or personal injury could result Refer to Figure A at the beginning of this manual for a complete list of components INTENDED USE Your drill driver hammerdrill is designed for professional drilling screwdriving and percuss...

Страница 11: ...ill position only If the Bind Up Control system activates the drill torque will drop and the tool will give a buzz sensation Just release the trigger to restart the drill The Bind Up Control system setting is preset at the factory but can be customized using the Tool Connect app Refer to Mode Selector table for factory presets Fig D Fig E Fig F 3 3 4 4 Three Speed Gearing Fig D F J WARNING Tool Co...

Страница 12: ...wise with one hand while holding the tool with the other hand Continue to rotate the chuck sleeve until several ratchet clicks are heard to ensure full gripping power Be sure to tighten chuck with one hand on the chuck sleeve and one hand holding the tool for maximum tightness To release the accessory repeat Steps 1 and 2 above Fig H Fig I Fig G 6 ASSEMBLY AND ADJUSTMENTS WARNING To reduce the ris...

Страница 13: ...ot attempt to replace the coin cell battery yourself WARNING Danger of explosion if battery is incorrectly replaced WARNING DO NOT INGEST BATTERY CHEMICAL BURN HAZARD This product contains a coin button cell battery If the coin button cell battery is swallowed it can cause severe internal burns in just 2 hours and can lead to death Keep new and used batteries away from children If the battery comp...

Страница 14: ...ury 5 IF DRILL STALLS it is usually because it is being overloaded or improperly used RELEASE TRIGGER IMMEDIATELY remove drill bit from work and determine cause of stalling DO NOT depress TRIGGER ON AND OFF IN AN ATTEMPT TO START A STALLED DRILL THIS CAN DAMAGE THE DRILL 6 To minimize stalling or breaking through the material reduce pressure on drill and ease the bit through the last fractional pa...

Страница 15: ...ver part failure due to normal wear or tool abuse For further detail of warranty coverage and warranty repair information visit www dewalt com or call 1 800 4 DeWALT 1 800 433 9258 This warranty does not apply to accessories or damage caused where repairs have been made or attempted by others THIS LIMITED WARRANTY IS GIVEN IN LIEU OF ALL OTHERS INCLUDING THE IMPLIED WARRANTY OF MERCHANTABILITY AND...

Страница 16: ...orporels mais qui par contre si rien n est fait pour l éviter pourrait poser des risques de dommages matériels AVERTISSEMENT lire tous les avertissements de sécurité et toutes les directives Le non respect des avertissements et des directives pourrait se solder par un choc électrique un incendie et ou une blessure grave AVERTISSEMENT afin de réduire le risque de blessures lire le mode d emploi de ...

Страница 17: ...l est impossible d éviter l utilisation d un outil électrique dans un endroit humide brancher l outil dans une prise ou sur un circuit d alimentation dotés d un disjoncteur de fuite à la terre GFCI L utilisation de ce type de disjoncteur réduit les risques de choc électrique 3 Sécurité personnelle a Être vigilant surveiller le travail effectué et faire preuve de jugement lorsqu un outil électrique...

Страница 18: ...es soins médicaux Le liquide qui gicle hors du bloc piles peut provoquer des irritations ou des brûlures 6 Réparation a Faire réparer l outil électrique par un réparateur professionnel en n utilisant que des pièces de rechange identiques Cela permettra de maintenir une utilisation sécuritaire de l outil électrique Avertissements de sécurité relatifs au marteau perforateur perceuse visseuse Pendant...

Страница 19: ... outil peut inclure les symboles suivants Les symboles et leur définition sont indiqués ci après V volts Hz hertz min minutes or DC courant continu fabrication classe I mis à la terre min par minute BPM battements par minute IPM impacts par minute RPM revolutions per minute sfpm pieds linéaires par minute plpm SPM FPM fréquence par minute A ampères W watts or AC courant alternatif or AC DC courant...

Страница 20: ... des transports interdit en fait le transport des blocs piles dans les commerces ou dans les avions dans les bagages de cabine À MOINS qu ils ne soient correctement protégés de tout court circuit Aussi lors du transport individuel de blocs piles s assurer que leurs bornes sont bien protégées et isolées de tout matériau pouvant entrer en contact avec elles et provoquer un court circuit Expédition d...

Страница 21: ...piles ont été conçus tout spécialement pour fonctionner ensemble Ces chargeurs n ont pas été conçus pour une utilisation autre que recharger les blocs piles rechargeables DeWALT Toute autre utilisation comporte des risques d incendie de chocs électriques ou d électrocution Protéger le chargeur de la pluie ou de la neige Tirer sur la fiche plutôt que sur le cordon pour débrancher le chargeur Cela p...

Страница 22: ...ibles d une installation résidentielle Cet équipement produit utilise et peut émaner des ondes radiofréquences qui s il n est pas installé et utilisé conformément aux directives pourront causer des interférences nuisibles aux communications radio Cependant en fonction des installations réalisées l absence d interférences n est pas garantie Si cet équipement cause des interférences nuisibles à la r...

Страница 23: ...rgeur ensuite se remettra automatiquement en mode de chargement Cette caractéristique assure aux blocs piles une durée de vie maximale Un bloc piles froid se rechargera moins vite qu un bloc piles chaud Le bloc piles se rechargera à ce rythme plus lent tout au cours du cycle de charge et ne retournera pas à sa vitesse maximale de charge même s il venait à se réchauffer Le chargeur DCB118 est équip...

Страница 24: ...argé dans un lieu frais et sec hors du chargeur pour optimiser les résultats REMARQUE les blocs piles ne devraient pas être entreposés complètement déchargés Il sera nécessaire de recharger le bloc piles avant réutilisation CONSERVER CES CONSIGNES POUR UTILISATION ULTÉRIEURE DESCRIPTION FIG A AVERTISSEMENT ne jamais modifier l outil électrique ni aucun de ses composants car il y a risques de domma...

Страница 25: ... couple Embrayage électronique Fig D F Votre outil est équipé d un système de tournevis à couple électronique réglable pour serrer ou desserrer une vaste gamme d attaches On retrouve inscrits sur la bague 3 des nombres un symbole de foret et un symbole de marteau Ces numéros sont utilisés pour régler l embrayage sur une plage de couple Plus le numéro sur la bague est élevé plus le couple est élevé...

Страница 26: ...r tout risque de dommages corporels et matériels Verrouiller systématiquement la gâchette et déconnecter l outil du secteur avant de changer tout accessoire AVERTISSEMENT s assurer que la mèche est bien serrée avant de mettre l outil en marche Une mèche mal serrée pourrait être éjectée de l outil et causer des dommages corporels Votre outil est équipé d un mandrin automatique 6 vec un manchon rota...

Страница 27: ...urrez confirmer que vous voulez enregistrer le produit Pour plus d informations sur les caractéristiques et fonctionnalités de DeWALT Tool ConnectMC veuillez appeler le 1 800 4 DeWALT 1 800 433 9258 visiter www dewalt com ou afficher les écrans de la page FAQ ou d aide dans l application mobile Pile bouton La fonctionnalité BluetoothMD est alimentée dans votre outil par une pile bouton qui le cas ...

Страница 28: ... 1 Sélectionnez la vitesse le couple désiré en utilisant le bouton de changement de vitesse 4 pour faire correspondre la vitesse et le couple à l utilisation désirée 2 Tournez la bague de réglage de couple 3 sur la position désirée REMARQUE utilisez le paramètre de couple le plus bas pour ajuster la vis à la profondeur désirée Plus le numéro est petit plus le couple est bas 3 Insérer l accessoire ...

Страница 29: ...s avant d effectuer tout réglage et d enlever ou d installer tout accessoire Un démarrage accidentel peut provoquer des blessures Exception les fonctions Tool ConnectMC et réglages de mode nécessitent que le bloc piles soit installé Nettoyage AVERTISSEMENT enlever les saletés et la poussière hors des évents au moyen d air comprimé propre et sec au moins une fois par semaine Pour minimiser le risqu...

Страница 30: ...contre tout préjudice accessoire ou indirect aussi il se peut que ces exclusions ne vous soient pas applicables Cette garantie confère des droits légaux particuliers à l acheteur mais celui ci pourrait aussi bénéficier d autres droits variant d un territoire à l autre En plus de la présente garantie les outils DeWALT sont couverts par notre CONTRAT D ENTRETIEN GRATUIT D UN AN DeWALT entretiendra l...

Страница 31: ...ión de la batería 11 Paquete de baterías 12 Mango principal 13 Mango lateral 14 Botón selector de modalidad Definiciones Símbolos y palabras de alerta de seguridad Este manual de instrucciones utiliza los siguientes símbolos y palabras de alerta de seguridad para alertarle de situaciones peligrosas y del riesgo de lesiones corporales o daños materiales PELIGRO Indica una situación de peligro inmin...

Страница 32: ...el uso de una herramienta eléctrica en un lugar húmedo es imposible de evitar utilice un suministro protegido con un interruptor de circuito por falla a tierra GFCI El uso de un GFCI reduce el riesgo de descargas eléctricas 3 Seguridad Personal a Permanezca alerta controle lo que está haciendo y utilice el sentido común cuando emplee una herramienta eléctrica No utilice una herramienta eléctrica s...

Страница 33: ...alizar una conexión desde un terminal al otro Los cortocircuitos en los terminales de la batería pueden provocar quemaduras o incendio d En condiciones abusivas el líquido puede ser expulsado de la batería Evite su contacto Si entra en contacto accidentalmente enjuague con agua Si el líquido entra en contacto con los ojos busque atención médica El líquido expulsado de la batería puede provocar irr...

Страница 34: ...producido por este producto puede contribuir a la pérdida auditiva ATENCIÓN Cuando no esté en uso guarde la herramienta apoyada en un costado sobre una superficie estable donde no interrumpa el paso o provoque una caída Algunas herramientas con paquetes de baterías de gran tamaño pueden colocarse paradas sobre el paquete de baterías pero pueden caerse fácilmente Los orificios de ventilación suelen...

Страница 35: ...etálicos Por ejemplo no ponga la batería en delantales bolsillos cajas de herramientas estuches de productos cajones etc junto con clavos tornillos y llaves etc sueltos El transporte de baterías puede causar incendios si sus terminales inadvertidamente entran en contacto con materiales conductores como llaves monedas herramientas manuales y otros por el estilo El Reglamento sobre Materiales Peligr...

Страница 36: ...puede comunicarse con el centro de reciclaje de su localidad para mayor información sobre dónde llevar sus baterías gastadas RBRC es una marca comercial registrada de Call 2 Recycle Inc Instrucciones Importantes de Seguridad Para Todos los Cargadores de Baterías ADVERTENCIA Lea todas las advertencias de seguridad y todas las instrucciones para la batería el cargador y la herramienta eléctrica No s...

Страница 37: ... deberían mantenerse alejados de las cavidades del cargador Desenchufe siempre el cargador cuando no haya una unidad de batería en su cavidad Desenchufe el cargador antes de intentar limpiarlo Certificaciones inalámbricas e información de seguridad Este dispositivo cumple con CAN ICES 3 B NMB 3 B Este dispositivo cumple con la Sección 15 de las normas de la Comisión Federal de Comunicaciones FCC y...

Страница 38: ...arga Unidad Cargada Restraso por Unidad Caliente Fría DCB107 DCB112 DCB113 DCB115 DCB118 DCB132 La luz roja continuará parpadeando pero una luz indicadora amarilla estará iluminada durante esta operación Una vez que la batería haya llegado a una temperatura apropiada la luz amarilla se apagará y el cargador continuará con el procedimiento de carga El cargador no cargarán una batería defectuosa El ...

Страница 39: ...de carga También puede cargar una unidad de batería que haya sido usada parcialmente cuando lo desee sin dañarla 5 Los materiales ajenos conductores por naturaleza tales como pero sin limitarse a el polvo del esmerilado las virutas metálicas la lana de acero el papel de aluminio o cualquier acumulación de partículas metálicas deberían mantenerse alejados de las cavidades del cargador Desenchufe si...

Страница 40: ...i se estanca Si el modelo no viene equipado con un mango lateral tome el taladro con una mano en el mango y la otra en la unidad de alimentación Botón de control de avance y reversa Fig A El botón de control de avance y reversa 2 determina la dirección de la herramienta y también sirve como botón de bloqueo Para seleccionar la rotación hacia delante suelte el interruptor tipo gatillo y apriete el ...

Страница 41: ...gue toque ligeramente el interruptor de gatillo ADVERTENCIA Mientras usa la luz de trabajo en modo medio o de luz de enfoque no mire fijamente a la luz ni coloque el taladro en una posición que pueda ocasionar que una persona mire directamente a la luz Podrían producirse lesiones graves a la visión ATENCIÓN Al usar la herramienta como luz de enfoque asegúrese de que esté en una superficie estable ...

Страница 42: ... antes de cualquier interacción con Tool Connect AVISO Compruebe siempre la configuración de la herramienta antes de utilizarla Si no está seguro de la configuración actual presione el botón selector de modalidad 14 Fig J para fijar la herramienta en la configuración de inicio según se describe en la etiqueta y en este manual Esta herramienta puede conectarse con dispositivos móviles que soportan ...

Страница 43: ...nción médica el electrolito de la pila está compuesto por un solvente orgánico y sales de litio No incinere ni elimine la herramienta junto con material de residuo doméstico La herramienta que haya llegado al final de su vida útil debe ser recogida por separado y devuelta a una instalación de reciclaje compatible con el medio ambiente OPERACIÓN ADVERTENCIA Para reducir el riesgo de lesiones person...

Страница 44: ...LADRO SE ATASCA probablemente se deba a una sobrecarga o al uso inadecuado de la herramienta SUELTE EL DISPARADOR INMEDIATAMENTE retire la broca de la pieza de trabajo y determine la causa del atascamiento NO OPRIMA EL DISPARADOR PARA INTENTAR DESTRABAR EL TALADRO PODRÍA DAÑARLO 6 Para minimizar los atascamientos o las roturas del material reduzca la presión y deje ir suavemente la broca hacia el ...

Страница 45: ...enimiento y los ajustes inclusive la inspección y el cambio de las escobillas cuando proceda deben ser realizados en un centro de mantenimiento en la fábrica DeWALT u en un centro de mantenimiento autorizado DeWALT Utilice siempre piezas de repuesto idénticas Para reparación y servicio de sus herramientas eléctricas favor de dirigirse al Centro de Servicio más cercano CULIACAN SIN Blvd Emiliano Za...

Страница 46: ...MITADA SE OTORGA EN VEZ DE TODAS LAS DEMÁS INCLUIDA LA GARANTÍA IMPLÍCITA DE COMERCIABILIDAD Y APTITUD PARA UN FIN PARTICULAR Y EXCLUYE TODOS LOS DAÑOS INCIDENTALES O CONSECUENTES Algunos estados no permiten limitaciones sobre la duración de una garantía implícita o la exclusión o limitación de daños incidentales o consecuentes así que estas limitaciones pueden no aplicarse a usted Esta garantía l...

Страница 47: ......

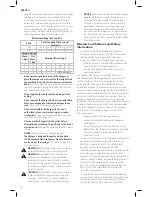
Страница 48: ...07 20 X X X X 30 30 60 40 30 X 22 X 22 22 X X X DC9182 18 X 40 40 X X 40 X X X X X X X X X 40 X DCB120 12 X X X X 30 30 60 45 35 X 20 X X X 45 X X DCB127 12 X X X X 35 35 90 60 50 X 30 X X X 60 X X DCB080 8 X X X 60 X X X X X X X X X X X X X BT Bluetooth NOTE The Bluetooth word mark and logos are registered trademarks owned by the Bluetooth SIG Inc and any use of such marks by DeWALT is under lice...

Отзывы: